Summer brings its own kind of beauty. It is golden light through a window, a jar of wildflowers on a kitchen counter, and the kind of warm color palette that makes a home feel alive from June through August. Resin captures that feeling better than almost any other craft material. Summer resin craft ideas take the colors, textures, and organic elements of the season and suspend them permanently inside something glossy, durable, and genuinely beautiful.
If you are new to resin, How to Make Your First Resin Art Piece Without Making a Mess is the perfect place to learn the basics before trying any of these summer projects.
What draws people to resin crafting; and keeps them coming back; is the element of surprise. You pour colors and watch them move in ways you did not plan. You press a dried flower into a mold and pull out something that looks like nature trapped in glass. Resin rewards curiosity and experimentation in a way that more rigid craft mediums simply cannot. Furthermore, the finished pieces look expensive and intentional whether they end up on a coffee table, a windowsill, or gifted to someone who collects beautiful things.

This list covers 15 summer resin craft ideas across a range of skill levels and project sizes. Some are quick weekend pours. Others are layered, multi-day builds that result in something truly showstopping. All of them use the same basic resin principles, so finishing even one project from this list will make the next one feel more familiar and confident. Clear your workspace and let summer into your resin.
Before You Pour: Quick Resin Basics
- Every project on this list uses two-part epoxy resin unless otherwise noted. Always wear nitrile gloves and a respirator mask. Work in a well-ventilated space and protect your table with a silicone mat or plastic sheeting.
- Mix resin and hardener according to your brand’s specific ratio. Stir slowly for a full three to four minutes, scraping the sides and bottom of the cup throughout. Fast stirring introduces bubbles. Incomplete mixing causes sticky, uncured patches in the finished piece.
- Use a heat gun or small torch held six inches above the surface to pop bubbles after pouring. Move constantly and never hover in one spot. Most epoxy resins need 24 to 72 hours of undisturbed curing time before demolding.
15 Summer Resin Craft Ideas for Your Home
1. Pressed Wildflower Coasters
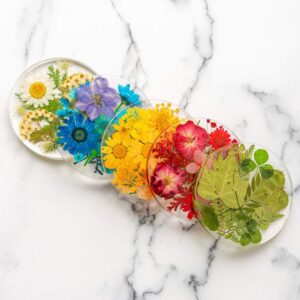
Collect small wildflowers and press them between parchment paper inside a heavy book for ten to fourteen days. Once fully dry, arrange the pressed flowers face-down inside round silicone coaster molds. Pour a thin clear resin layer over the flowers and let it gel before pouring a full second layer to encase them completely. After curing, demold and lightly sand the edges. Seal the top surface with a UV-resistant spray coat. These coasters look like windows into a summer meadow.
Pressed flower projects pair beautifully with How to Make Beautiful Summer Pressed Flower Resin Jewelry, especially if you enjoy preserving seasonal blooms in multiple ways.
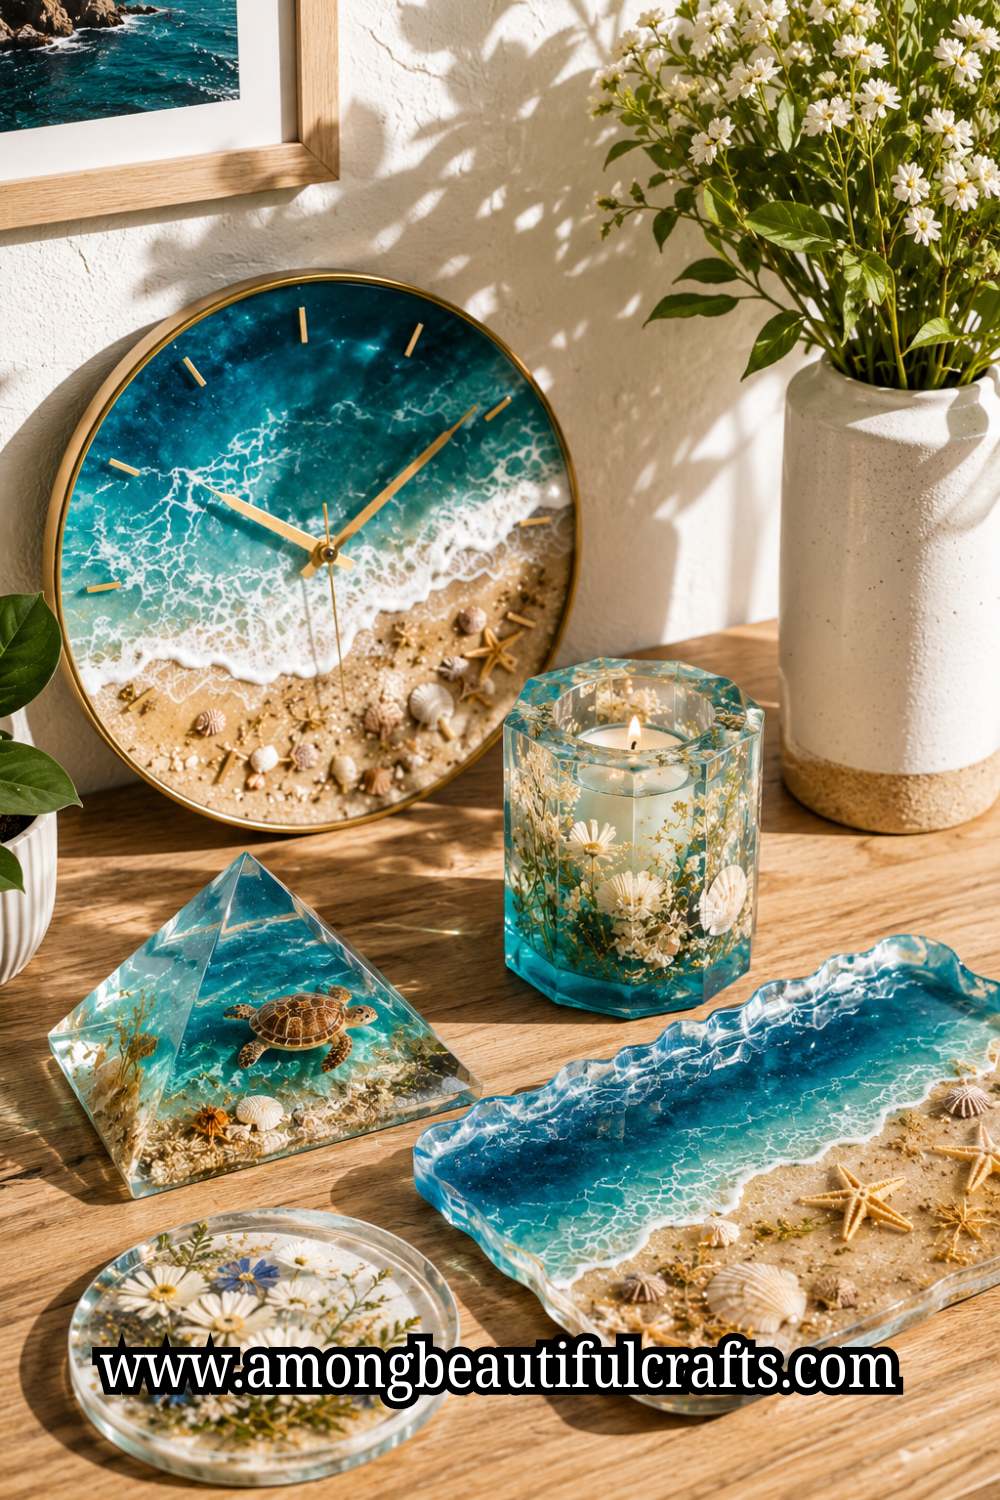
2. Ocean Wave Serving Tray
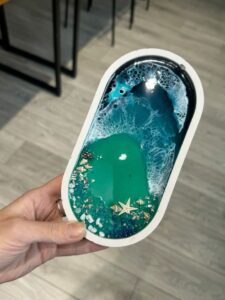
Pour a base layer of deep navy resin into a large rectangular silicone mold. While still wet, pour white resin in a diagonal curve across the navy to create a wave crest. Use a toothpick to pull thin white streaks outward from the crest for sea foam. Add small amounts of teal and light blue between the wave layers. Pour a thin clear top coat over everything once the base layer gels. The finished tray looks like a slice of ocean lifted straight from the water.
Coastal-themed resin projects naturally complement 15 Beautiful Things You Can Make With Seashells, where beach treasures become beautiful handmade décor.
3. Citrus Slice Paperweights
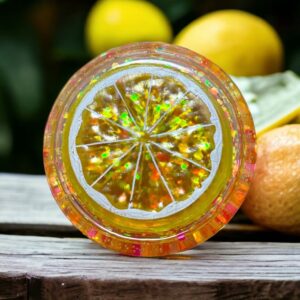
Pour a thin layer of yellow or orange resin into a small round mold. Once gelled, use a toothpick to draw thin lines radiating from the center outward like citrus segments. Fill alternate segments with slightly deeper orange or yellow resin. Add tiny air bubbles intentionally by blowing gently through a straw across the surface; these mimic the texture of real citrus pulp convincingly. Pour a clear dome layer over the finished slice once fully cured. These sit beautifully on a desk or kitchen counter all summer long.
4. Resin Geode Wall Art
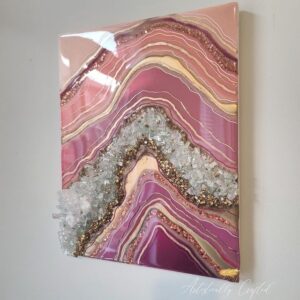
Glue chunky white and clear crystals along one curved edge of a large oval silicone mold or wood panel. Pour deep purple resin across one side of the piece. Add white resin in a thick band beside the crystal line. Drag teal and gold alcohol ink outward from the white band in organic, irregular strokes. Sprinkle gold mica powder lightly across the wet surface. The finished geode panel works mounted on a wall or propped on a shelf as a standalone art piece.
Creative statement pieces like this appeal to many people who also enjoy 25 Easy Art Projects for Kids That Look Amazing on Pinterest, where simple techniques create surprisingly impressive results.
5. Sunflower Resin Keychains
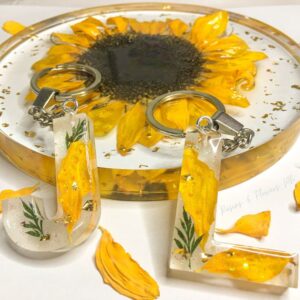
Pour a thin layer of yellow resin into small flower-shaped silicone molds. Let it reach gel stage. Add tiny pressed sunflower petals or yellow dried flower pieces across the surface. Pour a second yellow layer to encase them. Once cured, demold and drill a small hole at the top of each piece. Thread a keychain ring through the hole. Add a small gold chain for extra detail. These are quick to make in batches and work beautifully as handmade gifts or market items.
Sunflower-themed creations fit perfectly alongside How to Make Paper Sunflowers That Look Beautiful All Summer Long, another cheerful project inspired by one of summer’s most iconic flowers.
6. Resin and Dried Herb Bookmarks
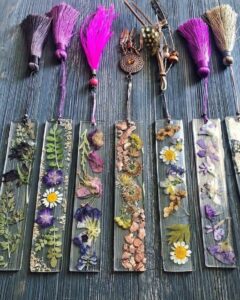
Cut thin rectangular bookmark molds from silicone or use a purpose-made silicone bookmark mold. Pour a clear resin base and let it partially gel. Lay small sprigs of dried lavender, rosemary, or chamomile across the surface. Pour a second clear layer to fully encase the herbs. After curing, punch a hole at the top and thread a ribbon or tassel through it. The herbs stay fragrant for months inside the sealed resin. Consequently, these bookmarks are genuinely functional as well as decorative.
7. Terrarium-Style Paperweight
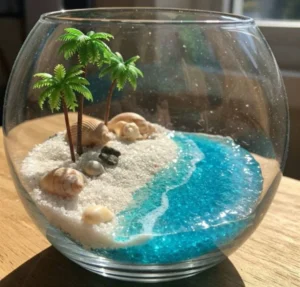
Layer different colored resin to build a miniature landscape inside a dome mold. Start with a thin brown layer for soil. Add a green layer for grass above it. While still wet, press tiny dried moss pieces and miniature fern fronds into the green layer. Pour a final clear dome layer over everything. Once cured, the finished piece looks like a tiny preserved forest captured under glass. Display it on a bookshelf or windowsill where light can pass through the clear dome layer.
Nature-inspired projects like this pair beautifully with 19 Easy Nature Crafts for Kids That Turn Outdoor Finds Into Art, especially for crafters who enjoy bringing elements from the outdoors into their creations.
8. Resin Bangles With Summer Flowers
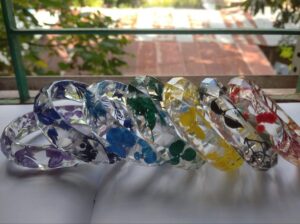
Use silicone bangle molds in the width and diameter you prefer. Pour a thin clear resin base into the mold channel. Press small dried flower pieces evenly around the channel before the base gels fully. Pour a second clear layer to encase the flowers. After full curing, demold carefully and lightly sand the inner and outer surfaces with 400-grit sandpaper. Polish with a resin polishing compound for a glass-like finish. These bangles draw consistent compliments and are among the most wearable of all summer resin craft ideas.
9. Poured Resin Wall Clock
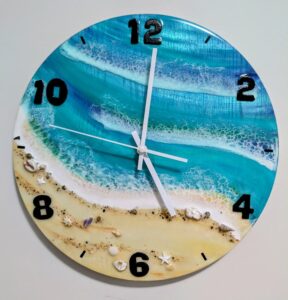
Purchase an inexpensive clock mechanism from a craft store. Trace a large circle on a wood panel or use a round wooden base. Seal the wood surface with a thin resin coat first. Once dry, pour swirling teal, white, and gold resin across the sealed surface. Let the colors flow organically without overworking them. After full curing, drill a small center hole and insert the clock mechanism from behind. Add clock face numbers using gold stickers or hand-painted numerals. This is a functional piece of art that genuinely earns its wall space all summer.
Creative home décor projects like this fit naturally alongside 21 Creative Ways to Use Dried Flowers in Your Home Décor, where handmade elements help create a warm and personalized space.
10. Resin Jewelry Dish With Shell Inclusions
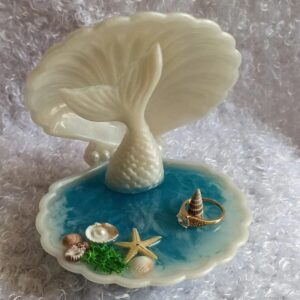
Pour a shallow layer of clear resin into a round or oval silicone mold. While still wet, press small seashells, sand dollars, and tiny pebbles across the surface. Add a drop of pale blue alcohol ink to the clear resin around the shells for a coastal feel. Pour a second thin layer to seal. After curing, demold and use a heat gun to give the top surface a final gloss. These jewelry dishes are particularly popular summer resin craft ideas because the beach theme feels appropriate on a vanity or bathroom shelf throughout the entire warm season.
11. Galaxy Resin Coasters

Pour deep navy resin into round coaster molds as a base. While wet, drop small amounts of purple, black, and teal resin across the surface. Use a toothpick to swirl the colors into nebula-like formations. Add tiny white dots using the tip of a brush handle dipped in white acrylic. Sprinkle a tiny pinch of holographic silver glitter across the surface before it fully gels. The glitter drifts and settles in the wet resin, creating a starfield effect that looks different depending on the light angle.
Colorful experimental projects often appeal to people who enjoy 23 Finger Painting Ideas for Kids That Spark Big Creativity, where creative exploration is encouraged over perfection.
12. Resin Photo Frame
![]()
Purchase a plain wood or plastic photo frame. Mix a small batch of clear resin and tint it with a tiny drop of warm gold or coral alcohol ink. Brush the tinted resin across the frame surface in thin, even strokes. While still tacky, press small dried flowers, shell pieces, or glitter along the frame border. Let it cure flat before standing the frame upright. The resin coating gives an inexpensive frame a rich, handcrafted quality that makes any photo inside it look intentionally styled.
Framed summer memories often pair beautifully with 17 Summer Paper Craft Ideas Kids Can Make During the Holidays, especially for families creating keepsakes throughout the season.
13. Resin Moon Phase Wall Hanging

Purchase or cut a set of crescent and circle wooden shapes in graduating sizes to represent the moon phases. Sand each piece smooth. Pour white and pale grey resin tinted with a touch of silver mica across each piece. Allow a slight organic variation across each moon; no two should look exactly identical. Once cured, drill a small hole at the top of each piece. String them in order across a length of driftwood or a thin dowel using thin gold chain or twine at varying drop lengths. Hang the finished piece against a white wall where its subtle texture and shimmer catch the light.
14. Resin Candle Holders
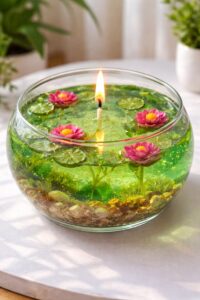
Wrap the outside of plain glass votive holders with a thin layer of clear resin mixed with summer-toned pigments; coral, soft yellow, sea green. Apply the tinted resin using a foam brush in uneven organic strokes for a sea glass effect. While still wet, press small shell pieces or dried petals onto select areas. Let the resin cure fully before placing a tealight inside each holder. The candlelight glows warmly through the resin layer and creates a beautiful ambient effect for summer evening gatherings.
Botanical projects like this often inspire crafters to explore 15 Summer Craft Ideas for Kids to Beat Boredom Without Screens, especially when looking for creative ways to celebrate the season indoors.
15. Layered Sunset Resin Art Panel
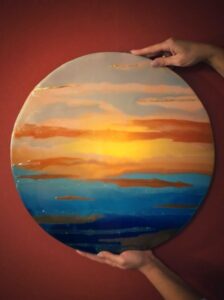
Seal a flat wood panel with a base coat of resin. Once dry, pour warm coral resin across the lower third of the panel. Add golden yellow above it, blending the two colors where they meet. Pour deep burnt orange above the yellow and soft lavender or pink at the very top for a dusk sky effect. While still wet, use a palette knife to gently drag the colors horizontally for a blended, painterly look. Press a thin silhouette of a cut-paper palm tree or mountain range into the wet surface before it cures. The finished panel looks like a painting; but with the gloss, depth, and permanence of resin.
Bright colorful resin projects share the same appeal as 19 Summer Painting Ideas for Beginners to Try Before September, where vibrant seasonal colors take center stage.
Tips for Getting the Best Results
- Temperature matters more than most beginners expect: Resin cures best between 70 and 75 degrees Fahrenheit. Cold rooms slow curing significantly and can cause cloudiness. Warm rooms speed curing and reduce working time. Additionally, warming your resin bottles in a warm water bath for five minutes before mixing improves flow and reduces bubbles considerably.
- Do not skip the UV sealer on finished pieces: Clear epoxy resin yellows over time when exposed to sunlight without UV protection. A clear UV-resistant spray coat applied after full curing protects your colors and keeps the piece looking fresh through many seasons of display.
- Seal natural inclusions before embedding: Pressed flowers, shells, and dried herbs occasionally release moisture or oils into fresh resin. Sealing each piece with a thin coat of Mod Podge or clear spray before embedding prevents cloudiness from forming around natural materials inside the finished piece.
- Work in batches when making multiples: If you are making a set of coasters or several keychains, mix one batch of resin and pour all molds from it rather than mixing separate small batches. This keeps the resin color and consistency perfectly uniform across a matching set.
Creative experimentation is one reason many people also enjoy 27 Animal Clay Crafts for Kids That Are Cute Beyond Words, where simple materials can become surprisingly impressive finished pieces.
Final Thoughts
Resin crafting in summer is a different experience from any other season. The warmth speeds your cure times slightly, the natural light makes color mixing easier to judge, and the abundance of seasonal materials; shells collected on a beach walk, wildflowers pressed from the garden, herbs snipped from a sunny windowsill; means you are never short of beautiful things to embed. Every project on this list was chosen because it uses summer itself as an ingredient, not just as a backdrop.
If you’re looking to expand your collection of beginner-friendly creative projects, 21 Paper Plate Crafts for Kids That Are Cheap, Easy and Adorable offers another fun way to turn simple materials into something memorable.
The thing about resin that keeps makers returning to it long after the first project is the way it holds onto a moment. A shell from a specific beach, a flower from a specific garden, a color palette chosen on a specific afternoon; resin preserves all of it inside something solid and permanent. Long after summer ends and the temperatures drop, the pieces you made this season will still be sitting on your shelves catching the light exactly as they did the day you demolded them. That kind of permanence is rare in a craft, and it is entirely worth the careful measuring, the patient curing, and the happy mess of a summer well spent.
