Summer is the perfect season to gather colorful blooms and turn them into something beautiful. Flowers seem to be everywhere during the warmer months, which makes it easy to collect petals and small blossoms for creative projects.
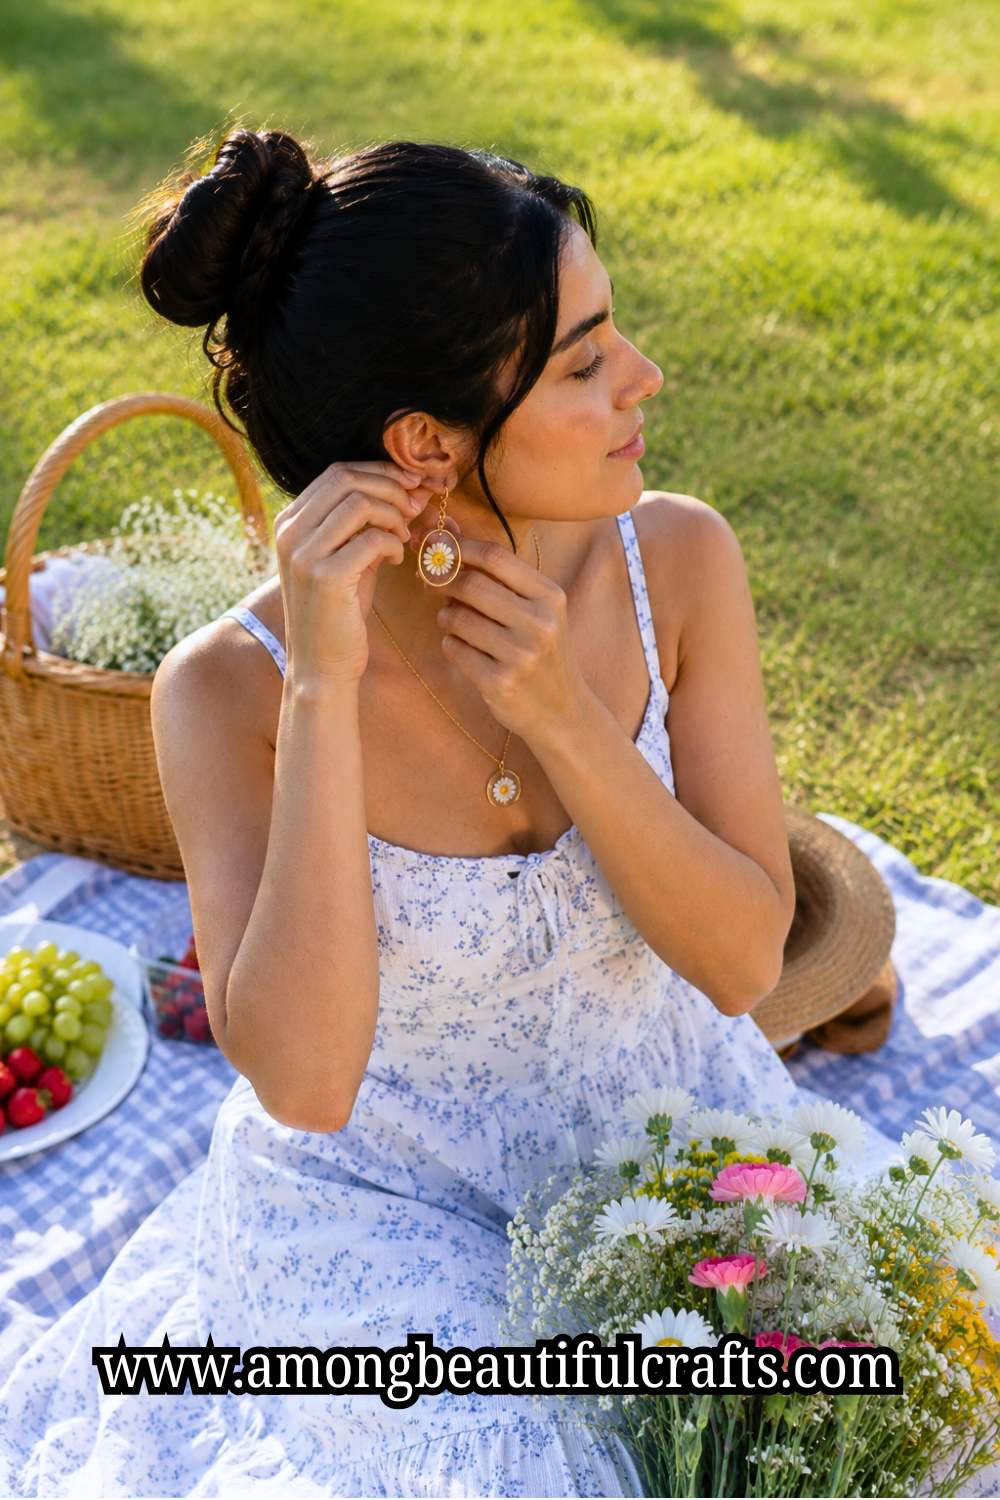
Instead of letting those flowers fade away, you can preserve their beauty in handmade accessories that last for years. That is one reason Summer Pressed Flower Resin Jewelry has become such a popular craft among DIY enthusiasts and nature lovers alike.
Resin jewelry offers a wonderful way to capture the delicate details of real flowers. Each piece becomes a tiny work of art that showcases nature’s colors, textures, and unique patterns. Moreover, no two pieces ever look exactly the same.
Whether you choose bright summer blooms, soft wildflowers, or tiny garden flowers, the finished jewelry feels personal and one of a kind. As a result, these handmade creations make thoughtful gifts as well as beautiful additions to your own collection.
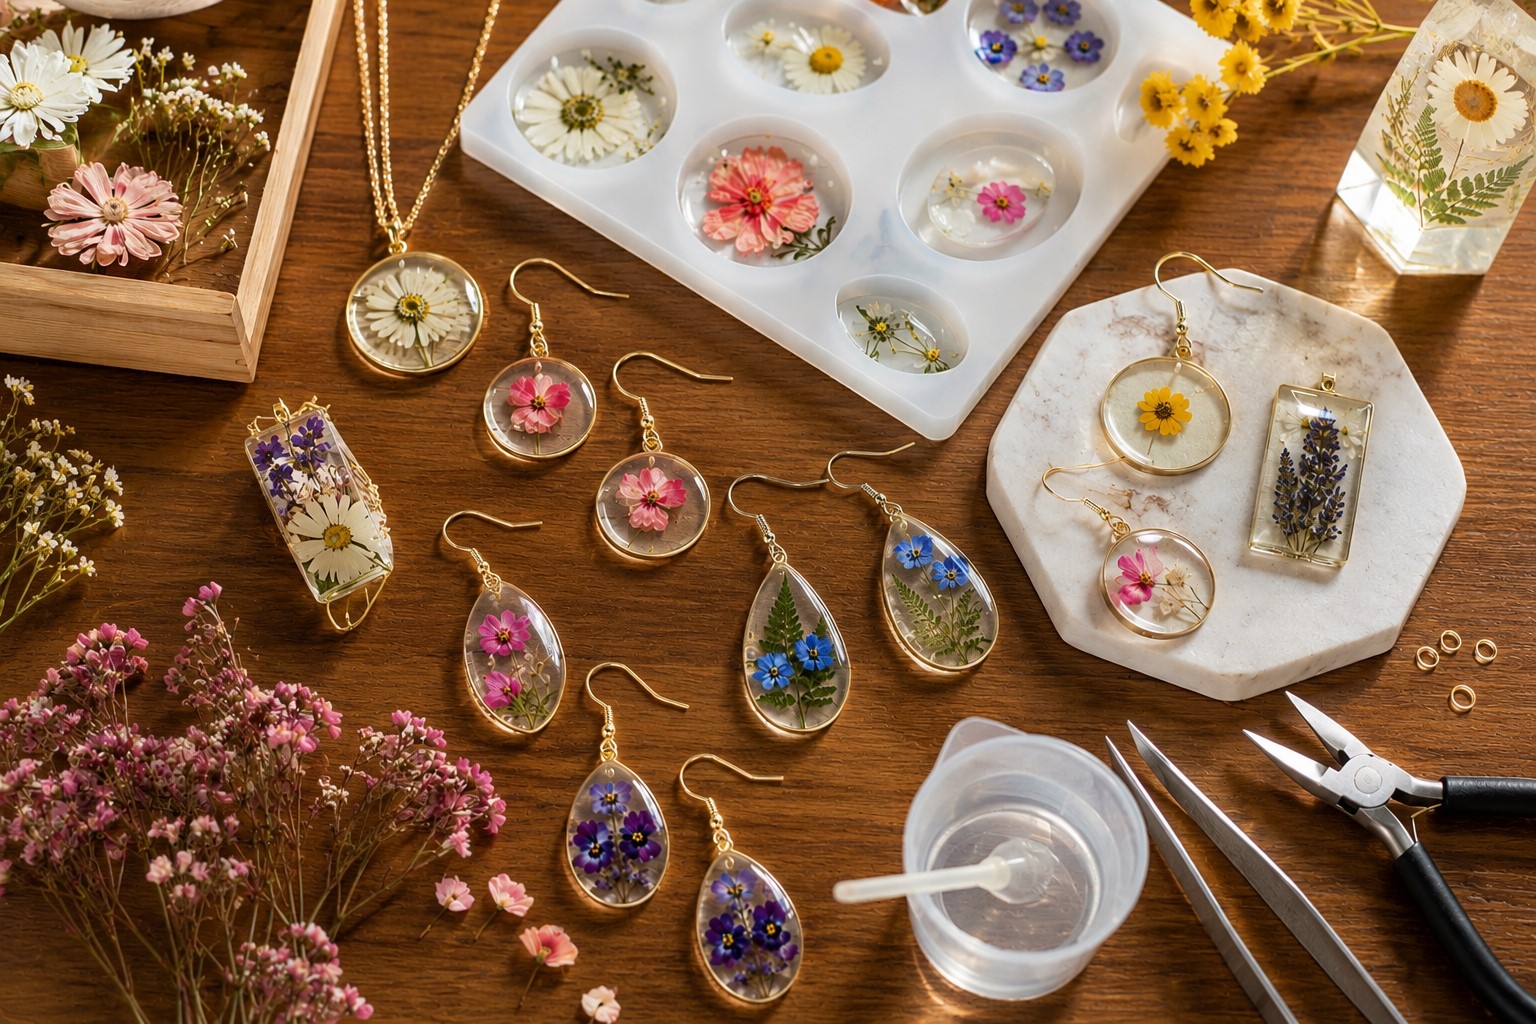
Another reason this project appeals to so many crafters is its versatility. You can create necklaces, earrings, bracelets, keychains, and pendants using the same basic techniques.
Furthermore, the supplies are relatively simple to find, making this an accessible project for beginners. With a little patience and creativity, you can transform pressed flowers into wearable keepsakes that preserve memories of the summer season. Follow the tutorial below to learn how to create stunning resin jewelry that highlights the natural beauty of pressed flowers.
If you enjoy preserving flowers before turning them into jewelry, take a look at How to Press Flowers at Home Without Them Turning Brown.
Why You’ll Love This Project
This project combines the beauty of nature with the elegance of handmade jewelry.
Instead of purchasing mass-produced accessories, you can create unique pieces that preserve real flowers from your garden, favorite walking trail, or special event. Moreover, resin helps protect delicate blooms while showcasing their natural colors and details.
The finished jewelry looks professional, yet the process remains simple enough for beginners. Best of all, each piece becomes a one-of-a-kind keepsake that captures the beauty of summer.
Skill Level
Beginner to Intermediate
Estimated Time
1 to 2 hours, plus resin curing time
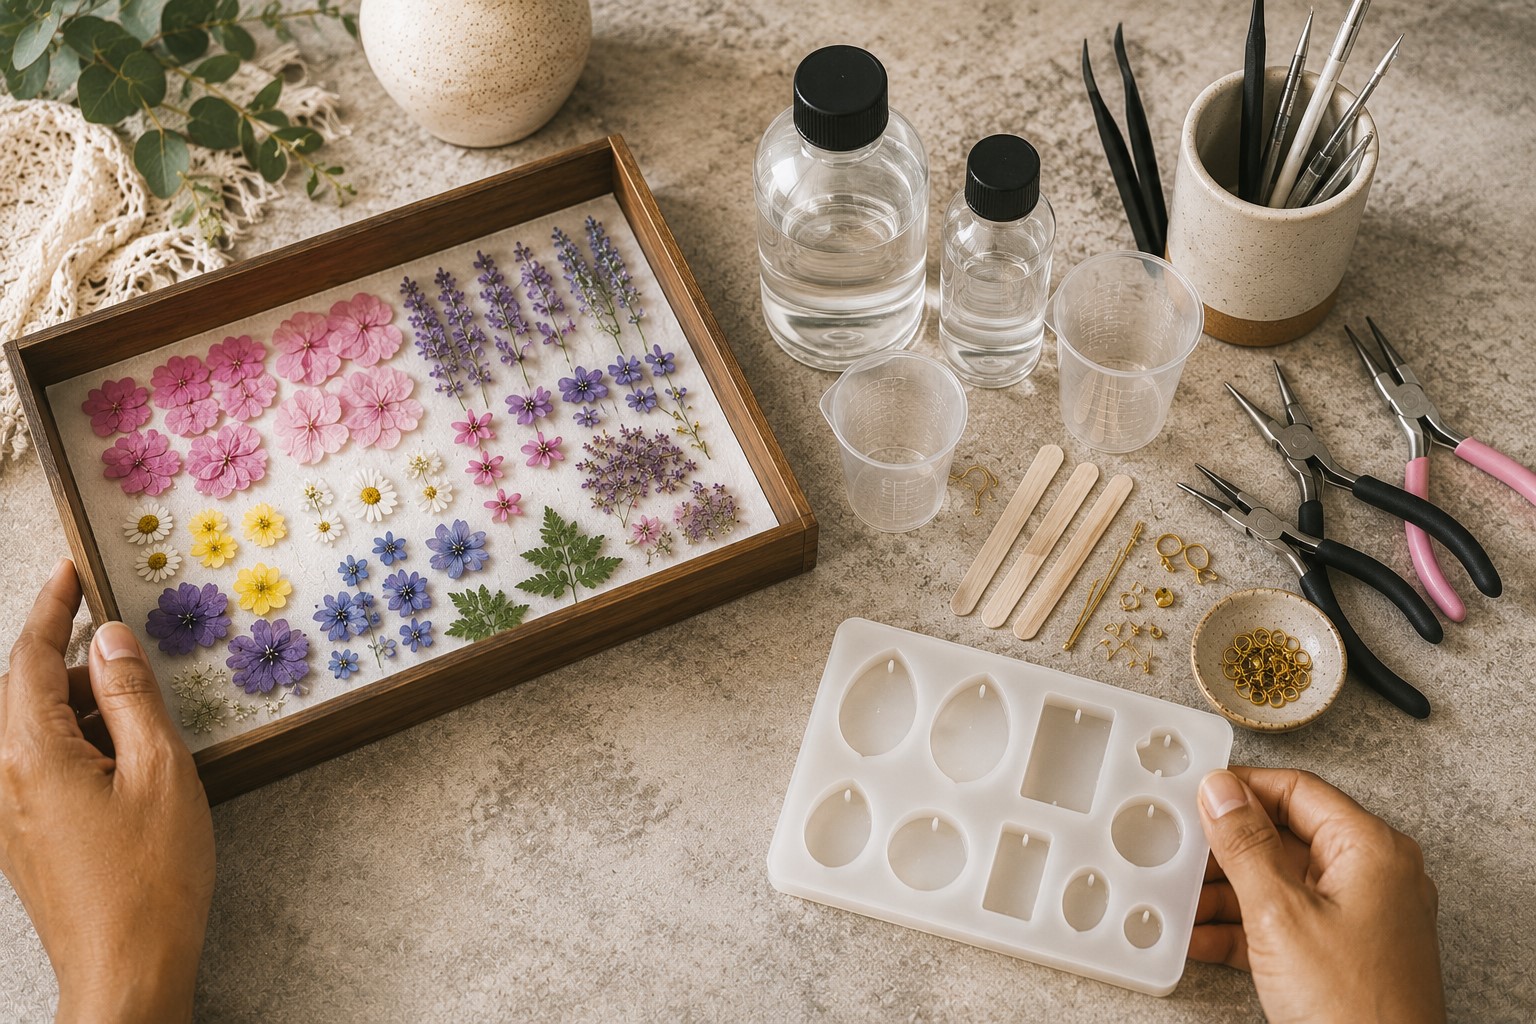
Supplies You’ll Need
- Pressed flowers
- Jewelry-grade epoxy resin
- Resin hardener
- Silicone jewelry molds
- Mixing cups
- Stir sticks
- Tweezers
- Toothpicks
- Disposable gloves
- Jewelry findings and jump rings
- Small scissors
- Protective work surface
How to Make Beautiful Summer Pressed Flower Resin Jewelry
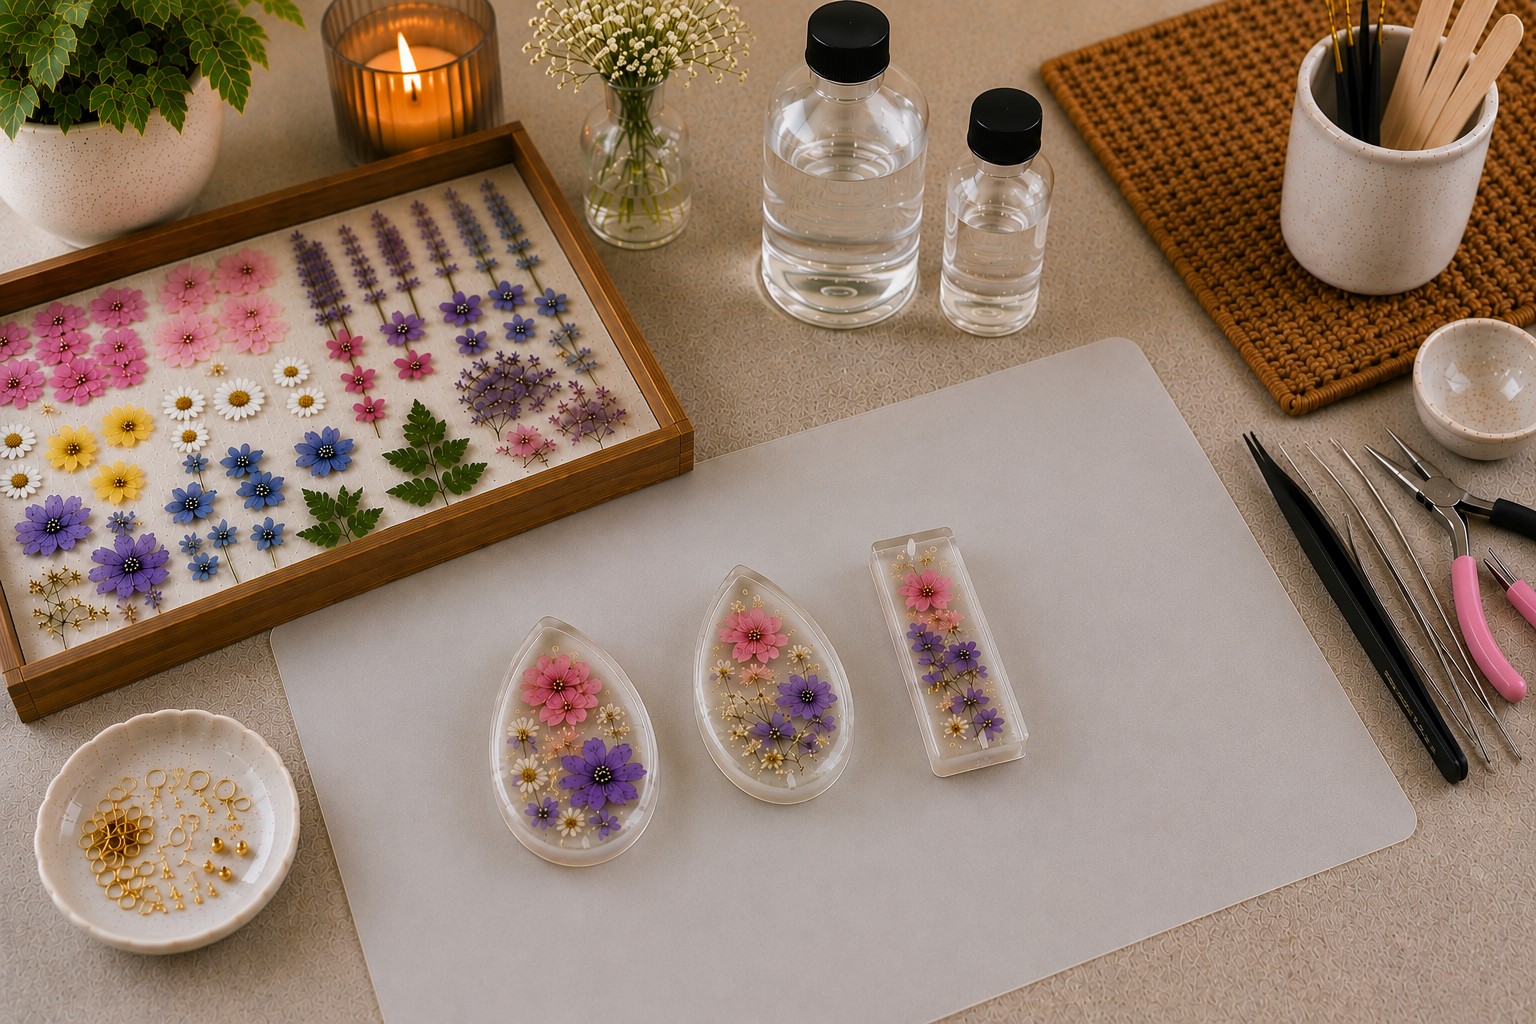
Step 1: Select Flowers for Your Jewelry
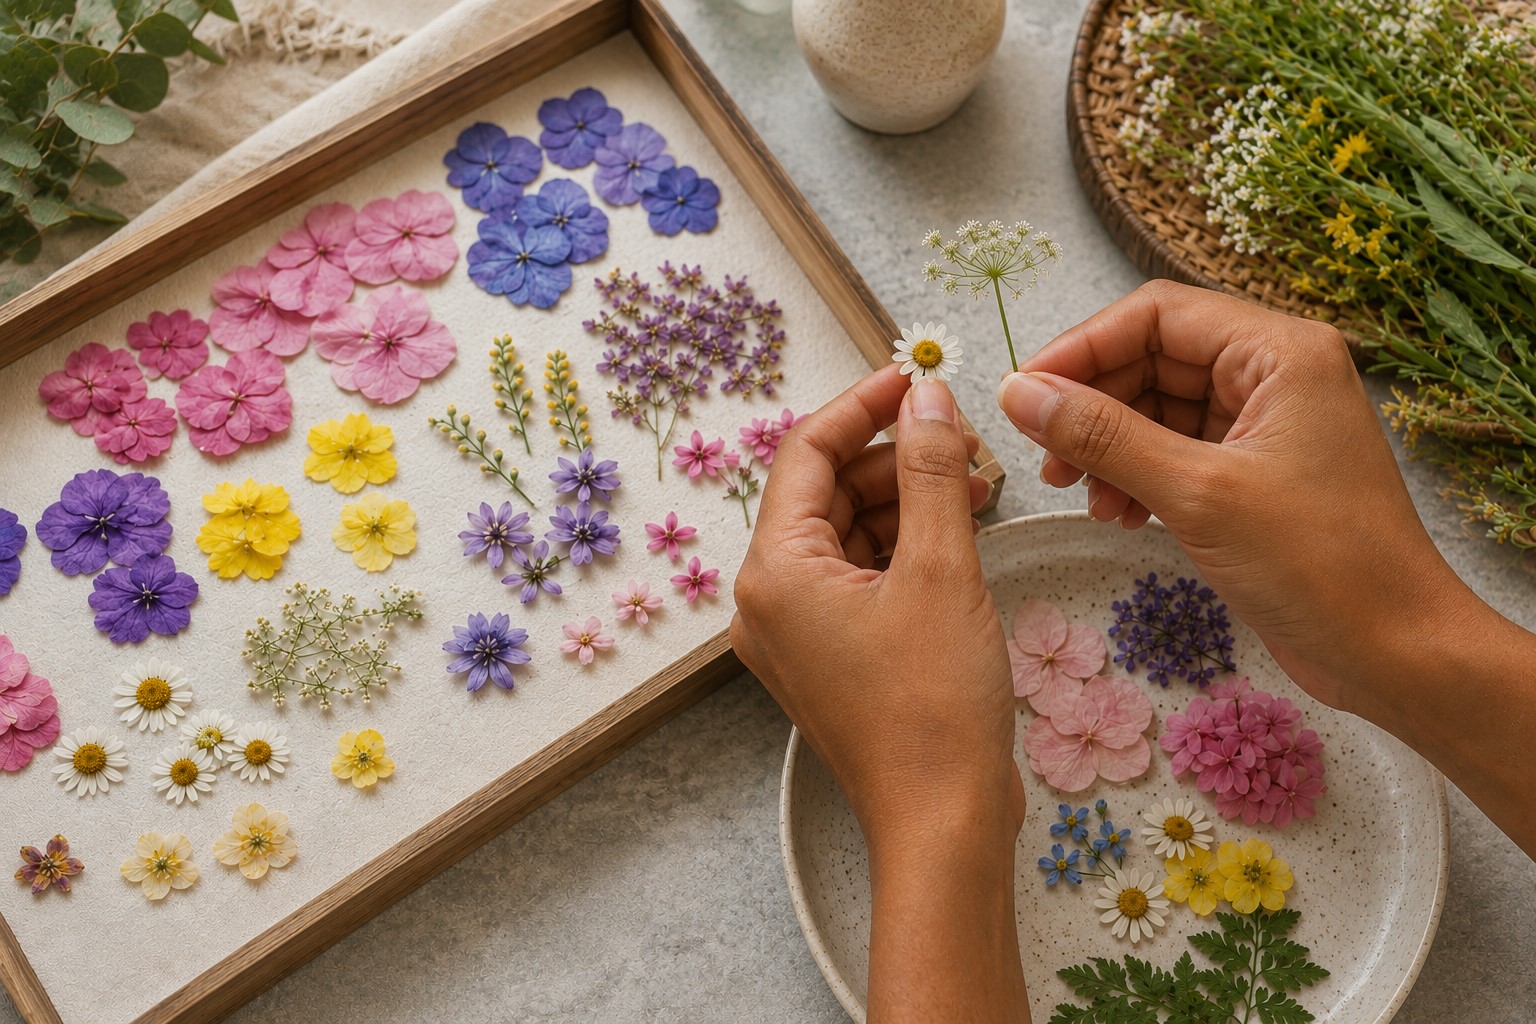
The flowers you choose will have a big impact on the final appearance of your jewelry. Small blooms usually work best because they fit comfortably inside most resin molds.
Daisies, forget-me-nots, baby’s breath, Queen Anne’s lace, and tiny wildflowers are all excellent choices. Look for flowers with vibrant colors and petals that are in good condition.
Avoid blooms that already show signs of wilting or discoloration. Furthermore, consider how different flower colors will look against a clear resin background.
Taking time to select attractive flowers at the beginning will help ensure that your finished jewelry looks beautiful and professional.
Step 2: Press and Dry the Flowers
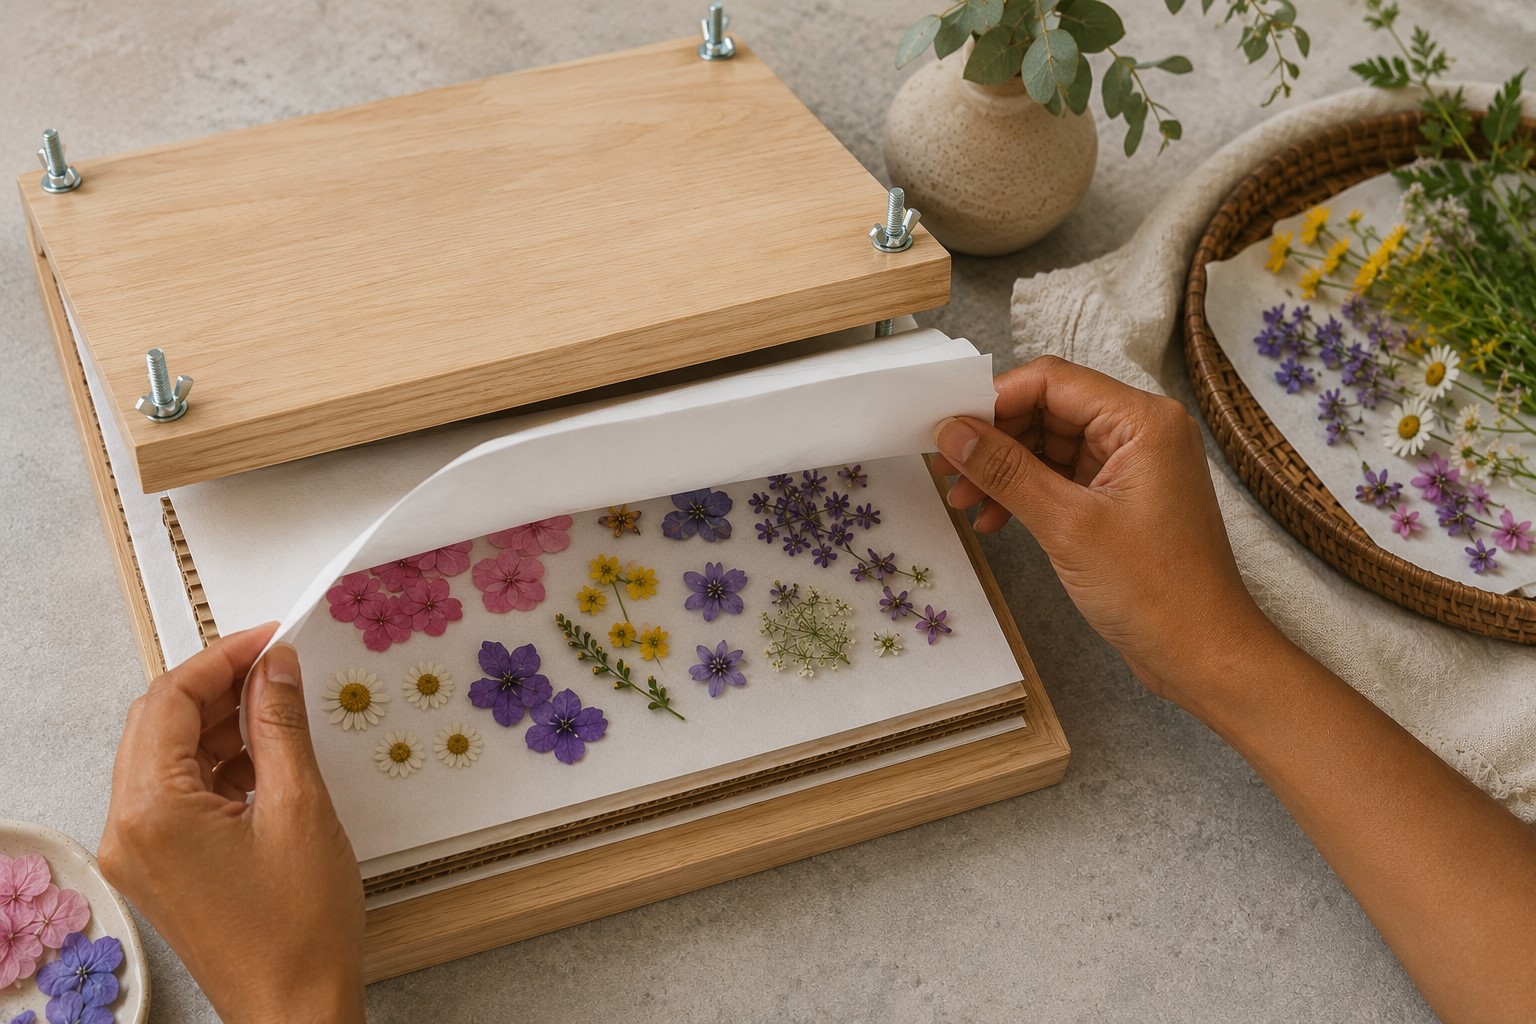
Before the flowers can go into resin, they must be completely dry. Place the blooms between sheets of parchment paper and press them inside a heavy book or flower press.
Leave them undisturbed for one to two weeks. Although the waiting period requires patience, it is one of the most important parts of the process. Any moisture trapped inside the flowers can cause discoloration or cloudiness later.
Once the flowers feel thin, flat, and completely dry, they are ready to use. Properly pressed flowers help create clearer resin pieces and preserve their natural beauty for a much longer time.
For more inspiration after pressing flowers, explore 19 Stunning Pressed Flower Projects You Can Start Today.
Step 3: Gather All Supplies
Having everything within reach before you begin will make the project much easier. Gather your pressed flowers, resin, hardener, molds, mixing cups, stir sticks, tweezers, gloves, and jewelry findings.
Lay the supplies out on your work surface so you can quickly access them when needed. Resin projects move more smoothly when you stay organized because the resin begins curing soon after mixing.
Furthermore, preparing ahead of time helps reduce mistakes and unnecessary interruptions. Spending a few extra minutes organizing your materials can make the entire crafting experience more enjoyable and less stressful.
Step 4: Prepare Your Workspace
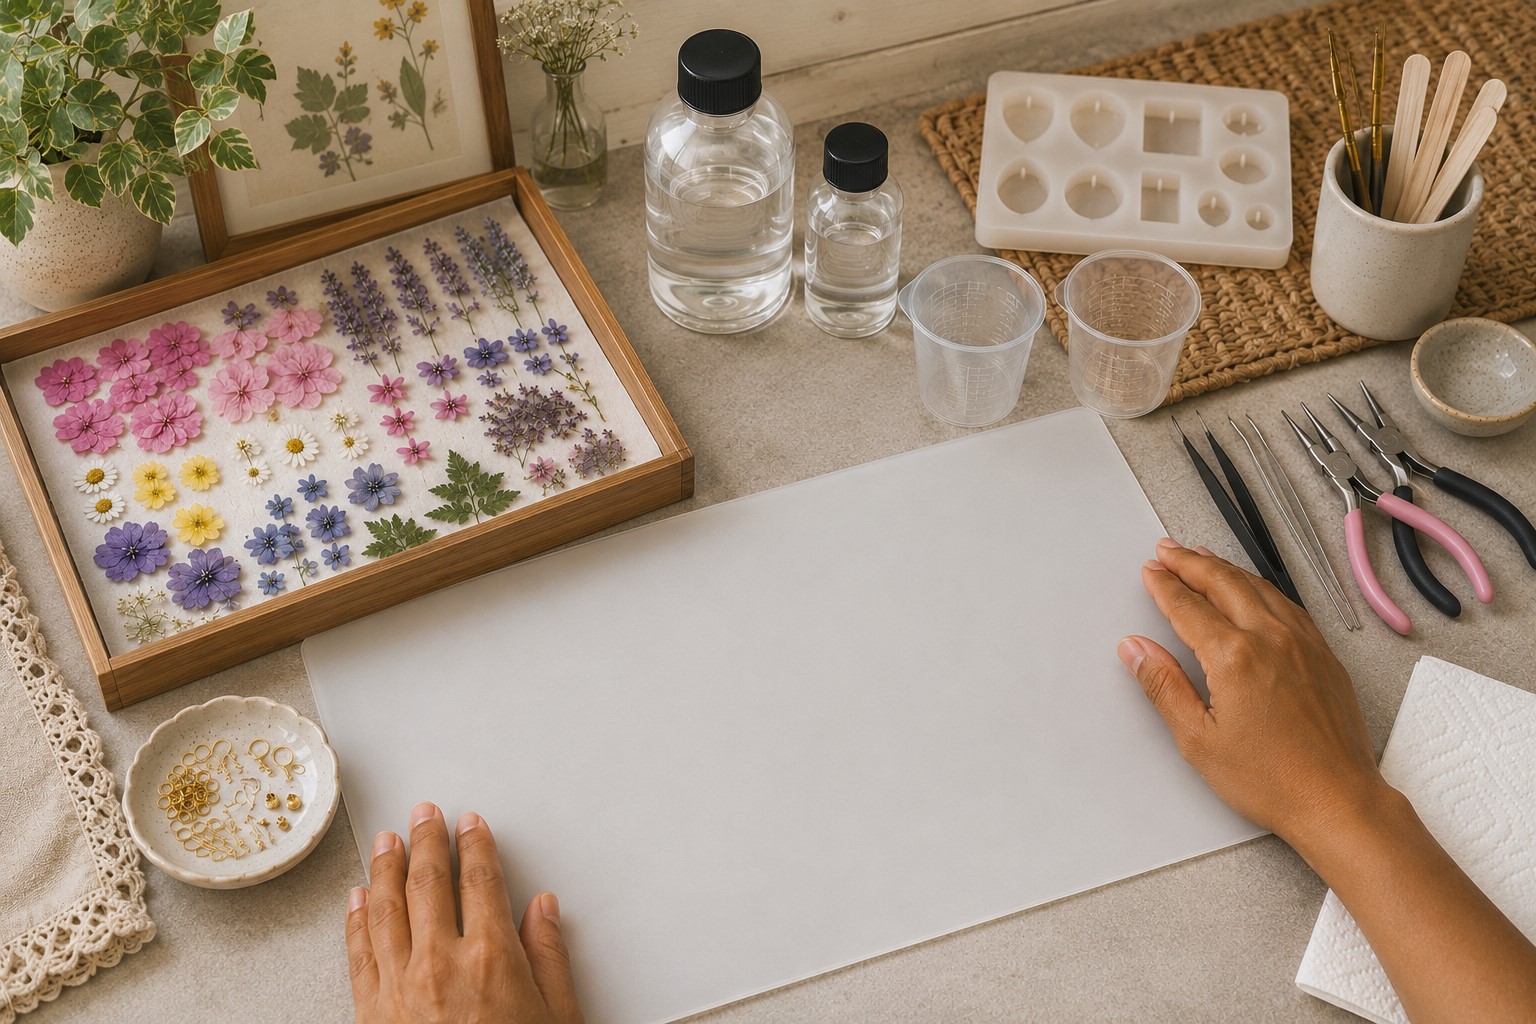
A clean workspace can greatly improve your results. Cover your table with a protective mat, plastic sheet, or parchment paper before opening the resin.
Then, make sure the area is free from dust, pet hair, and other debris that could become trapped in the resin. Work in a well-ventilated room and wear disposable gloves for protection.
It is also helpful to place all molds on a level surface. This prevents the resin from pooling unevenly during the curing process. Creating a safe and organized workspace allows you to focus entirely on the creative side of the project.
If this is your first resin project, read How to Make Your First Resin Art Piece Without Making a Mess.
Step 5: Plan Your Flower Arrangement
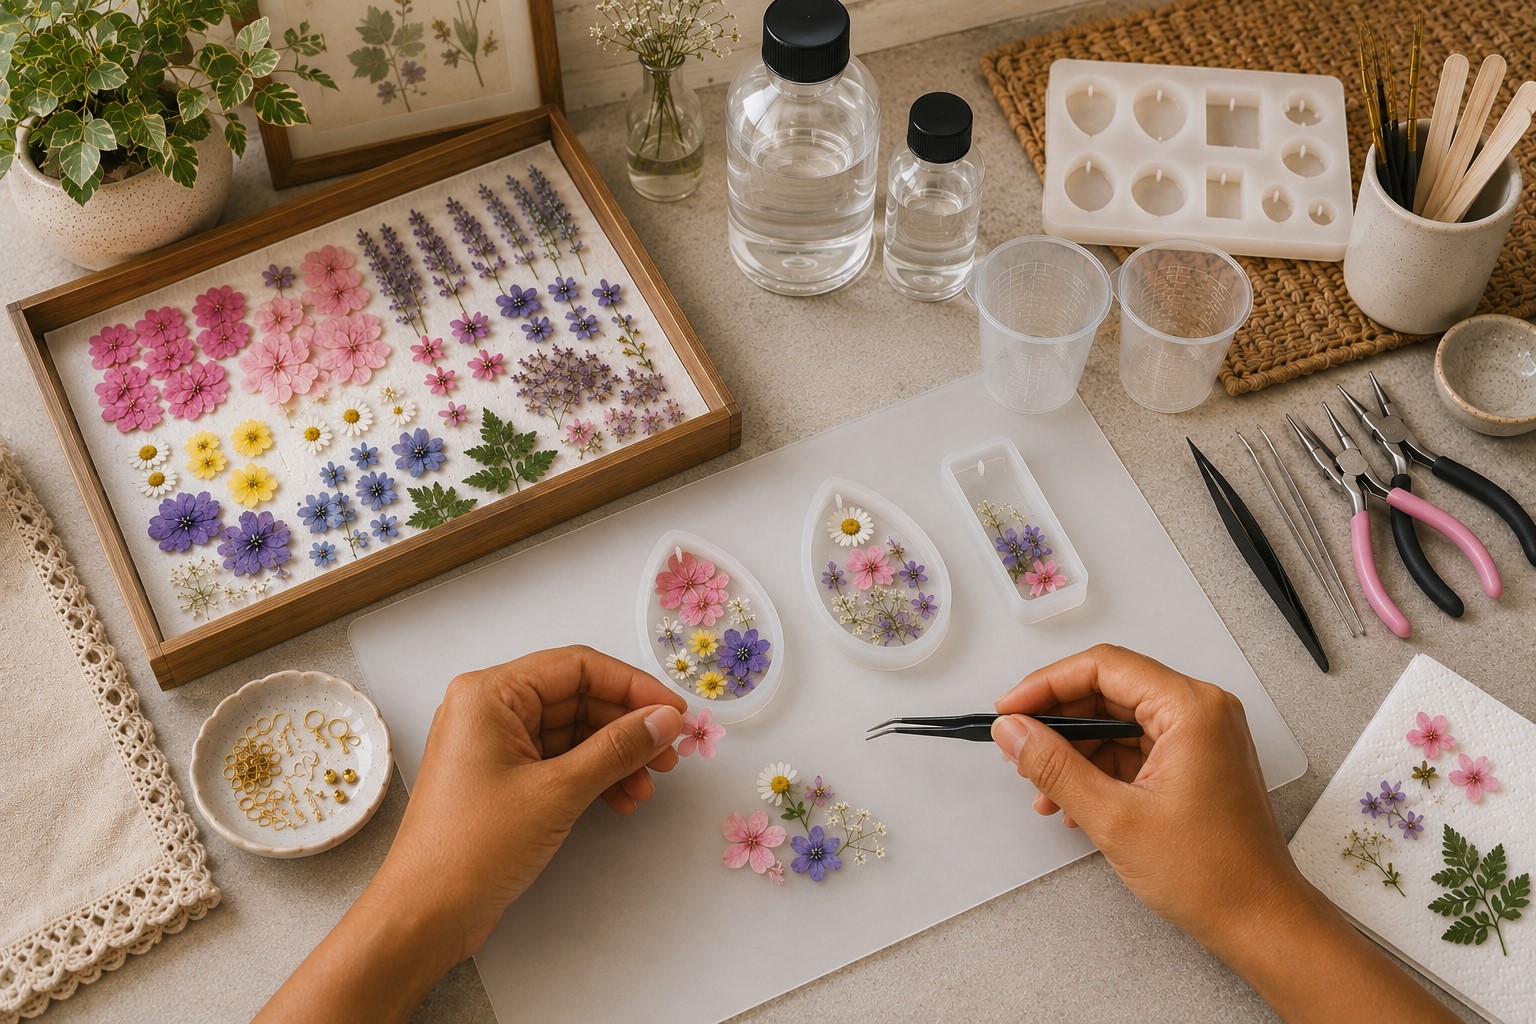
Before mixing the resin, experiment with different flower layouts inside the molds. Use tweezers to move the flowers around until you find an arrangement that looks balanced and visually appealing.
Some people prefer a simple design with a single flower, while others enjoy combining petals, leaves, and small blooms. This step gives you an opportunity to test different ideas without feeling rushed.
Moreover, planning ahead helps prevent mistakes once the resin is mixed. Taking time to arrange the flowers carefully can make the finished jewelry look more polished and thoughtfully designed.
You can also find decorating inspiration in 21 Creative Ways to Use Dried Flowers in Your Home Décor.
Step 6: Mix the Resin and Hardener
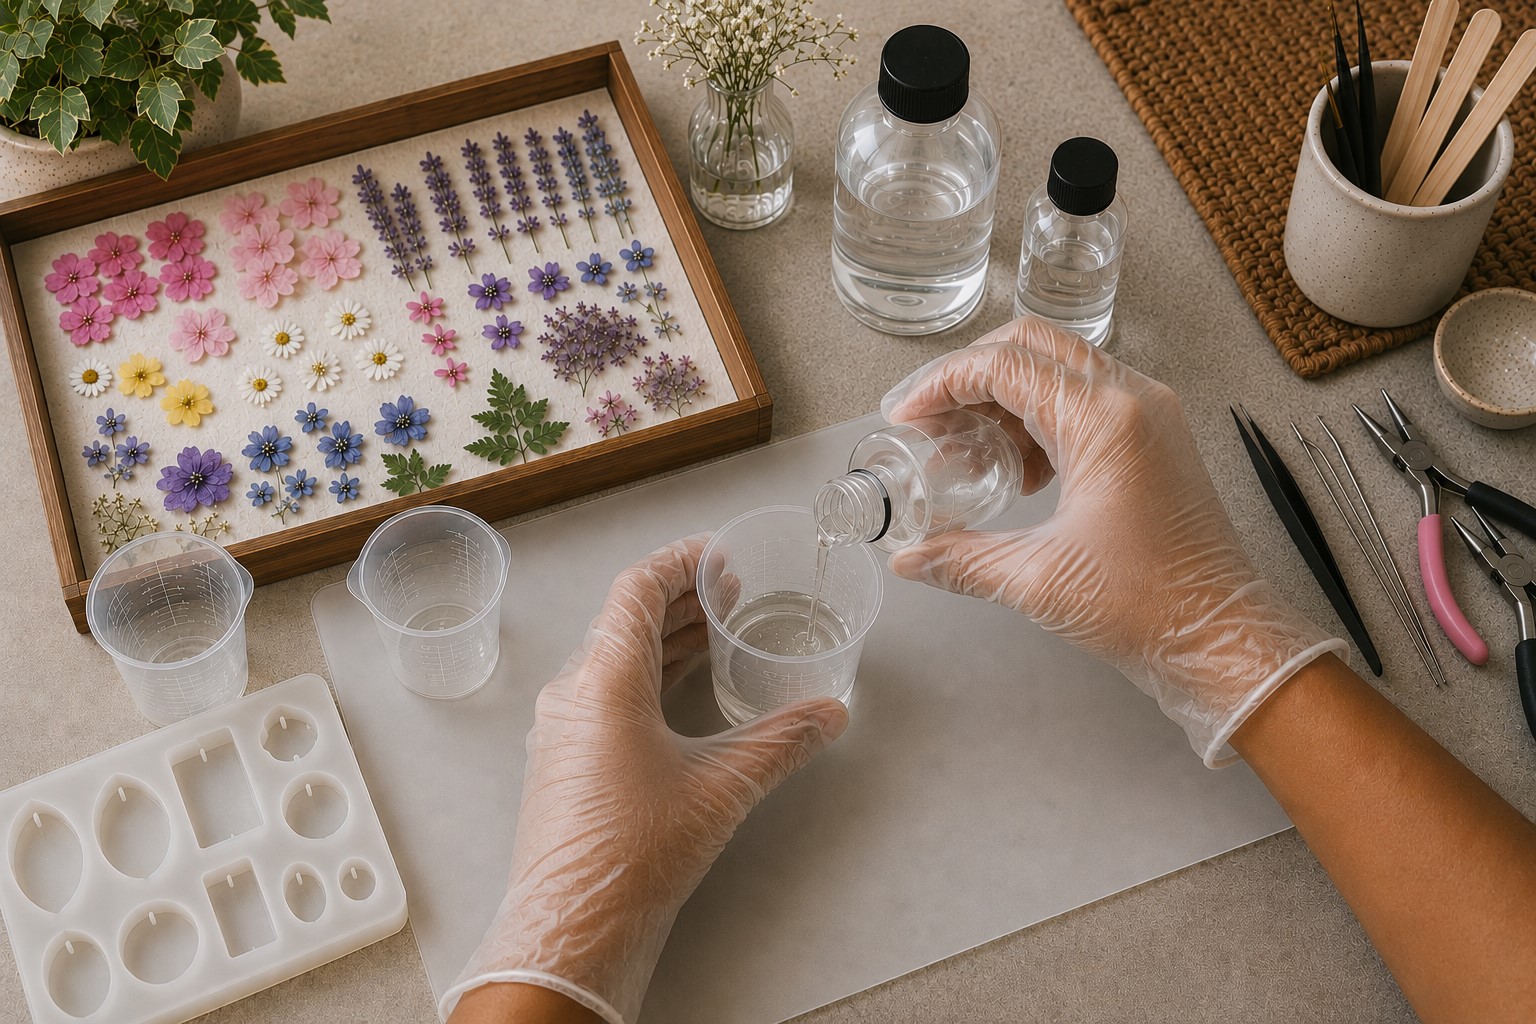
Carefully follow the instructions provided by the resin manufacturer. Measure the resin and hardener accurately because incorrect proportions can affect the curing process. Pour the components into a mixing cup and stir slowly for several minutes.
Fast stirring often creates unwanted air bubbles that can become trapped inside the jewelry. Continue mixing until the solution appears completely clear and evenly combined.
Although this step may seem simple, it plays a major role in the final quality of the project. Properly mixed resin helps create smooth, strong, and crystal-clear jewelry pieces.
Step 7: Pour a Thin Base Layer
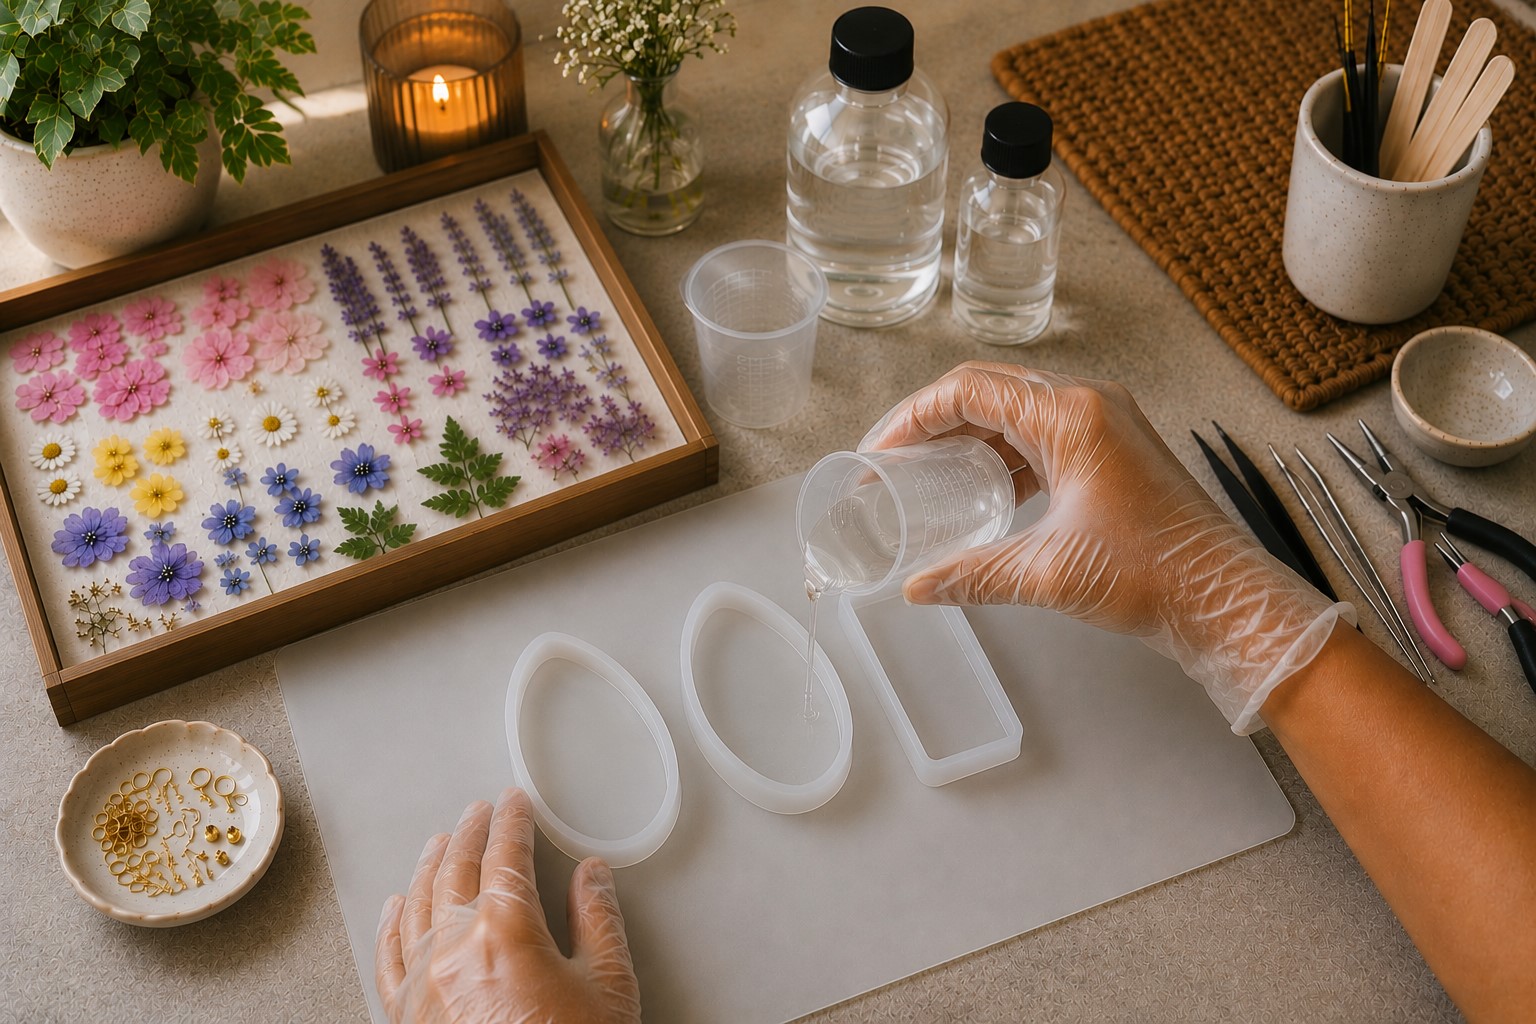
Pour a small amount of resin into the bottom of each mold. Use a toothpick or craft stick to spread the resin evenly across the surface.
This first layer serves as a foundation for the flowers and helps keep them in place during the next steps. Furthermore, a thin base layer can reduce movement once the flowers are added.
Check for air bubbles and remove any that appear. The resin should completely cover the bottom of the mold without becoming too thick. This simple foundation helps create a cleaner and more professional-looking finished piece.
Step 8: Position the Pressed Flowers
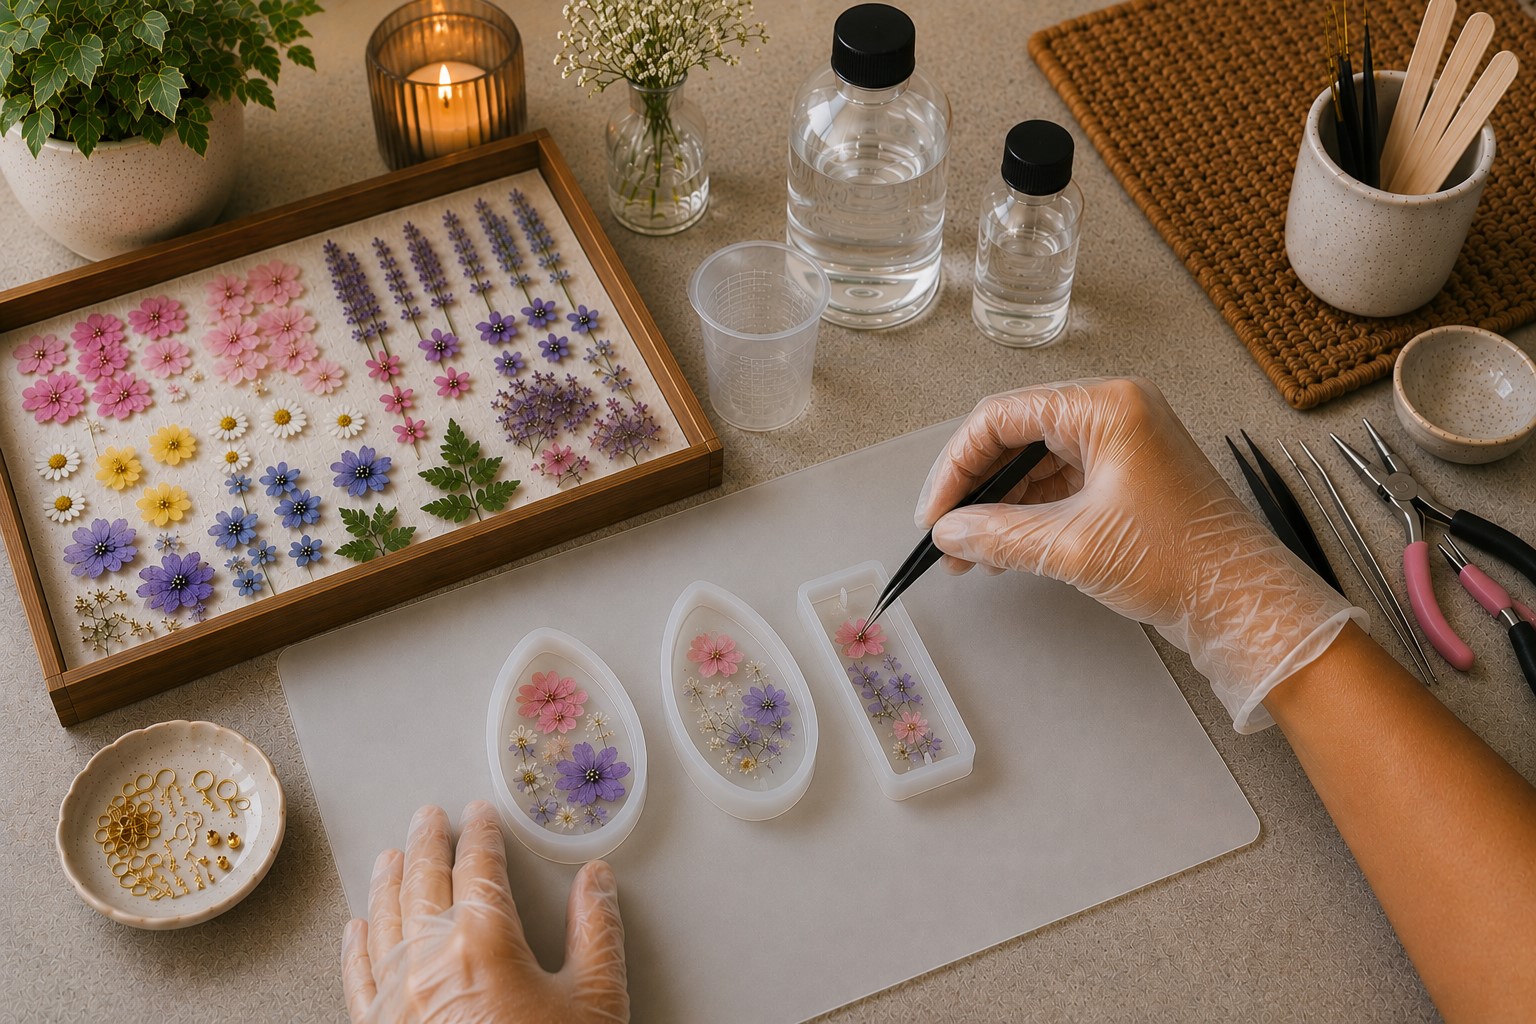
Now comes one of the most enjoyable parts of the project. Using tweezers, carefully place the pressed flowers onto the resin base.
Work slowly and experiment with different arrangements until you find a design that feels balanced and attractive. Some jewelry pieces look beautiful with a single flower, while others benefit from multiple blooms and leaves.
Try not to overcrowd the mold because too many elements can distract from the natural beauty of the flowers. As the flowers settle into place, your Summer Pressed Flower Resin Jewelry will begin to take shape and reveal its unique personality.
Flower lovers may also enjoy How to Make Paper Sunflowers That Look Beautiful All Summer Long.
Step 9: Fill the Mold with Resin
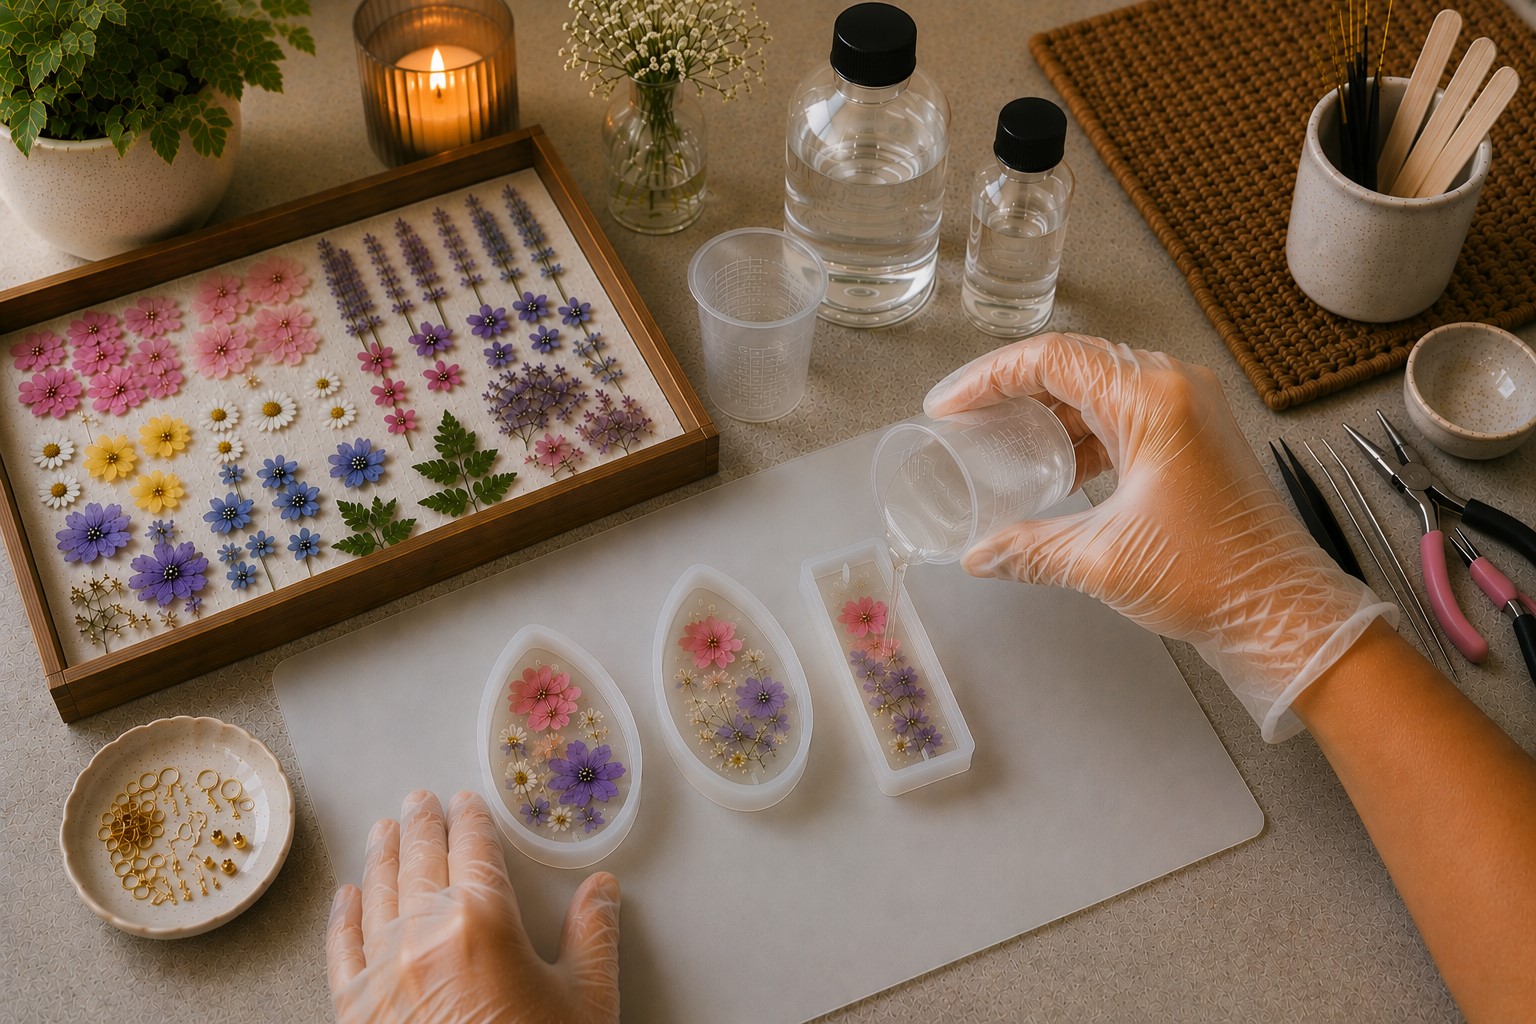
Once the flowers are arranged exactly where you want them, slowly pour additional resin into the mold. Cover the flowers completely while taking care not to overfill the mold.
Pouring too quickly can create bubbles and disturb the arrangement. If bubbles appear, use a toothpick to gently remove them. Furthermore, inspect the mold from different angles to ensure the flowers remain properly positioned.
The clear resin will preserve the delicate details of the blooms while creating a smooth protective layer. This step transforms the floral arrangement into a durable piece of wearable art.
Step 10: Allow the Resin to Cure
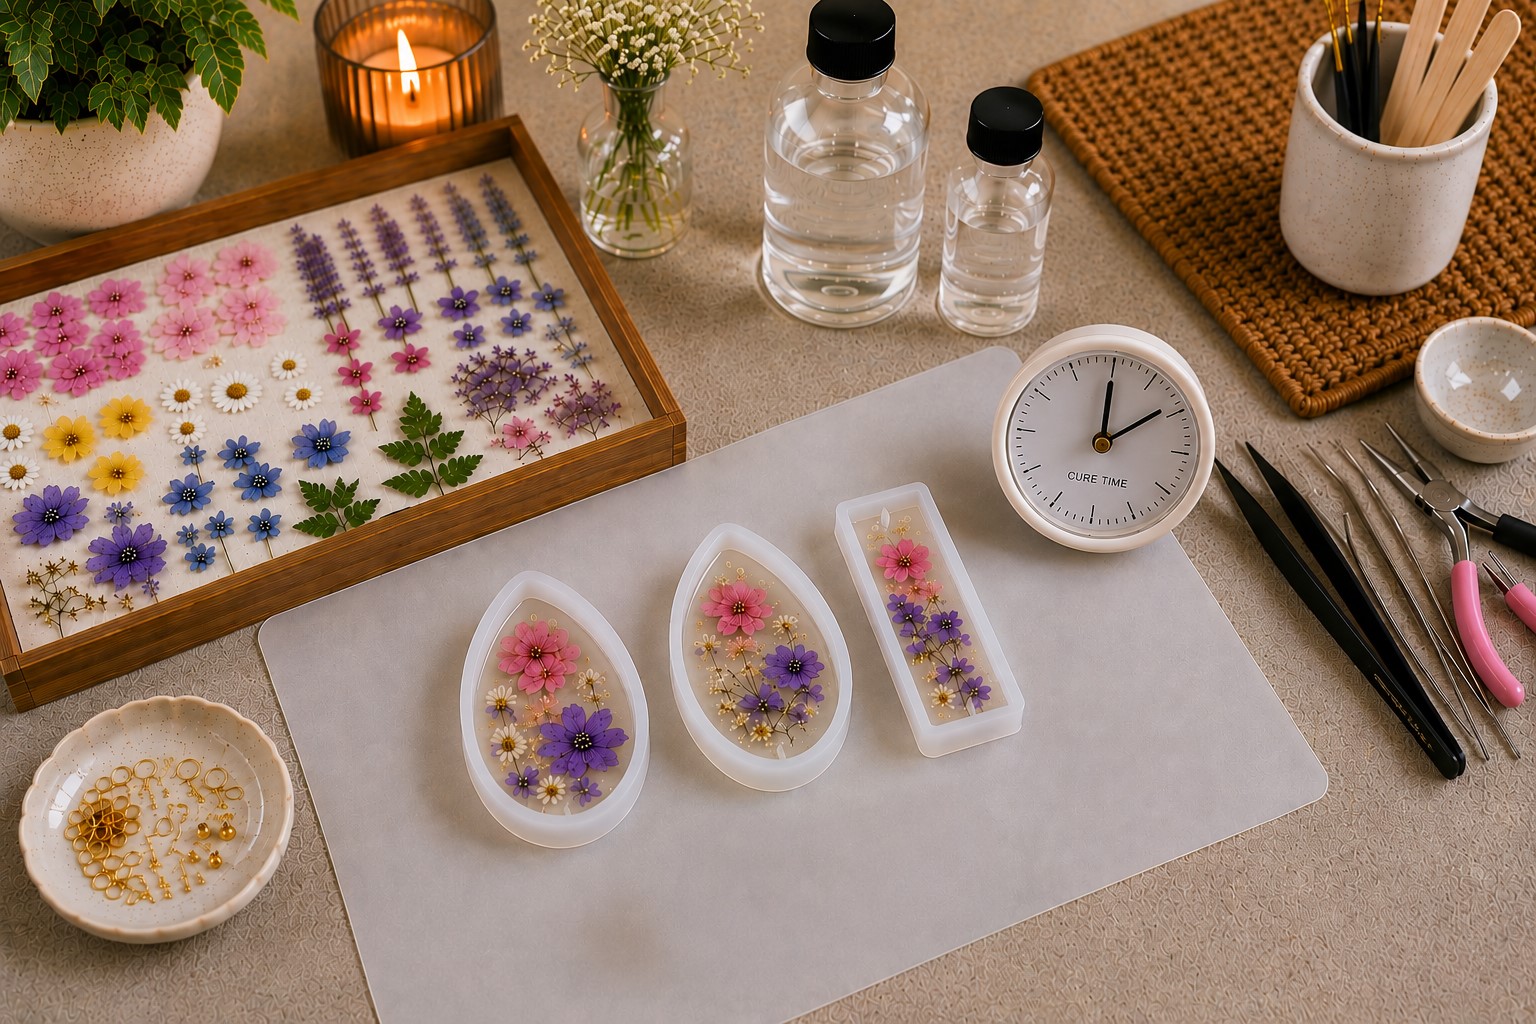
Place the molds on a flat, protected surface where they can remain undisturbed. Cover them with a clean container or box to keep dust away while the resin cures.
Follow the curing time recommended by the manufacturer, which may range from several hours to a full day. Although waiting can feel difficult, patience is essential for achieving strong and clear results. Moving the molds too soon can affect the finish and create imperfections.
Allowing the resin to cure properly helps ensure that the jewelry remains beautiful and durable for years to come.
For more resin inspiration, visit 15 Summer Resin Craft Ideas That Make Beautiful Home Décor.
Step 11: Remove the Pieces and Smooth the Edges
After the resin has cured completely, gently remove the jewelry pieces from the molds. Examine each piece closely for rough edges or small imperfections.
If necessary, use fine-grit sandpaper to smooth the edges until they feel comfortable to the touch. Take your time during this step because careful finishing can make handmade jewelry look much more professional.
Wipe away any sanding dust before continuing. Once finished, the pieces should feel smooth, polished, and ready for the final assembly stage.
Nature lovers often enjoy creating other natural crafts such as 15 Beautiful Things You Can Make With Seashells.
Step 12: Attach the Jewelry Findings
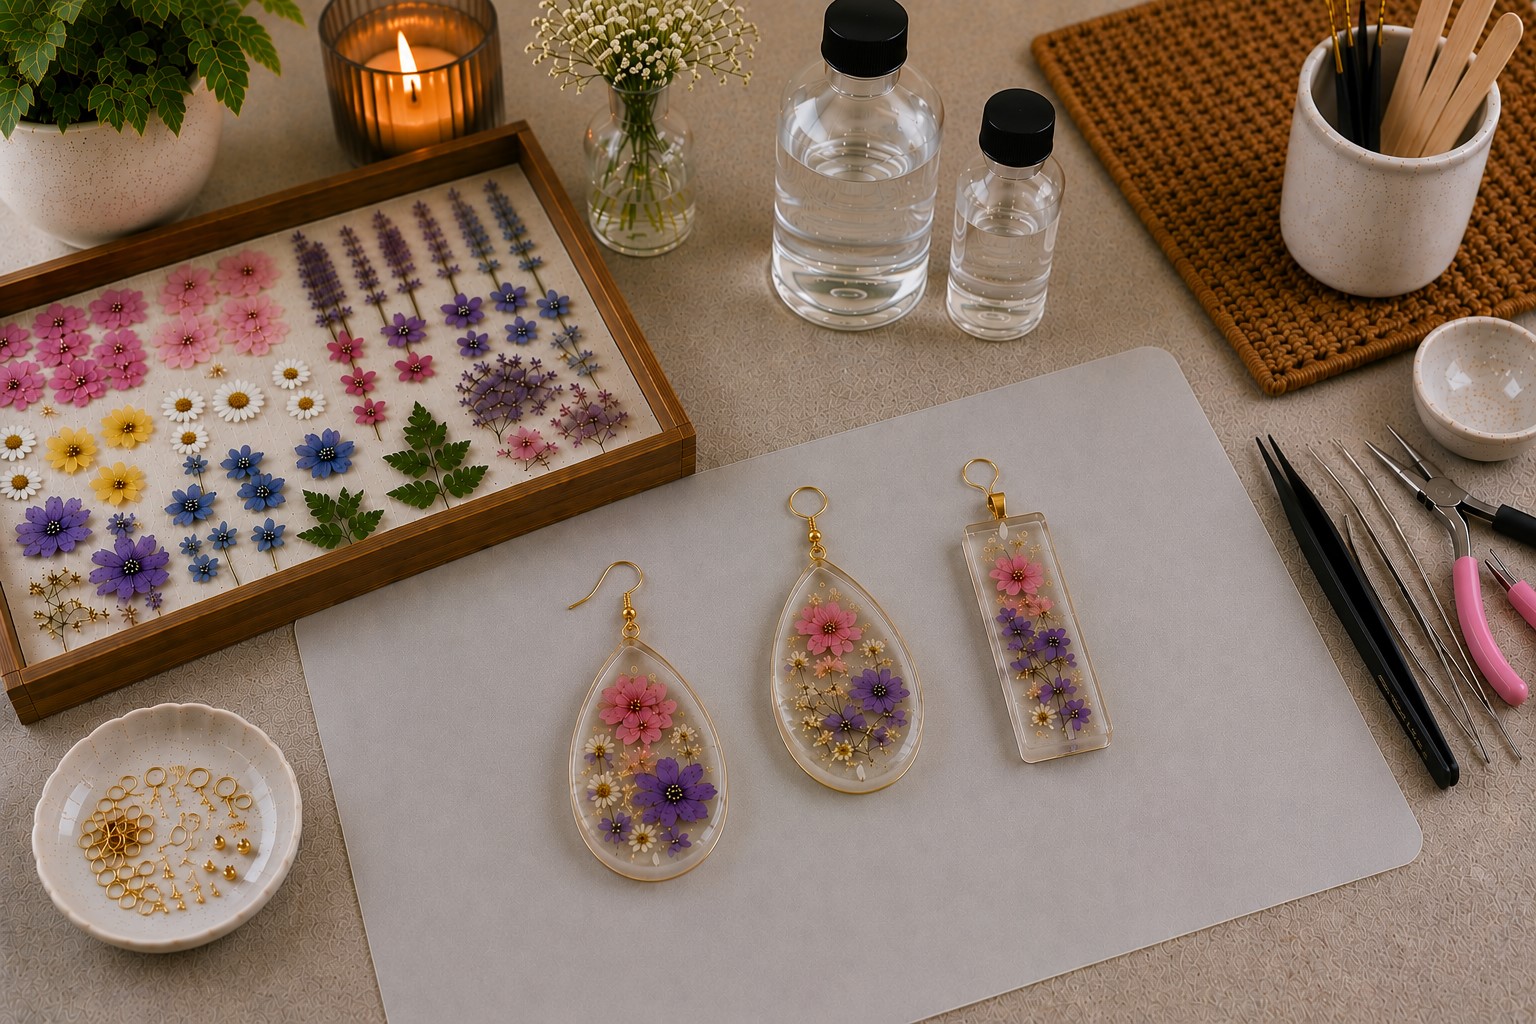
The final step brings the entire project together. Attach jump rings, necklace chains, earring hooks, or bracelet components to the resin pieces.
Check that all connections feel secure before wearing or gifting the jewelry. If you are creating multiple items, consider making matching sets for a coordinated look. Furthermore, take a moment to admire the preserved flowers inside each piece.
The finished Summer Pressed Flower Resin Jewelry captures the beauty of nature in a form that can be enjoyed long after the flowers themselves have faded.
Finishing Touches
Take a moment to inspect each piece closely before wearing or gifting it. Wipe away fingerprints and polish the surface with a soft cloth.
If desired, add small decorative charms or metallic accents for extra detail. Furthermore, consider creating matching sets that include earrings and a pendant. These small additions can make handmade jewelry feel even more special and personalized.
Styling Ideas
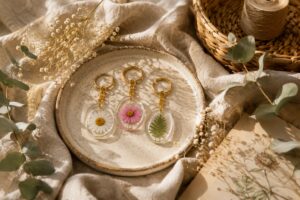
Pressed flower resin jewelry pairs beautifully with both casual and dressy outfits. A floral pendant can add a soft natural touch to a summer dress, while matching earrings create a coordinated look.
In addition, these pieces make thoughtful gifts for birthdays, anniversaries, weddings, and other special occasions. Because every flower arrangement differs slightly, each piece feels unique and meaningful. Many crafters also enjoy making seasonal collections using flowers from different times of the year.
For even more summer creativity, explore 19 Summer Painting Ideas for Beginners to Try Before September.
Common Mistakes to Avoid
One common mistake is using flowers that still contain moisture. Damp flowers can discolor over time and affect the clarity of the resin. Another issue involves mixing the resin too quickly, which often creates unwanted air bubbles.
Furthermore, avoid overfilling the molds because excess resin can spill over the edges. Taking your time and following the manufacturer’s instructions carefully will help you achieve better results and a more professional finish.
Final Thoughts
Creating Summer Pressed Flower Resin Jewelry is a wonderful way to preserve the beauty of seasonal blooms in a form you can enjoy every day. Instead of watching flowers fade away, you can transform them into lasting keepsakes that celebrate nature’s colors and delicate details. Moreover, each piece tells its own story because no two flowers are exactly alike. That uniqueness makes every creation feel personal and special.
Another reason this craft remains so popular is its versatility. You can create pendants, earrings, bracelets, keychains, and many other accessories using the same basic techniques. Furthermore, the project offers endless opportunities for creativity through different flower combinations, colors, and jewelry styles. Whether you prefer simple designs or more detailed arrangements, the possibilities are nearly endless.
You can also find family-friendly inspiration in 15 Summer Craft Ideas for Kids to Beat Boredom Without Screens.
Once you complete your first pieces, you may find yourself looking at flowers in a completely new way. Many crafters enjoy collecting blooms throughout the season and preserving them for future projects. Best of all, Summer Pressed Flower Resin Jewelry allows you to carry a small piece of nature with you wherever you go. The result is a collection of handmade accessories that combines creativity, craftsmanship, and the timeless beauty of real flowers.
