Pressed flowers are everywhere right now, and it’s not hard to see why. Somewhere between the aesthetic Pinterest boards and the growing desire to make things with your hands instead of just buying them, this craft found its audience again. But unlike a lot of trends that look great online and fall apart in real life, Pressed Flower Projects actually deliver. The results are genuinely beautiful, the process is calming, and the materials cost almost nothing to get started.
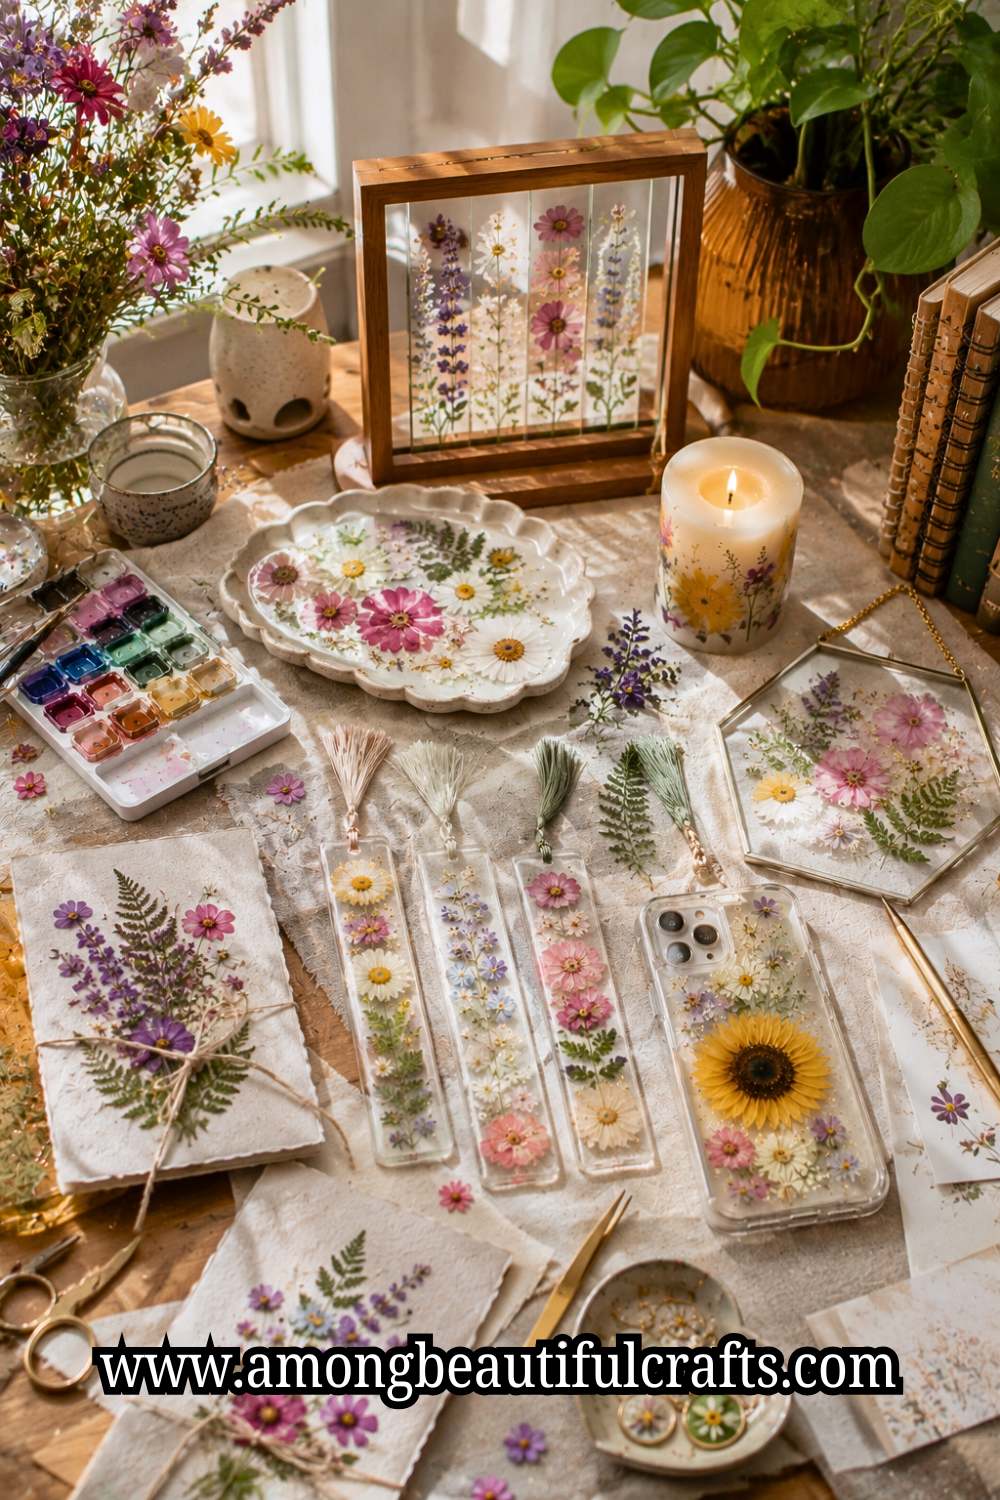
What you can make with pressed flowers might surprise you though. This isn’t about sticking a daisy between two pieces of glass and calling it a day. People are making resin bookmarks with tiny blooms suspended inside, framed art that looks like it belongs in a boutique, and greeting cards so beautiful that recipients frame them instead of throwing them away. The finished results look expensive and intentional, but the process is simple enough for kids to join in on too.
Before starting any project, learning How to Press Flowers at Home Without Them Turning Brown will help you preserve brighter colors and achieve better results.
You don’t need much to get started either. A heavy book, parchment paper, and flat flowers like pansies, daisies, or ferns are all the basics you need. From there, the projects practically guide themselves. These 19 ideas range from quick beginner makes to stunning decorative pieces that will genuinely stop people in their tracks. Pick one that excites you and start right there.
19 Stunning Pressed Flower Projects You Can Start Today
Home Décor Pressed Flower Projects
Project 01: Framed Flower Wall Art
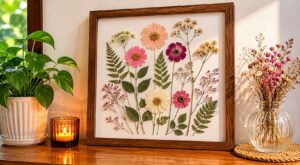
This is one of the most popular pressed flower projects around, and it is easy to see why so many people love it. Simply arrange pressed flowers on white cardstock inside a picture frame. You can create a rainbow pattern, a bouquet shape, or something completely abstract. The best part is that there are no wrong choices; every arrangement turns out beautiful in its own way. Moreover, it looks stunning hanging in any room of your home. Whether it is a bedroom, a hallway, or a living room, this project fits right in. Kids love picking the flowers and arranging them in fun designs. It keeps them busy and creative, and they feel so proud seeing their work displayed on the wall.
Creative display projects remain popular because of ideas found in 25 Easy Art Projects for Kids That Look Amazing on Pinterest, where simple materials are transformed into impressive artwork.
Project 02: Flower Shadow Box Display
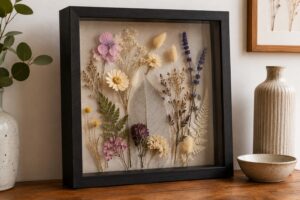
A shadow box gives your pressed flowers a three-dimensional look that a regular frame simply cannot match. First, glue your flowers onto a small canvas or thick paper, making sure each one sits flat and secure. Then place it inside a deep shadow box frame, leaving just enough space to give the arrangement that lovely raised effect. The depth is what makes this project so special and eye-catching. Furthermore, you can add labels with the flower names for a museum feel that impresses every visitor. This project is wonderful for science lovers and nature fans of all ages. It is also a great way to remember a nature walk, a garden in full bloom, or even flowers from a special occasion.
Nature-inspired keepsakes like this often appeal to families who enjoy 19 Easy Nature Crafts for Kids That Turn Outdoor Finds Into Art, where natural treasures become lasting creations.
Project 03: Pressed Flower Tray
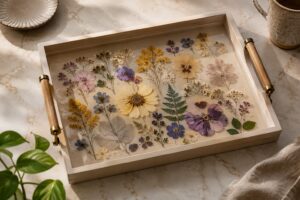
Turn a plain wooden tray into a floral masterpiece that looks like it came straight from a boutique. Arrange flowers on the tray surface in any pattern that feels right to you; symmetrical rows, a scattered wildflower look, or a full corner bouquet. Then brush a layer of Mod Podge over them, working slowly so every petal gets fully covered without shifting out of place. Make sure you get the edges too, since that is where petals tend to lift over time. Add a second coat once the first layer dries completely, and this second coat is what really gives the tray that smooth, polished finish. As a result, the flowers stay sealed and shiny forever, holding their color and shape through everyday use. This makes a beautiful gift for moms and grandparents who will actually use it and think of you every single time.
Decorative trays are especially beautiful when paired with ideas from 21 Creative Ways to Use Dried Flowers in Your Home Décor, creating coordinated floral accents throughout the home.
Project 04: Floral Candle Holders
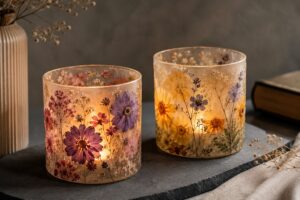
Wrap pressed flowers around a plain glass candle holder and watch something truly simple turn into something stunning. Use Mod Podge to stick each flower gently onto the glass, pressing down slowly from the center outward so no air bubbles get trapped underneath. Take your time with this step because thin petals can tear easily if you rush. Overlap some flowers slightly for a fuller, more layered look that catches the light from every angle. Then seal everything with one final coat on top, making sure the entire surface feels smooth and even before you set it aside to dry. A foam brush works better than a regular one here since it leaves fewer streaks on the glass. When candlelight shines through, the flowers glow beautifully in shades of amber, pink, and gold that you simply cannot recreate any other way.
Many crafters who enjoy working with natural materials also love 15 Beautiful Things You Can Make With Seashells, another collection of projects that turn simple finds into beautiful décor.
Stationery & Paper Pressed Flower Projects
Project 05: Handmade Greeting Cards
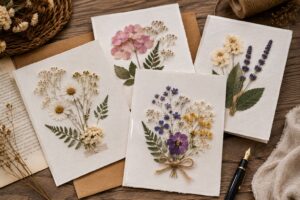
Cut a piece of cardstock in half and fold it to form a card that already looks more special than anything from a shop shelf. Choose a color that complements your flowers; cream and white work beautifully with almost every bloom, while kraft brown gives a more rustic, natural feel. Glue one or two pressed flowers to the front, keeping the design simple so the flowers remain the star of the show. A single flower slightly off-center often looks more elegant than covering the whole front. Then write a heartfelt message inside, and do not worry about perfect handwriting the slight imperfection is actually what makes it feel so genuine and warm. You can also add a small pressed leaf or two inside for a little surprise when the recipient opens it.
Paper-based handmade projects remain favorites among families who enjoy 21 Paper Plate Crafts for Kids That Are Cheap, Easy and Adorable, thanks to their accessibility and creative possibilities.
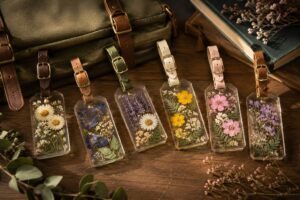
Project 06: Floral Bookmarks
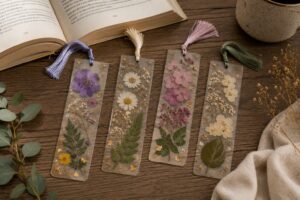
Cut a strip of cardstock into a long, thin rectangle that fits comfortably inside any book without bending the pages. Glue a pressed flower to the top section of the strip, centering it neatly so it sits right where the eye naturally lands. After that, laminate it for a durable, professional finish that protects the flower and keeps the colors looking fresh for years. The lamination also gives it a slight shine that makes the whole thing look far more polished than you would expect from such a simple project. These bookmarks are perfect for book lovers of all ages, from young readers just discovering their favorite stories to adults who always have three books going at once. They also look adorable slipped inside library books as a little surprise for the next person who checks it out.
Projects that combine creativity with practicality are one reason 29 Toilet Paper Roll Crafts for Kids That Are Surprisingly Cute continue to inspire so many makers.
Project 07: Pressed Flower Gift Wrap

Plain brown kraft paper becomes stunning wrapping paper instantly. Simply glue a few small pressed flowers across the surface in a random or intentional pattern. Then tie the gift with a ribbon for a nature-inspired finish that pulls everything together. Dried leaves and small sprigs tucked between the flowers add even more texture without any extra effort. Recipients often keep this beautiful wrapping as décor afterward, smoothing it out instead of tearing it open. Some people even frame it or pin it to a mood board. Therefore, your gift stands out before it even gets opened, which is something no store-bought wrapping paper can ever quite achieve.
Creative gift presentation often develops naturally into projects like 27 Easy Shark Paper Crafts Kids Can Make in 30 Minutes, where simple paper materials become memorable creations.
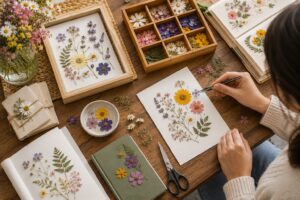
Project 08: Floral Journaling Pages
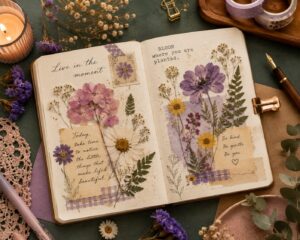
Pressed flowers make plain journal pages look magical and artistic in a way that instantly makes you want to sit down and write. Glue tiny blooms to the corners or margins of your pages, keeping them small enough that they frame the writing space without crowding it. Alternatively, press them behind vellum paper for a soft, dreamy effect that diffuses the colors into something almost watercolor-like. Writers and artists both love this technique for personal notebooks because it makes opening the journal feel like a small, lovely experience every time. Moreover, it encourages kids to write more creatively and freely because a beautiful page inspires more than a blank white one ever could. Flowers with flat, delicate petals like pansies and violas work especially well since they sit flush against the paper without creating awkward bumps.
Creative journals often become places where children sketch ideas inspired by 23 Finger Painting Ideas for Kids That Spark Big Creativity, encouraging even more artistic exploration.
Wearable & Accessory Ideas
Project 09: Resin Pressed Flower Jewelry

This is one of the most stunning pressed flower projects you can make. Place a tiny pressed flower inside a silicone resin mold, choosing blooms with flat petals and vibrant colors that will show up beautifully through the clear resin. Pour clear resin over it and let it cure for 24 hours in a dust-free space so nothing settles on the surface while it sets. Once hardened, pop it out and add a ring base or necklace chain to turn it into something you can actually wear every day. As a result, you get gorgeous, one-of-a-kind jewelry that no store can replicate. Each piece is completely unique, which makes them just as wonderful to give as they are to keep for yourself.
If resin is new to you, learning How to Make Your First Resin Art Piece Without Making a Mess can make the process much less intimidating.
Project 10: Flower-Pressed Hair Pins
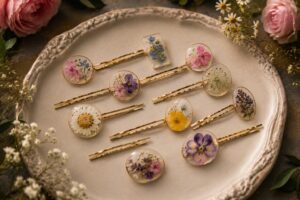
Grab some simple bobby pins or barrettes from a craft store, and look for the flat-topped ones since they give the glue a better surface to grip. Glue tiny pressed flowers onto each one with strong craft glue, pressing firmly and letting each flower dry completely before moving on to the next. Then seal them with a thin layer of clear nail polish on top to protect the petals from moisture and everyday wear. These hair accessories look absolutely adorable for school or parties and cost a fraction of what similar ones sell for in boutiques. Additionally, they make sweet little gifts for best friends, especially when you package a few together in a small clear bag tied with ribbon.
Project 11: Pressed Flower Bookbag Tags
Make a personalized luggage tag using laminated pressed flowers that instantly stand out on any baggage carousel. Place flowers on a piece of cardstock and laminate it securely, trimming the edges neatly for a clean, professional finish. Then punch a hole at the top and add a loop of ribbon in a color that matches your travel bag or personal style. This tag makes your bag easy to spot at school or airports without any confusion about whose bag it is. Furthermore, each tag is completely unique to whoever made it, which means no two will ever look exactly the same.
Gifts & Keepsake Projects
Handmade gifts always feel special and full of love. Therefore, pressed flower keepsakes are perfect for every occasion. From birthdays to baby showers, these ideas will wow everyone.
Project 12: Wedding Flower Memory Frame

Brides often save flowers from their special day as mementos that capture the magic of that moment forever. Press a few blooms from the wedding bouquet after the ceremony, working quickly since fresh flowers press best within the first few hours. Then arrange them beautifully inside a frame with the wedding date written in elegant script below the arrangement. This becomes a treasured keepsake that lasts for many decades, often becoming something couples pass down through generations. Similarly, guests can press flowers from centerpieces as souvenirs to remember the celebration long after the day has passed.
Project 13: Baby’s First Flower Keepsake

Press flowers from a baby shower or a newborn’s first garden visit, choosing soft pastel blooms that complement a nursery’s color palette beautifully. Arrange them in a small frame with the baby’s birth date written below in gentle, delicate lettering that matches the sweetness of the moment. This gift is incredibly meaningful and completely personal in a way that no toy or clothing item could ever replicate. Parents love displaying these little floral memories in the nursery where they become part of the room’s story from day one. In fact, many families keep them for generations, pulling them out years later to show the child exactly what was blooming the day they came into the world.
Keepsake projects that preserve meaningful memories share a similar appeal with 27 Animal Clay Crafts for Kids That Are Cute Beyond Words, where handmade creations often become treasured mementos.
Project 14: Personalized Flower Mugs
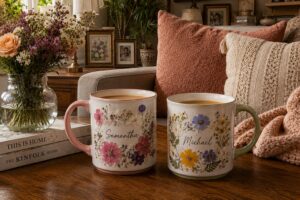
Arrange pressed flowers on a plain white ceramic mug, spacing them evenly around the surface so the design looks intentional from every angle. Seal everything carefully with dishwasher-safe Mod Podge, working in smooth strokes to avoid lifting any delicate petals mid-application. Let it dry fully before adding a second protective coat that locks everything in place for long-term everyday use. These mugs make wonderful birthday or Mother’s Day gifts that feel far more thoughtful than anything wrapped in a store bag. Besides, making them together with kids is super fun and easy, and little ones absolutely beam with pride watching someone drink from a mug they decorated themselves.
Creative family crafting sessions often begin with approachable activities like 25 Shark Crafts and Activities Every Little Shark Fan Will Love, which encourage children to experiment with different materials and techniques.
Fun Pressed Flower Projects for Kids
Project 15: Nature Collage Art
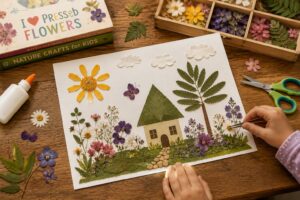
Kids can create wild, colorful art using pressed flowers and leaves that looks different and exciting every single time. Give them a large piece of paper and plenty of glue to work with, and throw in some dried grass, tiny twigs, and seed pods to make the collage even more textured and interesting. Then let them arrange everything freely without any rules at all, resisting the urge to guide or correct their choices. Each collage tells a different, wonderfully personal story that only that child could have created. Consequently, this activity builds creativity and self-expression in children while quietly teaching them to appreciate the small, beautiful things nature offers every day.
Project 16: Flower Suncatchers
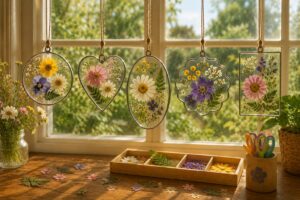
Sandwich pressed flowers between two pieces of clear contact paper, smoothing out any air bubbles carefully so the finished piece stays perfectly clear and flat. Cut the contact paper into shapes like stars, hearts, or circles using sharp scissors or a craft punch for cleaner, more precise edges. Punch a small hole at the top and thread a piece of string through it, using fishing line for an almost invisible hang that makes the shape appear to float in midair. Hang these near a sunny window for a beautiful rainbow effect that shifts and changes throughout the day as the light moves. The light shines through the petals in the most magical way, casting soft colored shadows on walls and floors that kids and adults alike cannot stop staring at.
Project 17: Pressed Flower Science Notebooks
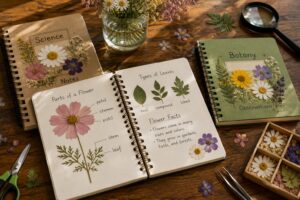
This project is perfect for curious little nature scientists who love exploring the outdoors and asking questions about everything they find. Kids pick flowers from the yard and press one of each kind, turning every garden walk into a mini research expedition full of discovery. Then they glue each flower into a notebook with its name below, and even simple labels written in a child’s own handwriting make the whole thing feel wonderfully official. Over time, they build their very own flower field guide that grows more impressive with every season and every new bloom they discover. Moreover, this makes learning about plants exciting and hands-on in a way that no textbook or worksheet ever quite manages to achieve.
Advanced & Unique Ideas
Project 18: Flower-Embedded Paper Making
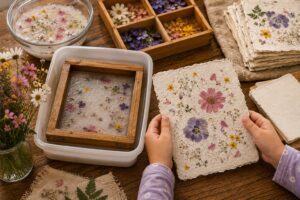
You can make your own paper with flowers pressed right inside it, and the whole process feels like pure magic from start to finish. Blend scrap paper with water in a blender to form a pulp mixture, aiming for a smooth, oatmeal-like consistency that spreads easily without clumping. Pour it onto a mesh screen and spread it into a flat, even layer, working quickly before the pulp starts settling unevenly. Then press tiny flowers gently onto the wet surface right away, nudging each one into place with a fingertip so they bond directly into the paper as it dries. Once it dries fully, you have one-of-a-kind handmade floral paper that is beautiful enough to write on, frame, or wrap a very special gift with.
Project 19: Pressed Flower Phone Cases
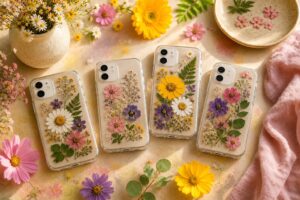
Get a clear, hard plastic phone case from any craft or phone store, looking specifically for ones designed with a small gap between the back panel and the insert layer. Arrange pressed flowers inside the case behind a clear insert sheet, taking your time to get the placement just right since every detail shows through the transparent backing. This keeps the flowers protected and your phone stylish at the same time, turning something you carry everywhere into a tiny piece of wearable art. Furthermore, you can change the flowers with each new season easily without buying a brand new case every time. Spring pansies, summer daisies, autumn leaves; the options are truly endless and swapping them out takes less than a minute.
Final Thoughts
Good results come from a few smart habits. First, always use freshly picked flowers for the brightest colors. Additionally, thinner petals press much more easily than thick ones. For example, roses are beautiful but their petals can be tricky at first. Instead, start with pansies, violets, or Queen Anne’s lace as a beginner.
Store finished pressed flowers in a dry, dark location. Sunlight fades pressed petals over time, so shade is your best friend. As a result, your flowers will keep their color for years and years. These pressed flower projects prove that nature is the best art supply. Every single one is beginner-friendly, affordable, and truly rewarding. You do not need a big budget or special skills to get started. Simply grab some flowers, a heavy book, and your imagination. Then let your creativity bloom in the most beautiful way possible.
The same combination of patience, creativity, and hands-on making is one reason 31 Shark Clay Crafts Kids Will Love Making Again and Again continues to inspire young creators who enjoy turning simple materials into memorable projects.
Above all, remember that every pressed flower project you make is unique. No two flowers press exactly the same way; and that is the magic. So go outside, pick some petals, and start creating something wonderful. Your garden is waiting, and your next masterpiece is just a flower away.