Real sunflowers are glorious for about two weeks before they droop, drop their petals, and end up in the compost bin. Paper sunflowers have no such expiry date. They sit in a vase or hang on a wall looking full and golden for as long as you want them there; no water, no wilting, no weekly replacement trips to the grocery store. Once you learn how to make summer paper sunflowers, you will wonder why you ever relied on the real thing for home décor.
Paper flowers have had a serious moment in the craft world recently, and sunflowers are among the most rewarding to make. Their bold yellow petals and dark textured centers are immediately recognizable, which means even a beginner’s first attempt reads as a sunflower from across the room. Additionally, the layered construction process is deeply satisfying; each petal you add brings the flower noticeably closer to finished, which keeps your motivation high from start to end.
Many crafters who enjoy seasonal floral projects also love 17 Summer Paper Craft Ideas Kids Can Make During the Holidays, making paper sunflowers a natural addition to any summer crafting session.
This guide walks you through making full, beautiful paper sunflowers using supplies you likely already own. The method here produces flowers sturdy enough to display in a vase, wire into a wreath, or scatter across a summer tablescape. No prior paper flower experience is needed. Just bring patience, a willingness to fold, and genuine excitement for making something that lasts all summer long.
Why Paper Sunflowers Work So Well
A sunflower’s shape is naturally forgiving. The petals do not need to be perfectly identical to look convincing. Real sunflowers have slight variations in petal width and curve, so your handmade version actually benefits from small imperfections. Furthermore, the large dark center of a sunflower hides any gaps or uneven petal placement, which makes this one of the most beginner-friendly paper flower designs available.
The layered petal structure also means you build the flower gradually. Unlike some paper flowers that require precise origami folds or intricate shaping, sunflowers are assembled piece by piece. Each step is simple on its own. Together, those simple steps produce something that looks complex and impressive.
Projects that combine simple techniques into impressive results are one reason 25 Easy Art Projects for Kids That Look Amazing on Pinterest continue to be popular with beginner crafters.
Supplies You Will Need
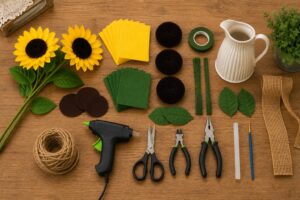
Gather everything before starting. Having supplies within reach means you never have to stop mid-petal with wet glue on your fingers.
For the petals:
- Yellow and golden yellow cardstock (medium weight works best)
- Scissors or a craft knife and cutting mat
- A bone folder or butter knife for shaping
- A pencil for tracing petal templates
Materials for the center:
- Brown or dark chocolate cardstock
- Black cardstock
- A round object for tracing (a jar lid or compass works perfectly)
- Brown and black tissue paper (optional, for a textured center)
For the base and stem:
- Green cardstock or floral tape
- Floral wire or wooden skewers (for stems)
- A hot glue gun and glue sticks
Optional extras:
- Yellow crepe paper (for frillier, more dimensional petals)
- Green cardstock for leaves
- A vase or mason jar for display
How to Make Paper Sunflowers That Look Beautiful All Summer Long
Step One: Make Your Petal Templates

Sunflowers use two sizes of petals; a larger outer ring and a slightly smaller inner ring. Having consistent templates makes cutting faster and keeps your finished flower looking balanced.
Draw a petal shape on a piece of scrap cardstock. A sunflower petal is roughly teardrop-shaped with a slightly pointed tip and a narrow base. Make the large petal template about three and a half inches long and one inch wide at its widest point. Make the small petal template about two and a half inches long and three quarters of an inch wide.
Cut both templates out carefully. These will be your tracing guides for every petal you cut throughout the project. Precise templates mean consistent petals, and consistent petals mean a rounder, more balanced finished flower.
The same attention to consistency and repetition helps when creating 29 Toilet Paper Roll Crafts for Kids That Are Surprisingly Cute, where repeated shapes often come together to form the finished design.
Step Two: Cut Your Petals
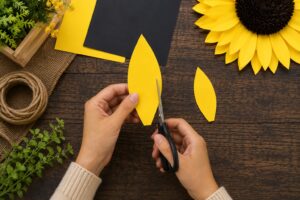
Trace and cut 14 large petals and 10 small petals per flower. Use two slightly different shades of yellow if you have them; a bright yellow for the large outer petals and a golden amber shade for the smaller inner petals. The color variation mimics how real sunflower petals deepen in color toward the center of the bloom.
Stack two or three sheets of cardstock together when cutting. This lets you cut multiple identical petals in a single pass. Keep your scissors moving in smooth continuous strokes rather than short choppy cuts. Smooth cuts produce cleaner petal edges that look more natural once assembled.
Once all petals are cut, set them in two separate piles sorted by size. This keeps the assembly process organized and prevents you from reaching for the wrong petal size mid-build.
Many crafters who enjoy working with paper also have fun making 21 Paper Plate Crafts for Kids That Are Cheap, Easy and Adorable, since both projects transform simple materials into eye-catching creations.
Step Three: Shape the Petals
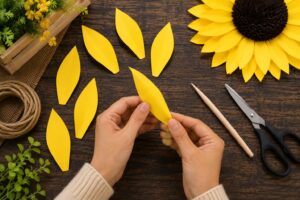
Flat petals produce a flat flower. Shaped petals produce a flower with dimension, movement, and life. This step makes the difference between a paper sunflower that looks handmade and one that looks genuinely beautiful.
Take one petal and lay it flat on your work surface. Press the bone folder or the back of a butter knife firmly along the center of the petal from base to tip. Apply enough pressure to create a visible center ridge. This central crease makes the petal curve gently inward, mimicking the cupped shape of a real sunflower petal.
Next, curl the tip of each petal slightly backward over the edge of a pencil. Hold the tip against the pencil and gently roll the pencil away from you. Release and the tip will hold a soft natural curl. Repeat this shaping process on every single petal before assembly. Shaped petals are the single most important factor in how professional your finished flower looks.
The patience required during this stage is similar to what makes 19 Summer Painting Ideas for Beginners to Try Before September so rewarding; small details often create the biggest visual impact.
Step Four: Make the Flower Center
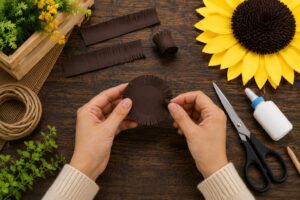
The center of a sunflower is what makes it instantly recognizable. A well-made center elevates the whole flower considerably.
Basic center method:
Cut two circles from dark brown cardstock; one about two and a half inches in diameter and one about two inches in diameter. Cut a circle from black cardstock about one and a half inches in diameter. Stack them from largest to smallest and glue them together in the center.
Textured center method (recommended):
Cut your cardstock circles as above. Then cut small squares of dark brown and black tissue paper. Crumple each square into a tiny ball. Glue the crumpled tissue balls across the surface of the stacked circles until the top is completely covered in texture. This creates the bumpy, seed-like texture of a real sunflower center and makes an enormous visual difference.
Allow the center to dry completely before attaching petals. Creative texture techniques like these are one reason 25 Shark Crafts and Activities Every Little Shark Fan Will Love remain such a favorite with children who enjoy hands-on crafting.
Step Five: Attach the Outer Petal Ring
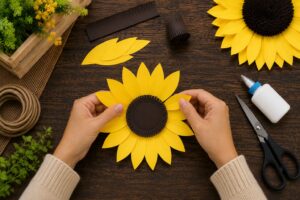
Apply a small dab of hot glue to the narrow base of a large petal. Press it flat against the underside edge of the flower center. Hold firmly for ten seconds until the bond sets. Attach the next large petal beside the first, with the bases slightly overlapping.
Work your way around the full circumference of the center, spacing petals as evenly as possible. For 14 large petals around a two-and-a-half-inch center, the petals will sit close together with slight overlapping. This is exactly right; sunflower petals are naturally packed tightly at the base.
Once all large petals are attached, look at the flower from above. Adjust any petals that point in an unexpected direction by gently bending the base while the glue is still slightly warm. Step back and check that the overall silhouette looks round and full before moving on.
Arranging petals evenly around a central focal point uses many of the same design principles found in 15 Summer Craft Ideas for Kids to Beat Boredom Without Screens, where simple materials often come together to create surprisingly polished results.
Step Six: Attach the Inner Petal Ring
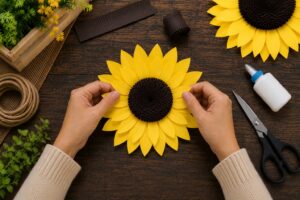
The inner ring of smaller petals fills the gap between the outer petals and the center, creating the layered depth that makes paper sunflowers look full and three-dimensional.
Apply hot glue to the base of each small petal and press it between two of the large outer petals, angled slightly upward toward the center. The small petals should peek out above the large petals rather than sitting at the same level. This upward angle creates dimension and makes the flower look like it is opening toward you.
After attaching all small petals, press the textured center firmly onto the middle of the flower over all the petal bases. Apply a generous ring of hot glue to the underside of the center before pressing. Hold it down firmly for thirty seconds. The center should completely cover all the raw petal bases beneath it.
Layered floral designs like this often inspire crafters to try How to Make Beautiful Summer Pressed Flower Resin Jewelry, another project that highlights the beauty of flowers in a completely different medium.
Step Seven: Add a Stem and Leaves
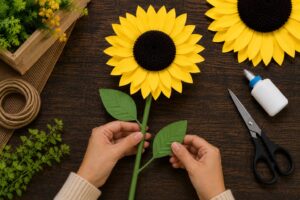
For a vase-ready sunflower, a sturdy stem is essential. Wrap a wooden skewer or length of floral wire tightly with green floral tape. Start at the top and spiral the tape downward in overlapping layers. The tape clings to itself without glue and produces a smooth, natural-looking stem.
Apply a generous amount of hot glue to the top of the wrapped stem. Press it firmly against the back of the flower center and hold it straight and steady for a full minute until the glue sets hard. Set the flower down carefully and avoid touching the stem joint for at least five more minutes.
Cut two leaf shapes from green cardstock. Score a center vein down each leaf with a bone folder. Curl the leaf edges slightly for a natural look. Apply hot glue to the base of each leaf and press them onto the stem at different heights, about four to six inches below the flower head. Hold each leaf in place until the glue sets.
Nature-inspired details such as leaves, stems, and floral shapes are also celebrated in 19 Easy Nature Crafts for Kids That Turn Outdoor Finds Into Art, where natural forms become part of the creative process.
Step Eight: Style and Display Your Sunflowers
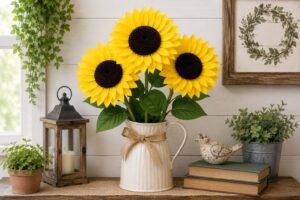
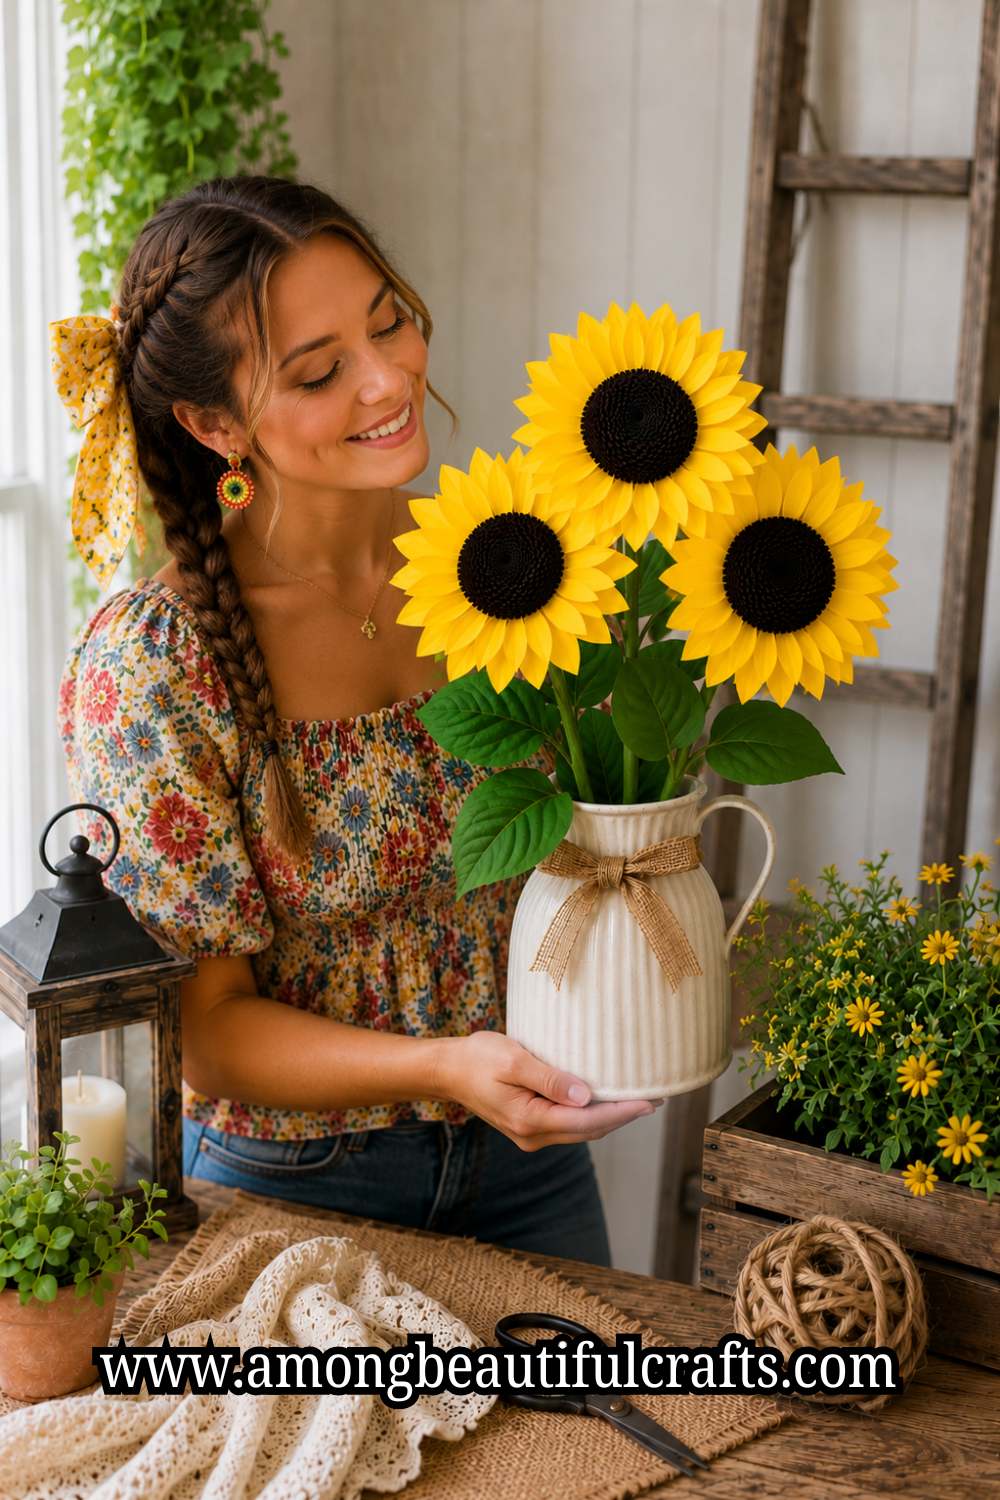
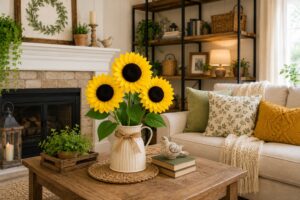
One paper sunflower is lovely. A cluster of three to five is genuinely stunning. Make flowers in slightly different sizes; vary the number of petals or the diameter of the center; for a more natural, garden-like grouping.
Arrange your finished flowers in a ceramic vase or a mason jar filled with decorative stones or sand to hold the stems steady. Mix in stems of green paper leaves cut in simple elongated shapes. Tuck in a few smaller flowers made from yellow tissue paper for softness and contrast.
Alternatively, remove the stem entirely and hot glue the flower head flat onto a wreath frame. Cluster several sunflowers together with greenery and smaller accent flowers for a summer wreath that lasts the entire season. Paper sunflowers also make beautiful gift toppers, hair accessories pinned to a clip, or decorative accents on a handmade card.
Home displays featuring handcrafted flowers pair beautifully with ideas from 15 Summer Resin Craft Ideas That Make Beautiful Home Décor, especially when you’re decorating for the season with handmade pieces.
Tips for Better Paper Sunflowers Every Time
- Use medium-weight cardstock only. Paper that is too thin tears during shaping. Paper that is too thick resists curling and creasing. Medium-weight cardstock is the sweet spot for petals that shape easily and hold their form permanently. Understanding how different materials behave is something many crafters discover while making 27 Animal Clay Crafts for Kids That Are Cute Beyond Words, where choosing the right material can make a significant difference in the final result.
- Shape every single petal. Skipping the shaping step is the most common beginner shortcut and the most visible one. Flat petals flatten the whole flower. Shaped petals take only seconds each but transform the finished result completely.
- Work with a hot glue gun, not a glue stick. Glue sticks do not bond cardstock firmly enough for a structured flower that will be handled and displayed. Hot glue sets fast, holds strong, and stays flexible enough that petals do not snap off under light pressure.
- Make multiples. Your second sunflower will be noticeably better than your first. Your fifth will surprise you. The petal shaping becomes instinctive, the petal placement gets faster, and the overall proportions sharpen with each flower you make.
Final Thoughts
Paper sunflowers are one of those crafts that genuinely overdeliver on the effort put in. The supplies are modest, the steps are straightforward, and the result sits in your home looking like something you spent considerably more time and money on. There is a specific kind of satisfaction in placing a finished flower in a vase and watching it hold its shape, its color, and its cheerful presence day after day without any maintenance at all.
Many crafters eventually pair their paper blooms with ideas from 21 Creative Ways to Use Dried Flowers in Your Home Décor, creating seasonal displays that combine different textures, colors, and handmade elements throughout the home.
What makes these flowers worth coming back to again and again is how much room they leave for creativity. Once you have the basic method, everything becomes a variable; the shade of yellow, the size of the bloom, the texture of the center, the way the petals are arranged. No two flowers you make will ever be identical, and that variety is what keeps a vase of paper sunflowers feeling alive and interesting even though every petal is cut from a sheet of cardstock. Make a few this summer and discover what version of this flower belongs entirely to you.