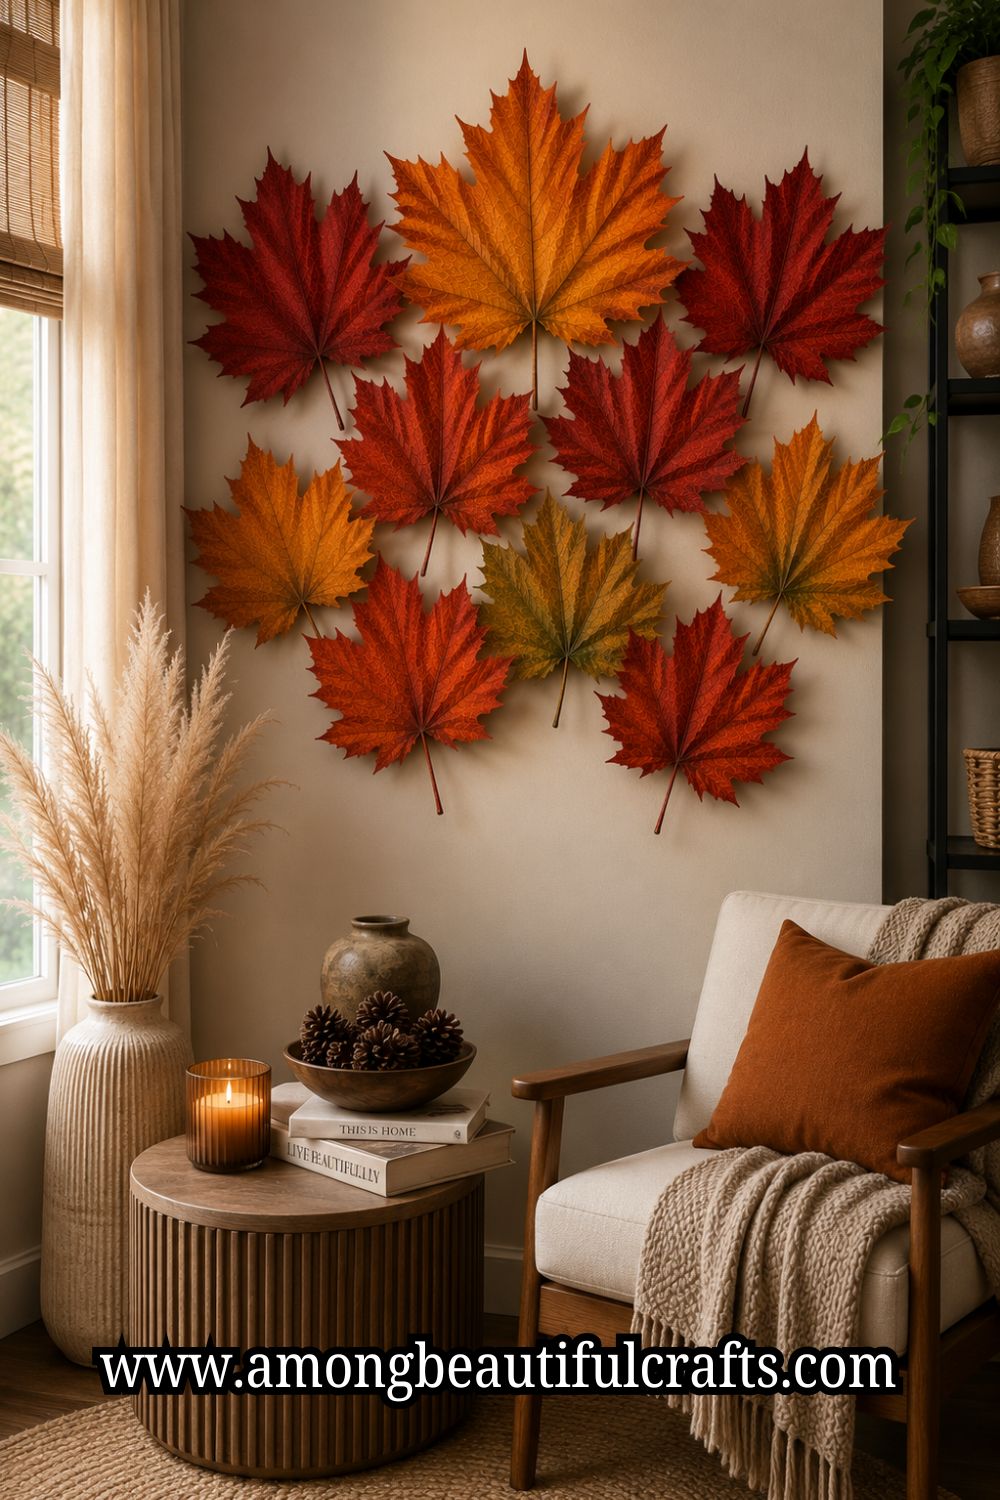
How to Make Giant Paper Maple Leaves for Stunning Fall Décor

Every fall, stores fill their shelves with the same pumpkins, wreaths, and garlands. They look nice, but they rarely feel personal. I wanted something that covered a large space, cost very little, and made people stop for a second look.

That’s when I started experimenting with oversized paper maple leaves. I had no special tools or fancy paper.

I simply gathered a few basic supplies and kept adjusting my design until it looked right. Before long, one leaf turned into a whole collection, and my plain wall became the highlight of the season.

If you’ve been searching for a guide on How to Make Giant Paper Maple Leaves, you’re about to see that impressive fall décor can come from the simplest materials.

Decorating with giant paper maple leaves changes the way a room feels without asking you to replace everything else.

A few oversized leaves can make an empty wall look complete, turn a plain corner into a cozy fall display, or give your mantel a fresh seasonal look.

Unlike fresh foliage, these leaves stay beautiful all season, so you can enjoy your hard work for weeks.

Even better, you can match the colors, sizes, and textures to your own style instead of settling for whatever you find in stores.
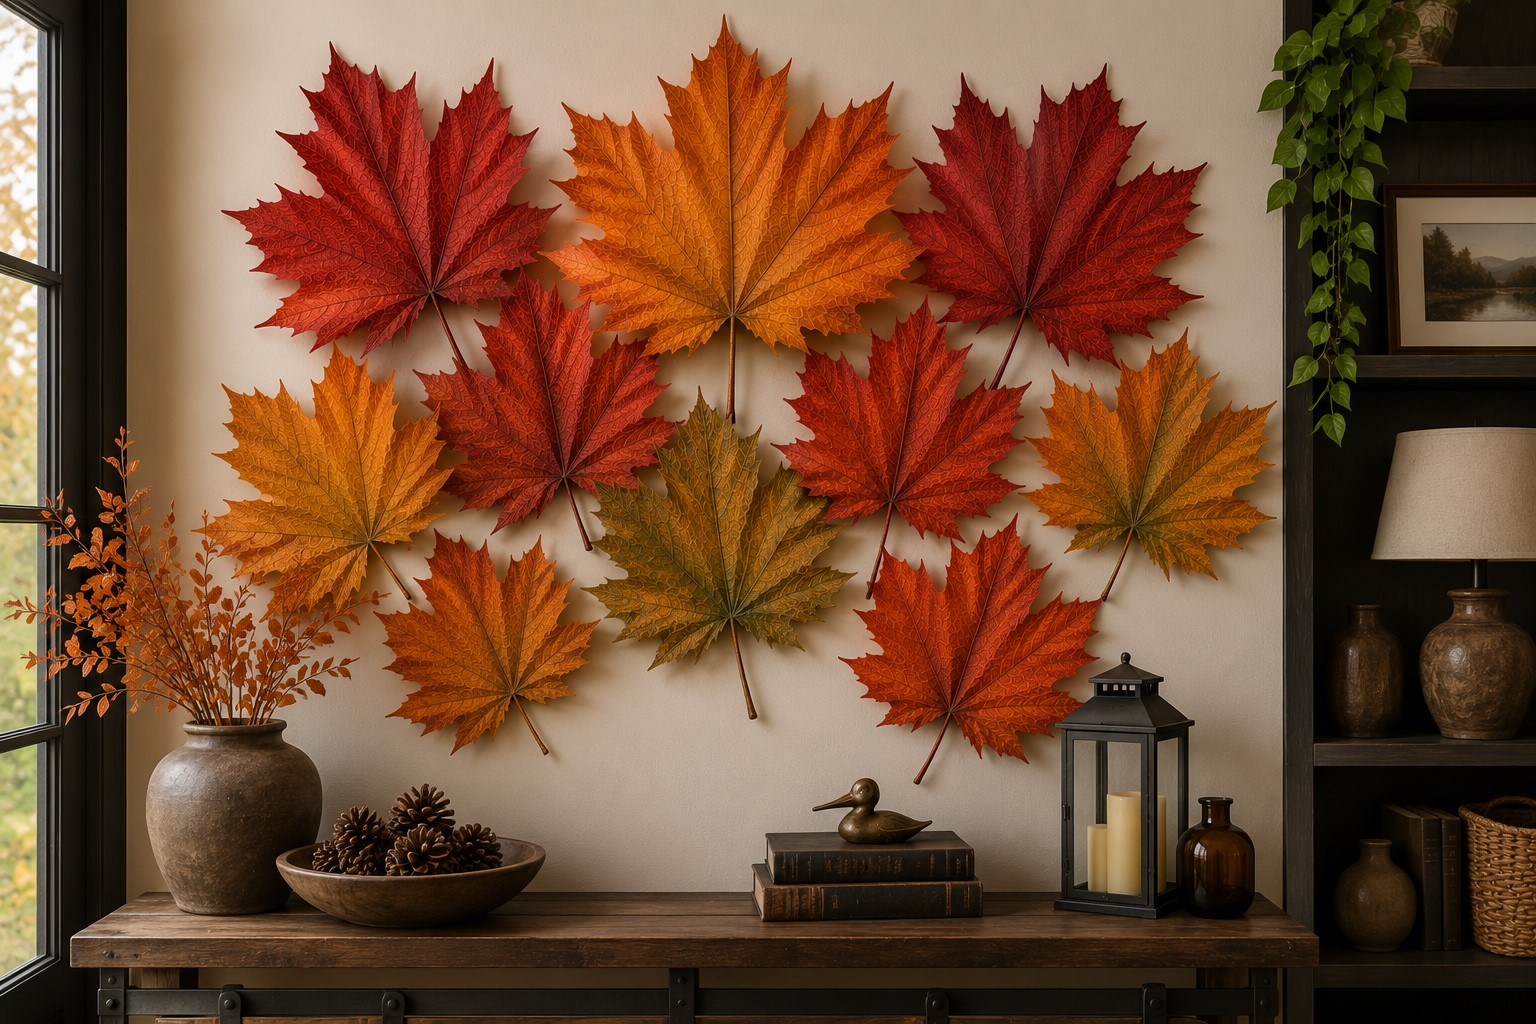
I’ll walk you through the entire process one step at a time, including the little details that make the biggest difference.

You’ll learn how to create realistic leaf shapes, build strong oversized pieces that don’t flop over, and add simple finishing touches that make people look twice.

By the end, you’ll have beautiful handmade decorations that feel unique, look expensive, and become part of your fall decorating tradition year after year.

Supplies You’ll Need

Gather your supplies before you begin. Having everything ready makes the project smoother and helps you focus on creating each leaf.

  • Large sheets of cardstock, kraft paper, or heavyweight construction paper
  • Pencil
  • Eraser
  • Large maple leaf template or plain paper for drawing one
  • Sharp scissors
  • Craft knife (optional)
  • Cutting mat
  • Ruler
  • Hot glue gun and glue sticks
  • Double-sided tape
  • Bone folder or the back of a butter knife
  • Acrylic paint in fall colors (optional)
  • Paintbrushes
  • Soft sponge
  • Chalk pastels or colored pencils
  • Floral wire (optional)
  • Floral tape
  • Twine, fishing line, or removable adhesive hooks

Pick the Best Paper

Heavyweight cardstock or kraft paper works best because it keeps its shape after folding. White cardstock is perfect if you want to paint your own fall colors.

Kraft paper creates a warm rustic look, while colored cardstock lets you skip most of the painting.

Choose Your Leaf Size

There isn’t a perfect size, so make your leaves fit your decorating space. Smaller leaves work well for wreaths and table displays, while oversized ones create beautiful wall art and photo backdrops.

How to Make Giant Paper Maple Leaves for Stunning Fall Décor

Step 1: Create or Print Your Maple Leaf Template
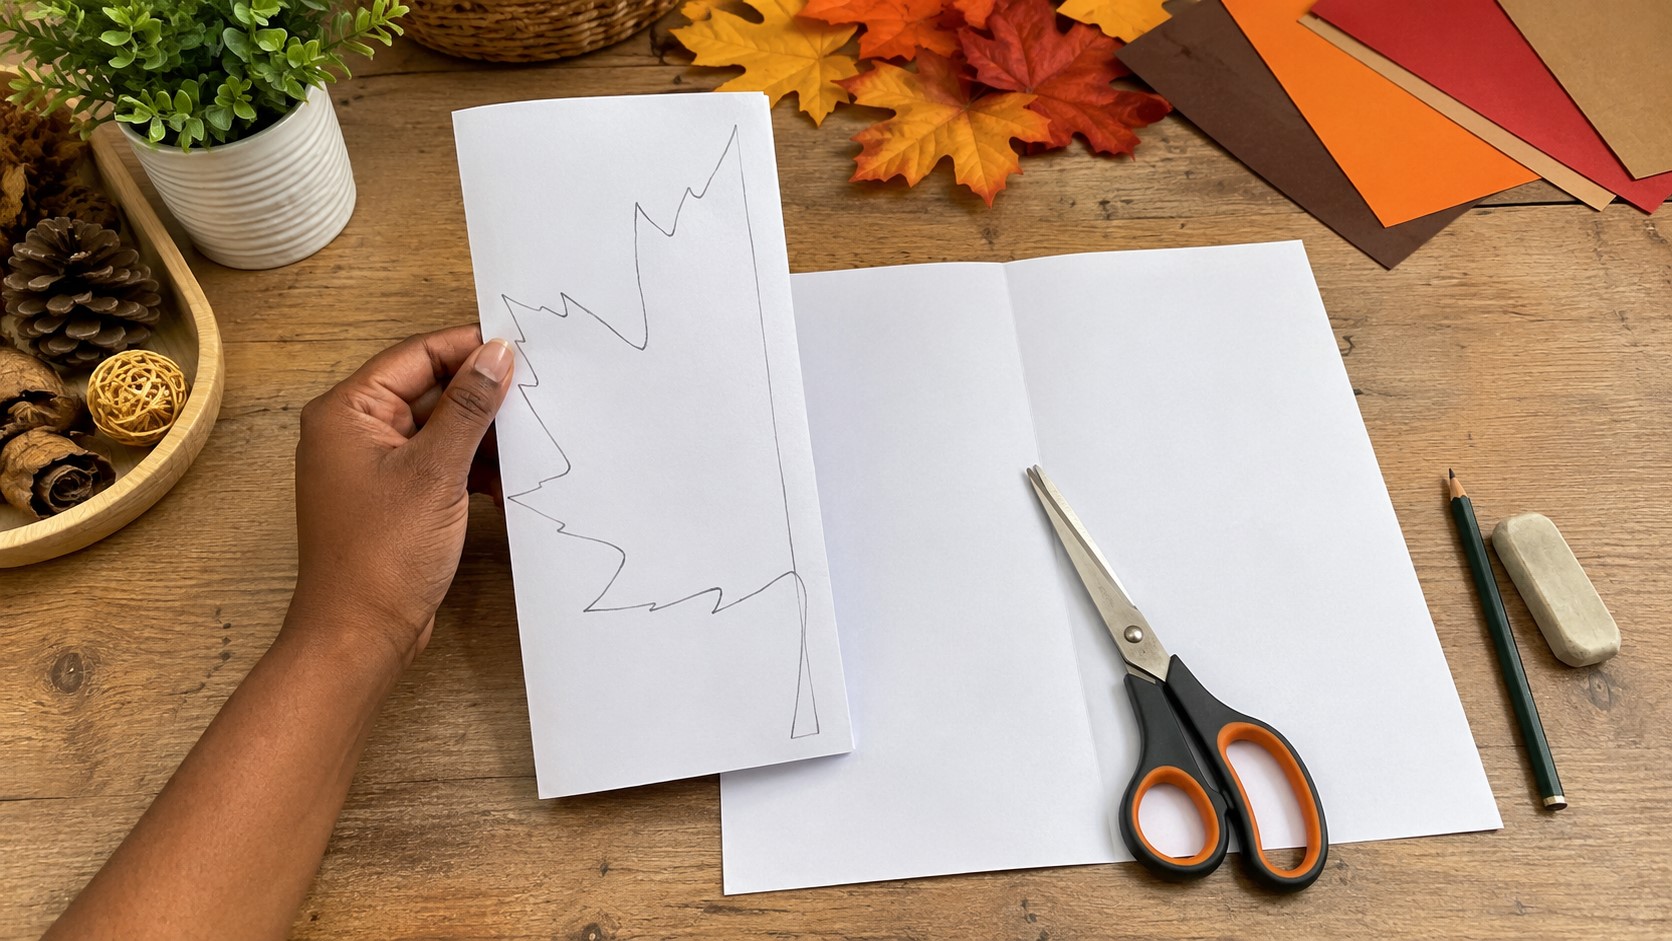
Start by making a template for your maple leaf. You can print one online or draw your own if you enjoy sketching. If you’re drawing it yourself, fold a large sheet of paper in half before you begin.

Sketch one half of the leaf along the fold, then cut around the outline while the paper is still folded. When you open it, you’ll have a balanced maple leaf shape.

Don’t worry if it isn’t perfectly identical on both sides because real maple leaves naturally have small differences.

Before moving on, hold the template against the space where you plan to decorate. This quick check helps you see if the size feels right.

If the leaf looks too small, enlarge the template now instead of after cutting your craft paper. Spending a few extra minutes here saves paper and gives you a much more dramatic finished display.

Once you’re happy with the shape and size, smooth out any rough edges with your scissors so every leaf you trace starts with a clean outline.

Step 2: Trace the Template onto Your Paper
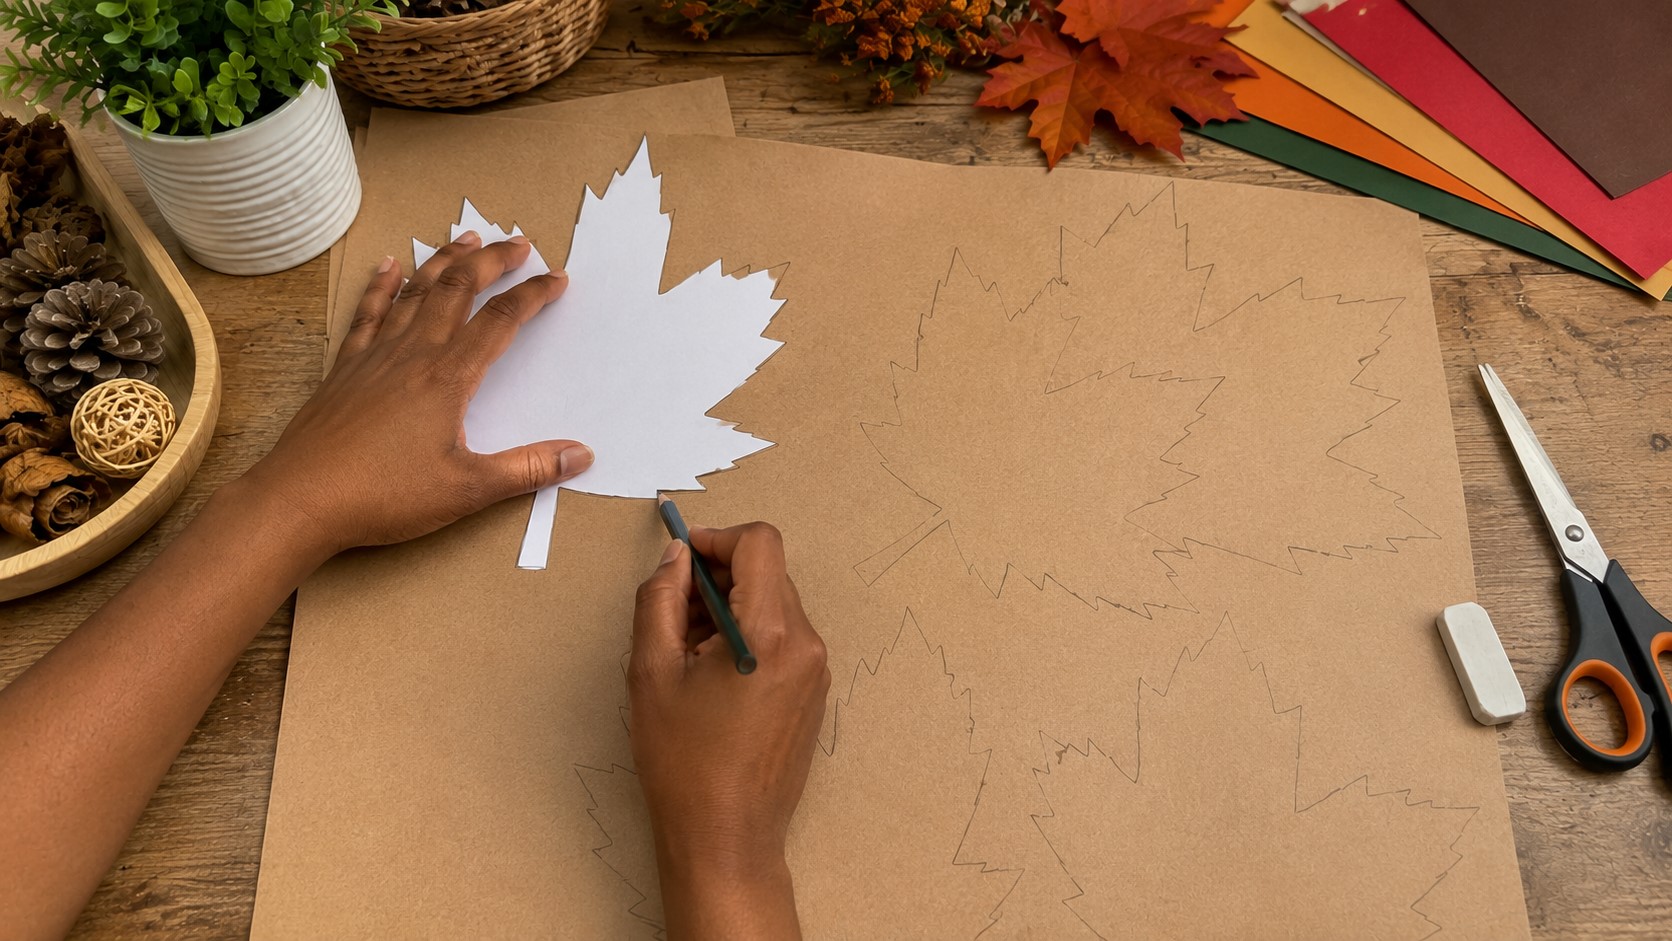
Place your template on the back of the cardstock or kraft paper so any pencil marks stay hidden. Hold it firmly with one hand and lightly trace around the edges with a sharp pencil.

Work slowly around each point instead of rushing. Those pointed tips are what give a maple leaf its distinctive look, so keeping them neat will make a big difference later.

If you’re making several leaves, arrange the template across the paper before tracing them all. Turn the template in different directions to fit more shapes on each sheet and reduce waste.

After tracing, take a moment to check every outline. Make sure the lines connect properly and each point looks complete.

Fixing a small mistake now is much easier than trying to repair a leaf after you’ve already cut it out.
Step 3: Cut Out Each Maple Leaf

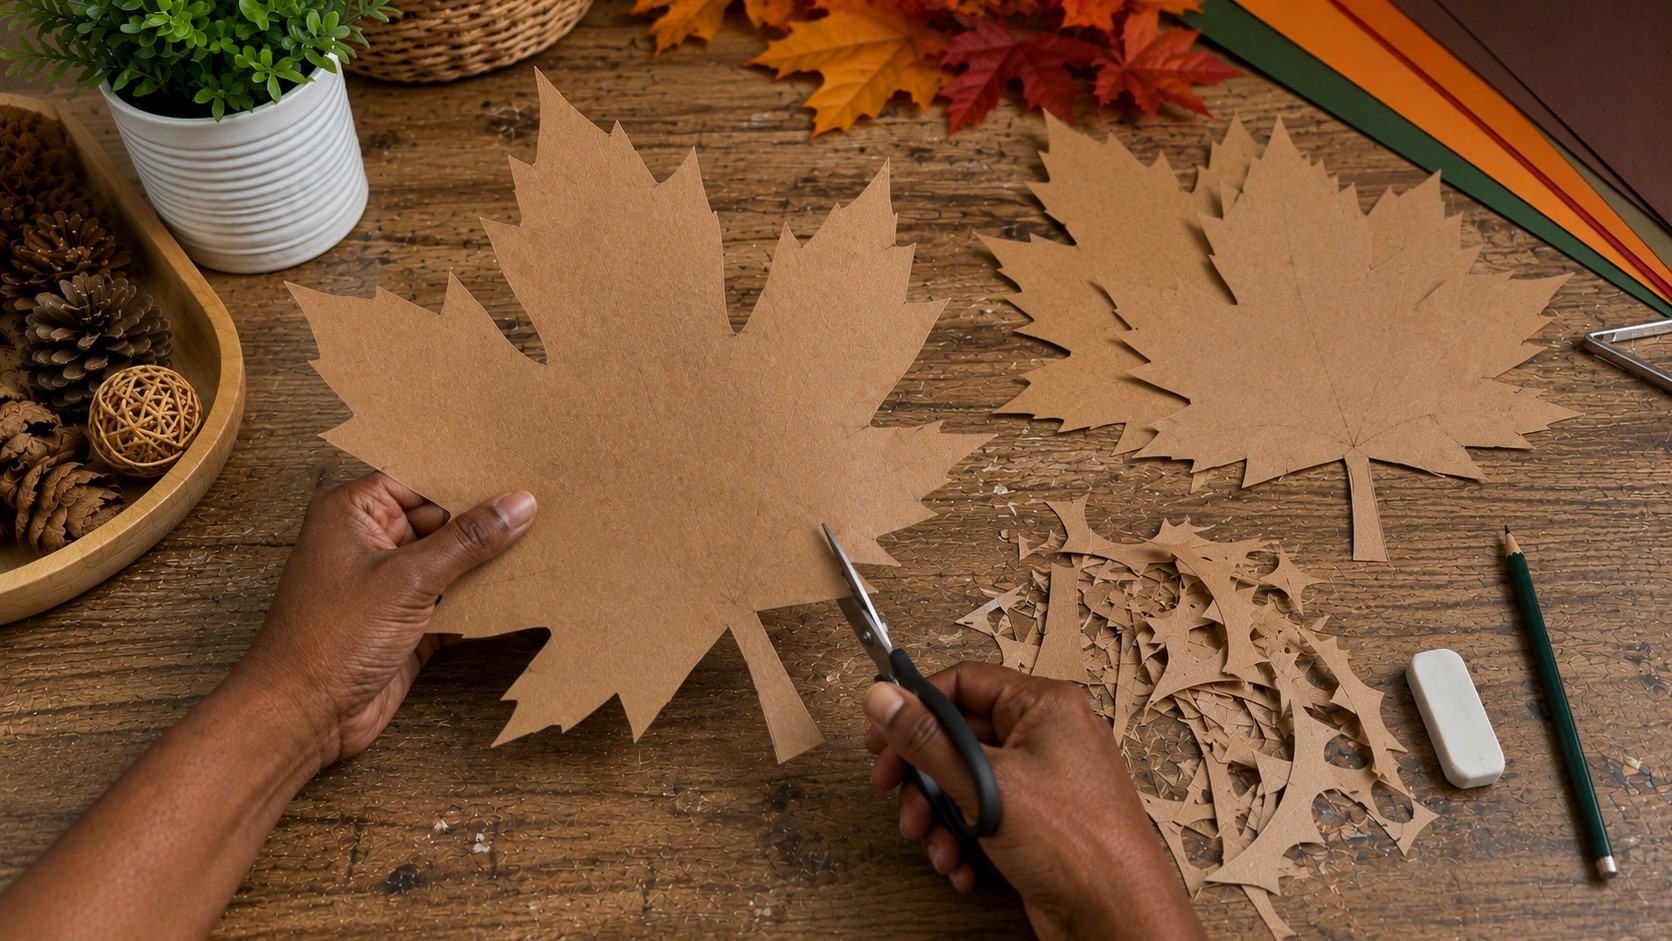
Now it’s time to turn your outlines into actual leaves. Use a pair of sharp scissors and cut slowly along the pencil line.

Long, steady cuts usually create smoother edges than short, quick snips. As you reach the narrow spaces between the points, turn the paper instead of twisting your scissors. This gives you better control and helps keep the tips nice and sharp.

After cutting out each leaf, look closely around the edges. If you notice any uneven curves or rough spots, trim them carefully before moving on.

There’s no need to make every leaf look exactly the same. In fact, slightly different shapes make the finished display feel much more natural.

Once you’ve finished cutting, gently erase any visible pencil marks so your leaves look clean and ready for the next step.

Step 4: Add the Main Veins

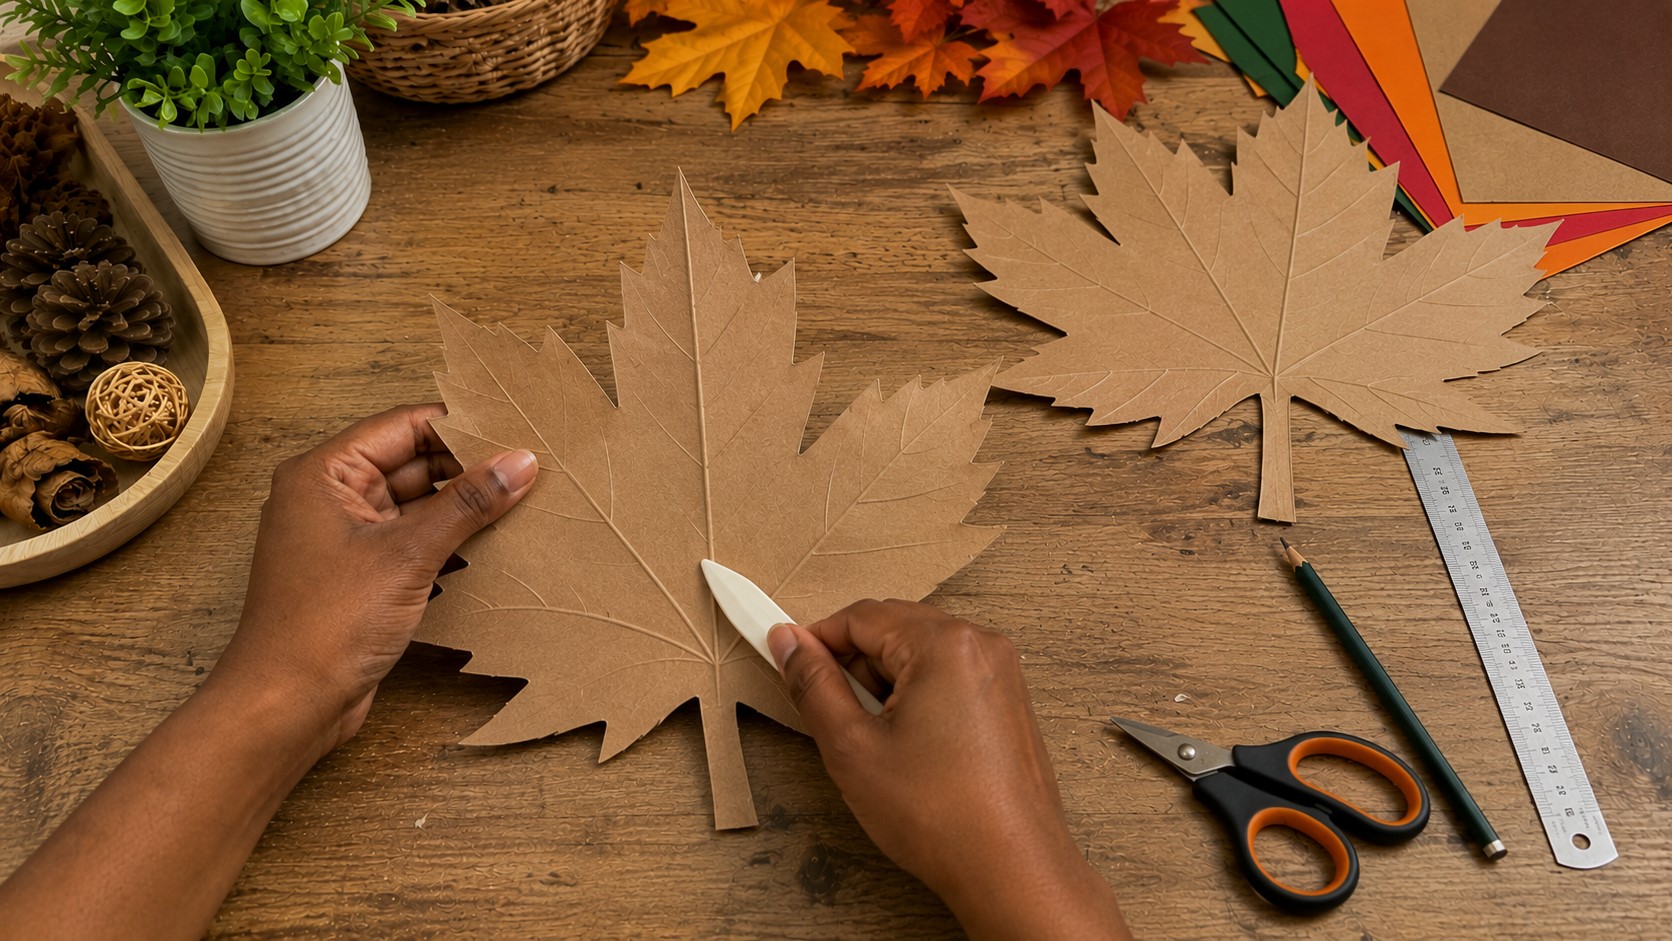
A flat paper leaf already looks nice, but adding veins makes it look much more realistic. Place one leaf on your table and use a ruler to find the center.

Using a bone folder or the back of a butter knife, press a straight line from the bottom stem to the top point. Apply gentle pressure because you’re creating a crease, not cutting the paper.

Next, score smaller veins that branch from the center toward each point. Space them naturally instead of making every line perfectly even.

Real maple leaves have veins that spread in different directions, so don’t worry about perfect symmetry.

Once you’ve finished, gently bend along each scored line with your fingers. You’ll immediately notice the leaf has more texture and depth instead of looking completely flat.

Step 5: Shape the Leaf

This step is where the leaf starts looking less like paper and more like something you picked up on an autumn walk.

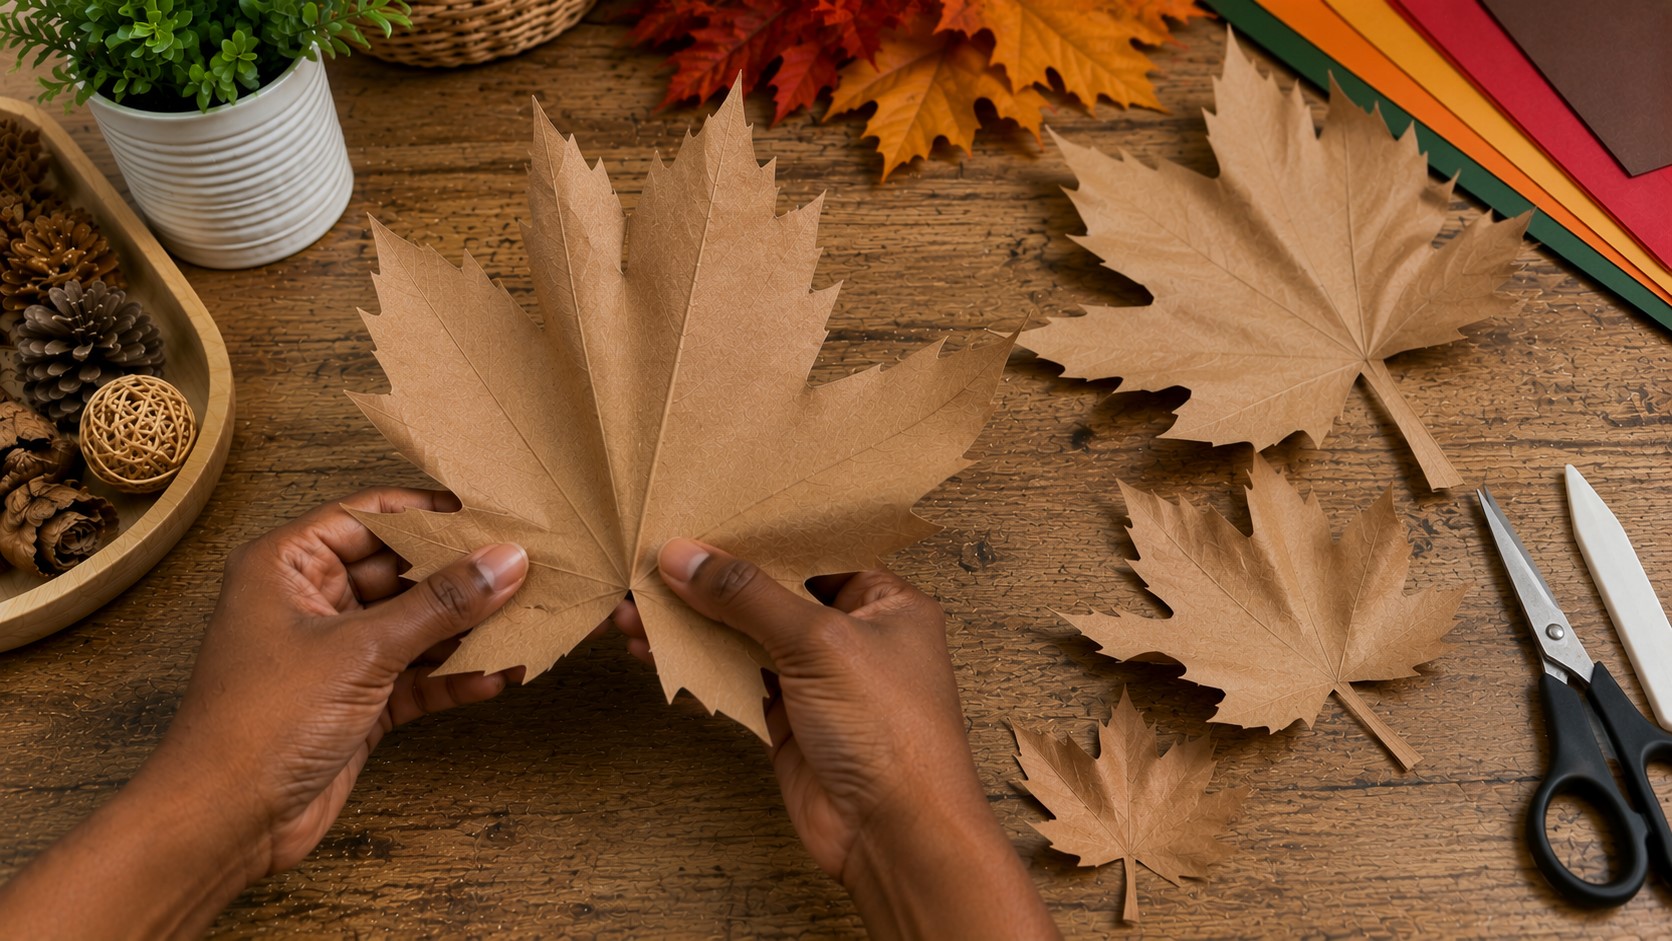
Hold the leaf with both hands and gently fold the center vein upward. Then slightly bend a few of the side sections forward or backward. Keep the curves soft because sharp folds can make the paper look stiff.

Look at a real maple leaf if you have one nearby. You’ll notice that the edges naturally curl in different directions instead of lying perfectly flat.

Try to copy that look by gently curling some of the points with your fingers or by wrapping them around a pencil for a few seconds.

You don’t have to shape every leaf exactly the same. Giving each one a slightly different curve makes the entire arrangement look much more realistic.

Step 6: Paint the Leaves if Needed

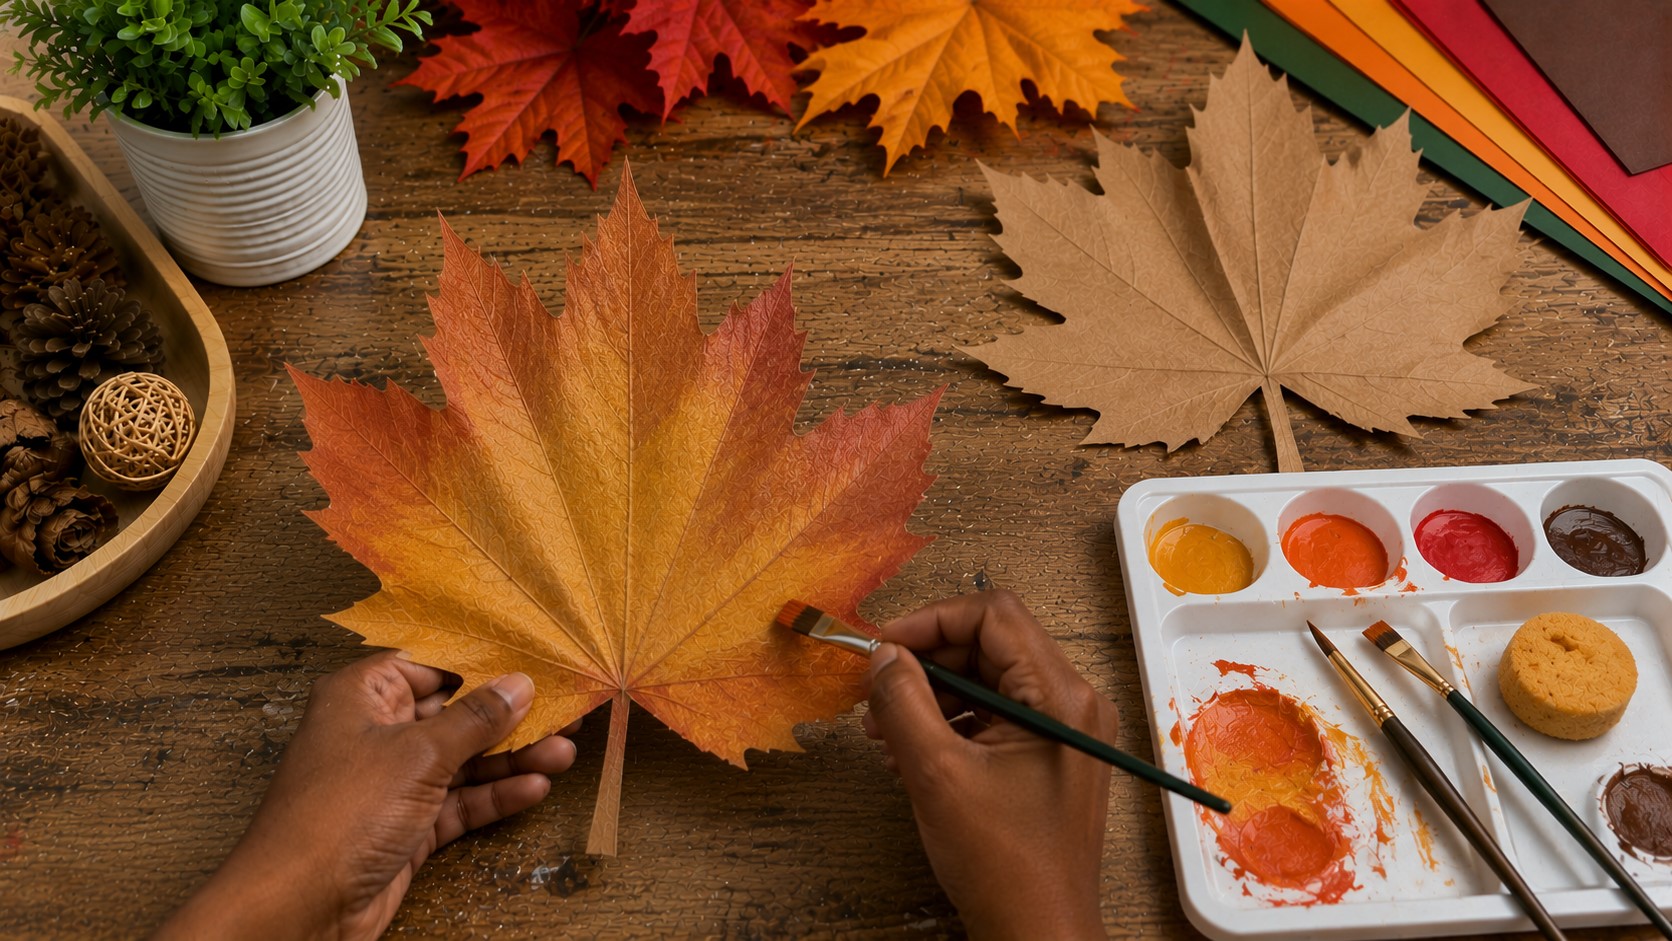
If you’re using white cardstock, now is the perfect time to bring your leaves to life with color. Choose classic fall shades like golden yellow, burnt orange, deep red, warm brown, or even a touch of olive green.

Start with the lightest color and cover most of the leaf using a soft paintbrush or sponge.

While the paint is still slightly damp, add a second color around the edges or near the center veins. Blend the colors together with light strokes instead of painting solid blocks.

This creates the natural color changes you often see in real maple leaves. If you’d like even more detail, lightly brush a little brown along the edges after the first layer dries.

Building color little by little usually gives a much softer and more realistic finish.

Step 7: Add Extra Texture and Details

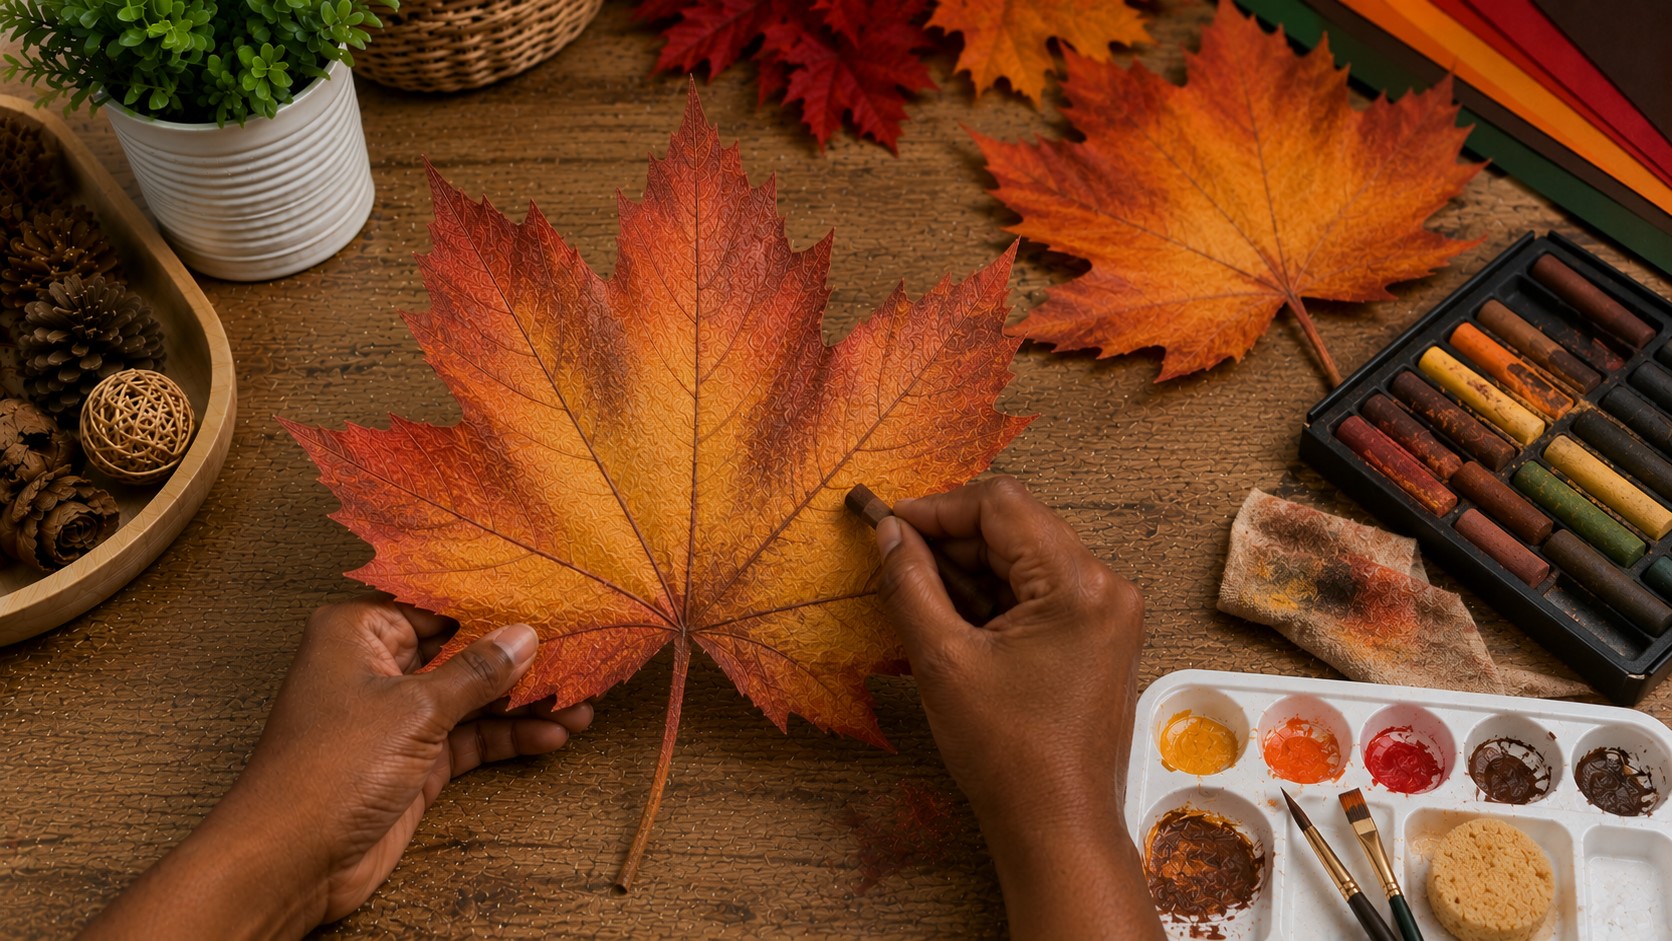
Once the paint has dried, spend a few minutes adding the finishing touches. Lightly rub brown or dark orange chalk pastel along the veins and around the edges.

Blend it gently with your finger or a soft cloth so the color fades naturally into the paper. If you don’t have pastels, colored pencils work well too.

You can also deepen a few of the score lines with a colored pencil to make the veins stand out more.

Don’t add heavy shading everywhere because too much can hide the beautiful colors underneath. Step back every few minutes and look at the leaf from a distance.

Sometimes the smallest details make the biggest difference, and it’s easier to notice them when you’re not looking too closely.

Step 8: Strengthen Large Leaves

If you’ve made oversized maple leaves, they may need extra support to keep their shape after hanging.

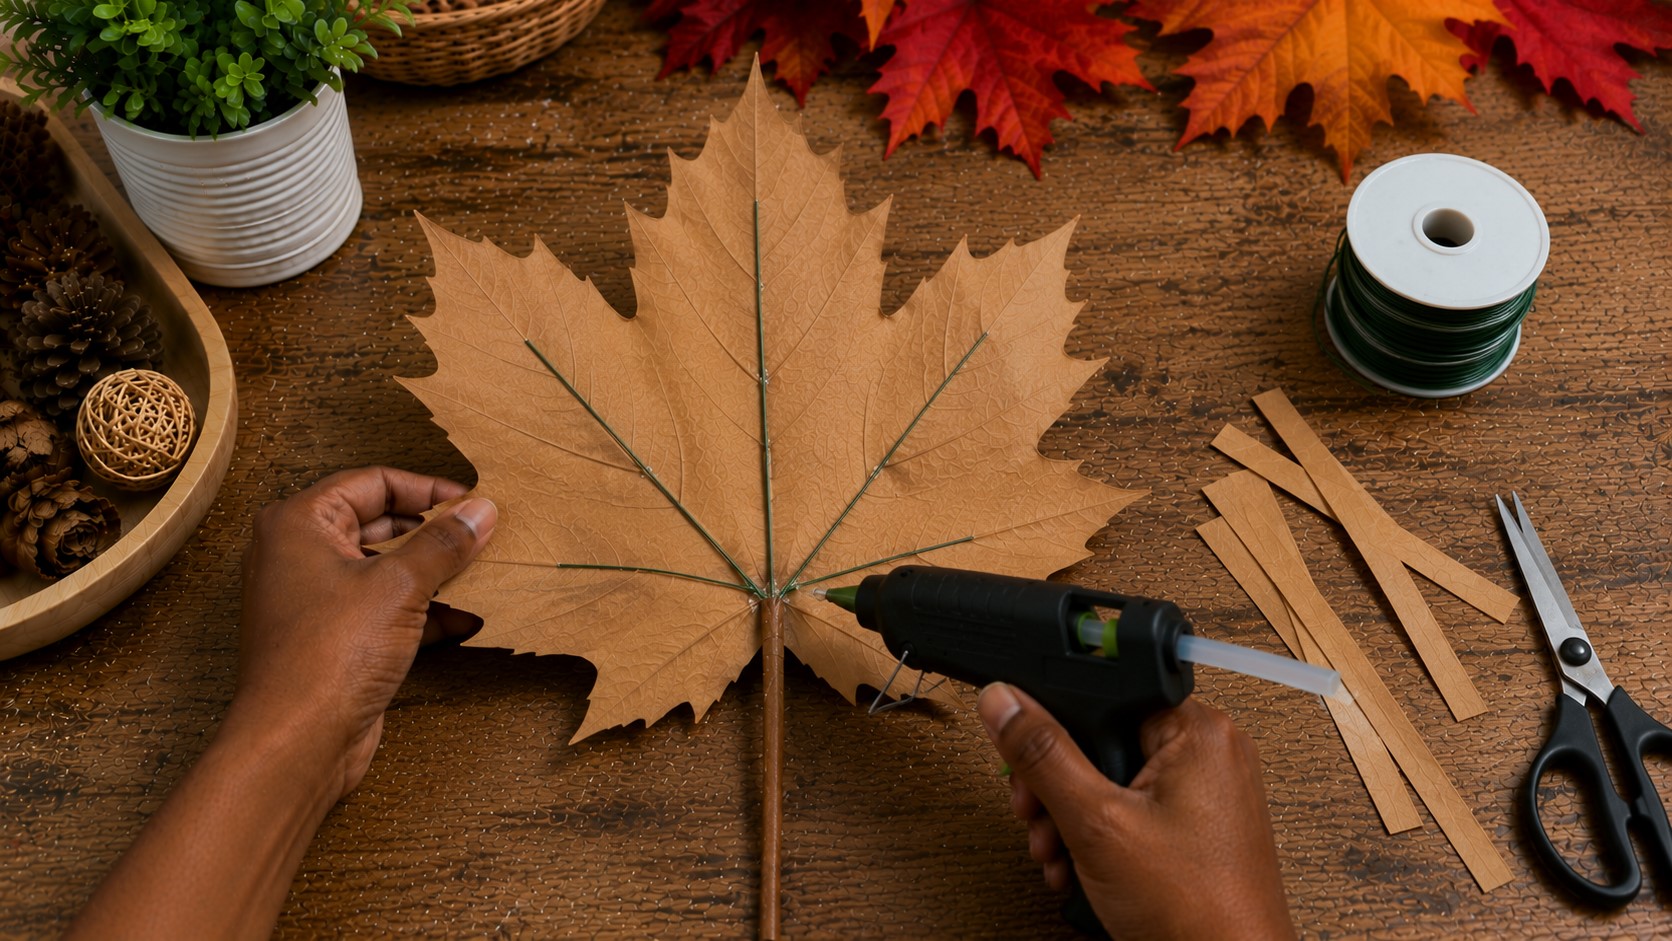
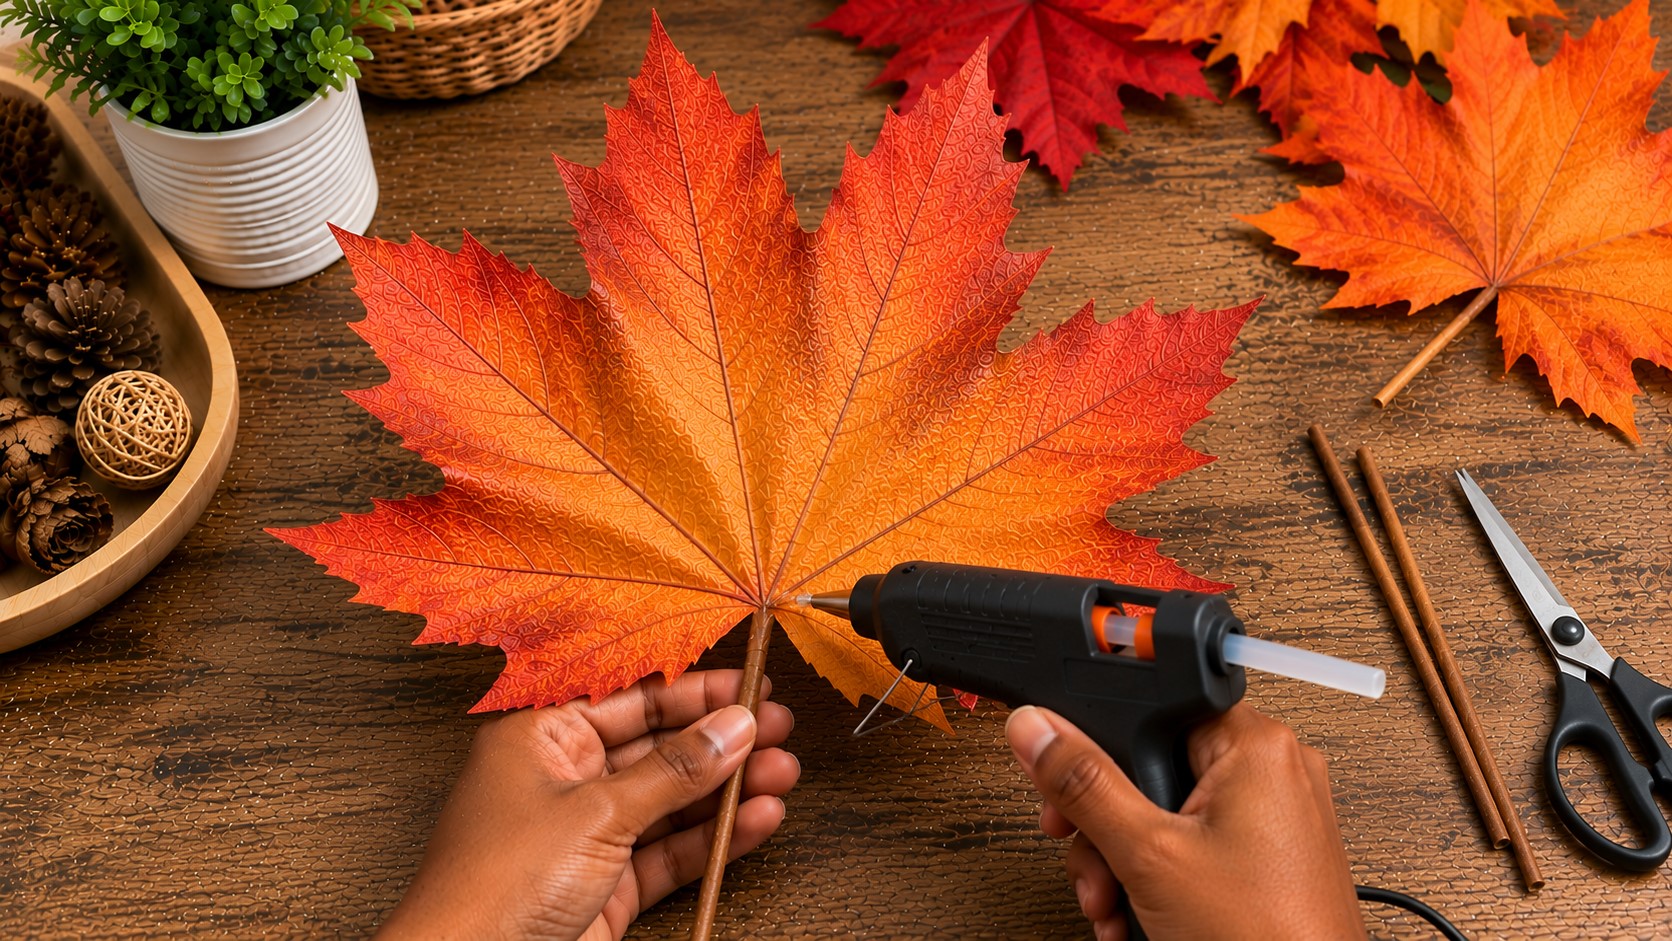
Turn each leaf over and attach a thin piece of floral wire along the center vein with hot glue. Press it down gently and allow the glue to cool completely before moving the leaf.

If needed, add shorter pieces of wire along two or three of the larger side veins. Cover the wire with a narrow strip of matching paper or floral tape to keep the back looking neat.

This simple step helps the leaves stay sturdy while still allowing you to bend them into natural shapes whenever you decorate.

Step 9: Make a Realistic Paper Stem

A stem may seem like a small detail, but it makes a surprising difference. Without one, the leaf can look unfinished. Cut a narrow strip of brown cardstock about 4 to 6 inches long.

Roll it tightly between your fingers or around a wooden skewer to create a thin stem. Secure the end with a small dot of hot glue so it stays rolled.

Attach the stem to the back of the leaf at the bottom center. Hold it in place for a few seconds until the glue sets.

If you want a more natural look, bend the stem slightly instead of leaving it perfectly straight. You can even brush a little darker brown paint over it to give it extra depth. Once attached, the leaf will instantly look more lifelike and polished.

Step 10: Create Different Leaf Variations

One of the easiest ways to make your display look professional is by avoiding identical leaves. Nature never creates the same leaf twice, so your paper version shouldn’t either.

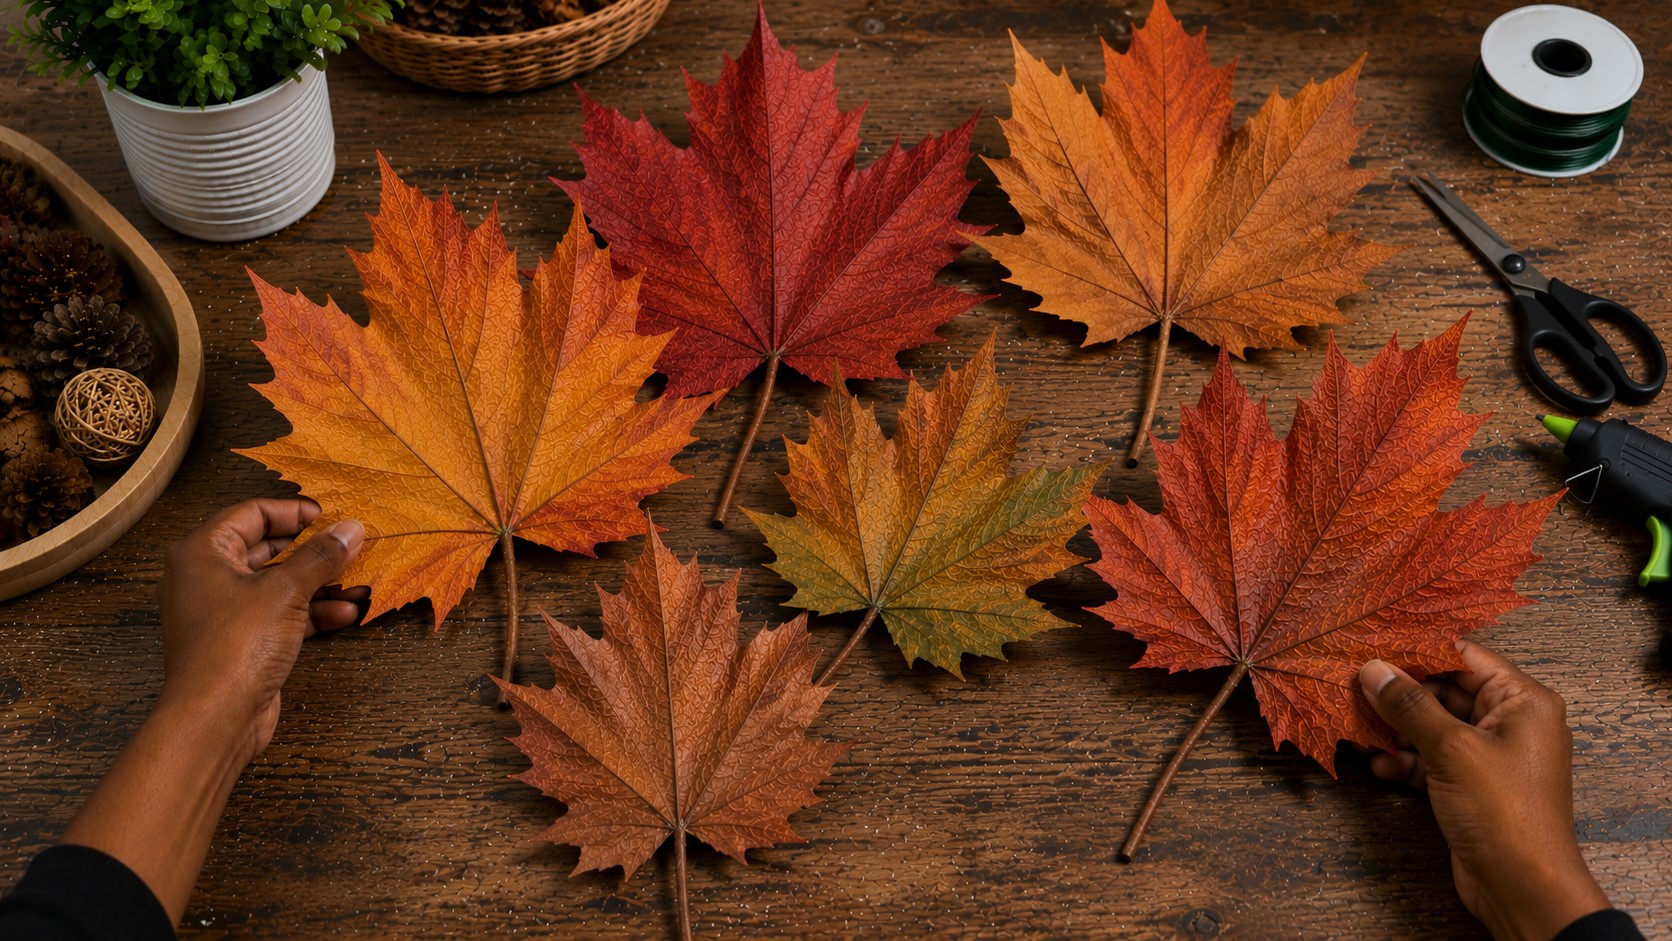
Make a few leaves slightly wider, while others can have longer points or softer curves. Even changing the size by an inch or two makes a noticeable difference.

You can also vary the colors. Leave some leaves mostly golden yellow, while others feature deep reds or burnt orange with hints of brown.

A few leaves can even have touches of green to resemble early autumn foliage. Mixing shapes and colors gives your arrangement movement and makes it look much more natural than using identical pieces.

Step 11: Arrange Your Leaves Before Hanging

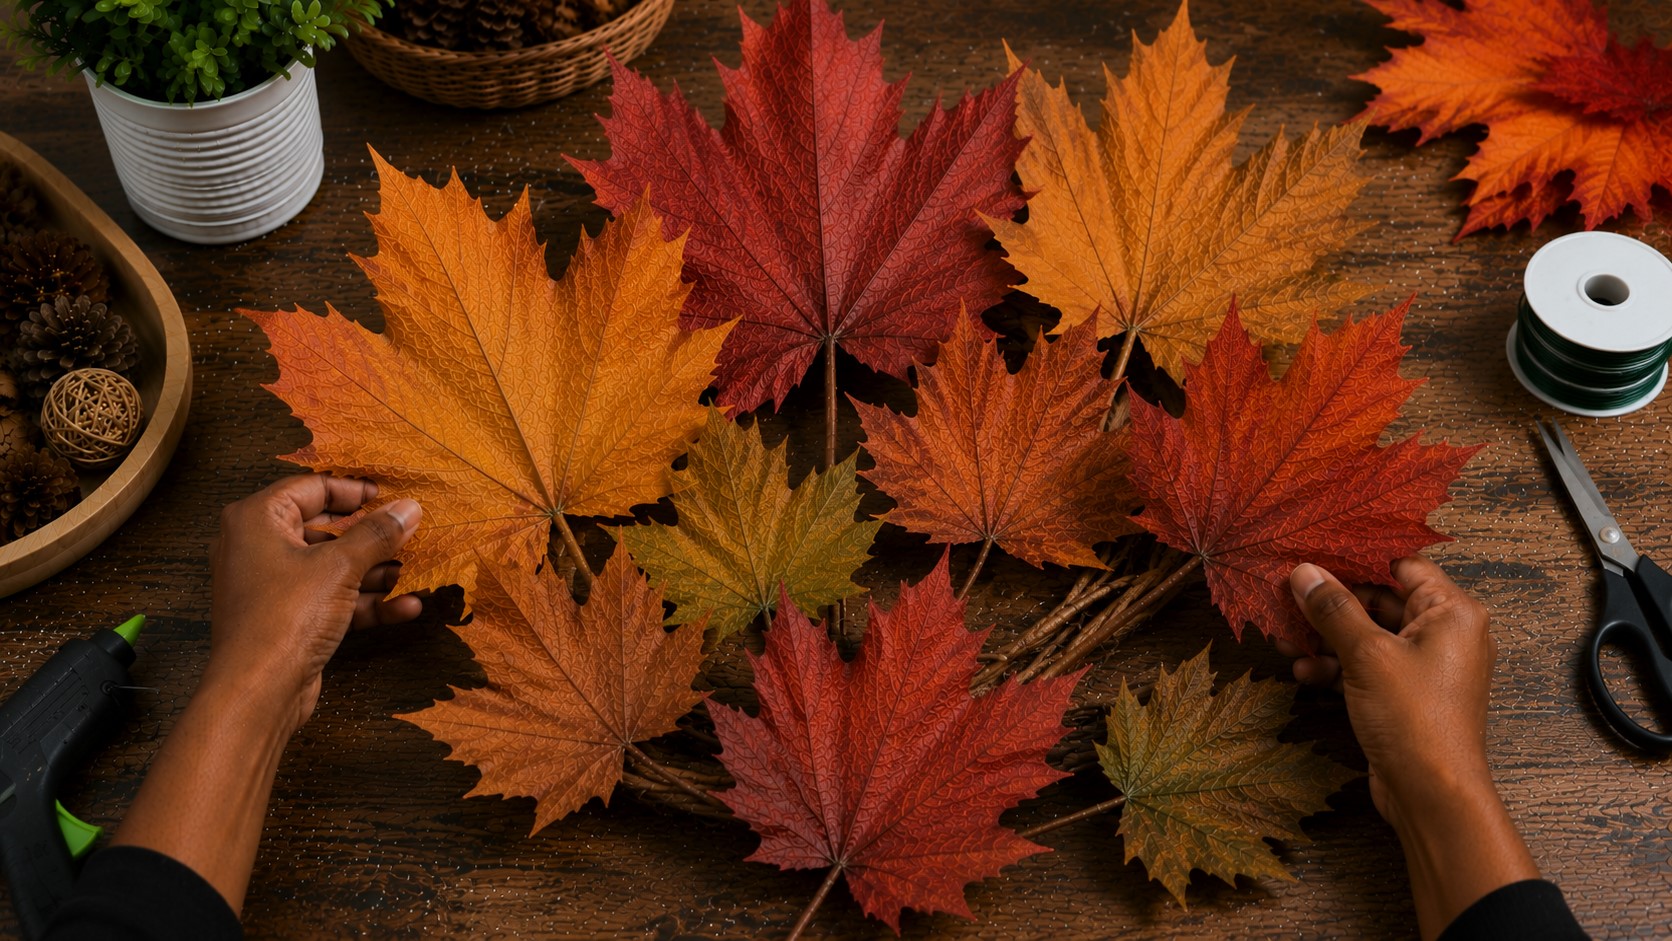
Before reaching for the glue or tape, lay all your finished leaves on the floor or a large table. Move them around until you’re happy with the arrangement.

Place the largest leaves first because they naturally become the focal points. Then fill the open spaces with medium and smaller leaves to create balance.

Step back every few minutes and look at the arrangement from a distance. This helps you spot empty areas or places where too many similar colors sit together.

Don’t be afraid to rearrange everything several times. Spending a little extra time here often makes the final display look much more intentional and eye-catching.

Step 12: Display Your Giant Paper Maple Leaves

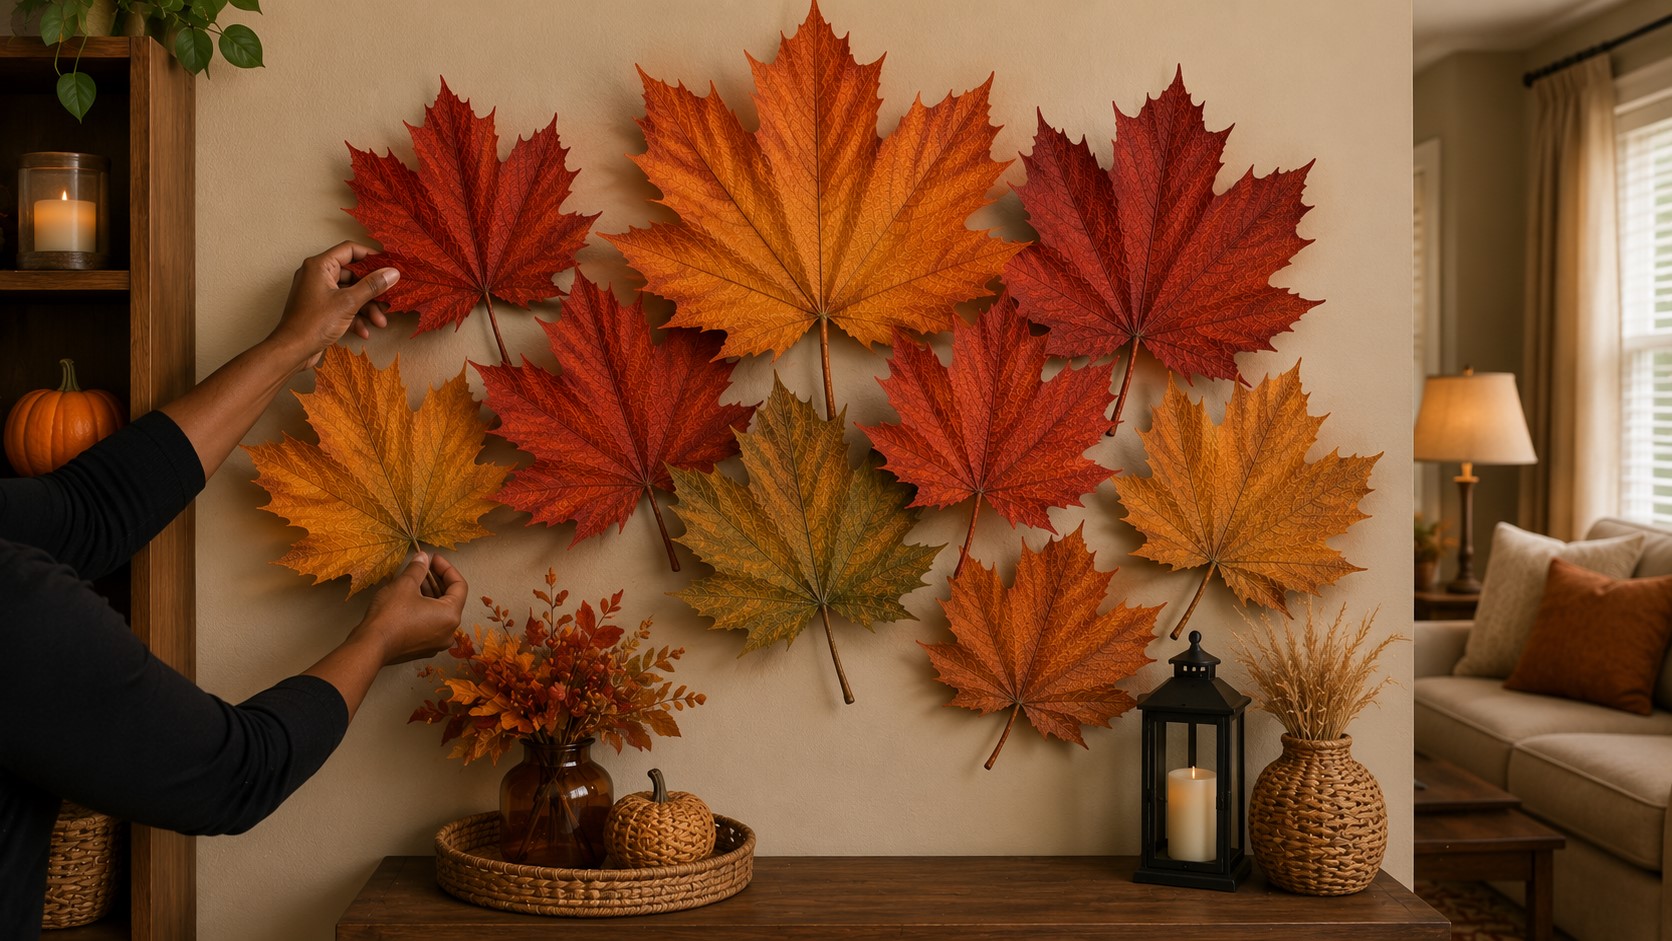
Now comes the most rewarding part of the project. Hang your leaves using removable adhesive strips, double-sided tape, fishing line, or small hooks, depending on where you’re decorating.

If you’re creating a wall display, let a few leaves overlap slightly. This creates depth and keeps the arrangement from looking too flat.

You can also use the leaves in many other ways around your home. Scatter a few across a dining table, tuck them into a fall wreath, decorate your front door, or create a cozy fireplace display.

They also make beautiful photo backdrops for autumn parties and family gatherings. Once everything is in place, make a few final adjustments until the display feels balanced.

Then step back and enjoy a handmade fall decoration that brings warmth and character to your space.

Common Mistakes to Avoid

Even a simple project can have a few challenges. The good news is that they’re easy to avoid once you know what to watch for.

I. Using Paper That Is Too Thin

Thin paper bends easily and may tear while shaping the leaves. Choose heavyweight cardstock or sturdy kraft paper so your leaves hold their form.

II. Making Every Leaf the Same

Identical leaves can make the display look flat. Change the size, color, and shape slightly to give your arrangement a more natural appearance.

III. Rushing the Cutting

Quick cuts often leave rough edges and uneven points. Slow, careful cutting creates cleaner leaves that need very little trimming afterward.

IV. Skipping the Veins

Flat leaves without veins don’t have much character. Adding simple score lines gives the paper texture and makes each leaf look far more realistic.

V. Using Too Much Glue

Large amounts of hot glue can leave bumps and visible marks. Apply only small amounts where needed to keep the finished leaf neat.

VI. Hanging Without Planning

Putting the leaves on the wall one at a time usually leads to uneven spacing. Arrange everything first so the final display looks balanced and well thought out.

Creative Ways to Use Giant Paper Maple Leaves

  • Decorate a Fireplace Mantel: Layer several leaves across your mantel with candles, lanterns, and small pumpkins. The oversized leaves create a colorful backdrop without making the space feel crowded.
  • Create a Fall Photo Backdrop: Attach the leaves to a wall behind a dessert table or seating area. Mix different sizes and colors for a backdrop that looks festive in every photo.
  • Dress Up Your Front Door: Glue a few giant leaves onto a grapevine wreath or hang them around your front door for an eye-catching autumn welcome.
  • Make a Dining Table Centerpiece: Scatter several leaves down the center of the table and add candles or small gourds between them. It’s a simple way to bring seasonal charm to family meals.
  • Brighten an Empty Wall: Turn a plain wall into a statement piece by arranging oversized leaves in a flowing pattern. This works especially well in entryways and living rooms.
  • Decorate for a Fall Party: Use the leaves behind a snack table, gift table, or drink station. They instantly make the space feel festive without requiring expensive decorations.
  • Add Them to a Classroom or Office: These paper leaves aren’t just for homes. They also brighten classrooms, offices, libraries, and community spaces during the fall season while staying beautiful for weeks.

Related Posts

Leave a Reply

Your email address will not be published. Required fields are marked *