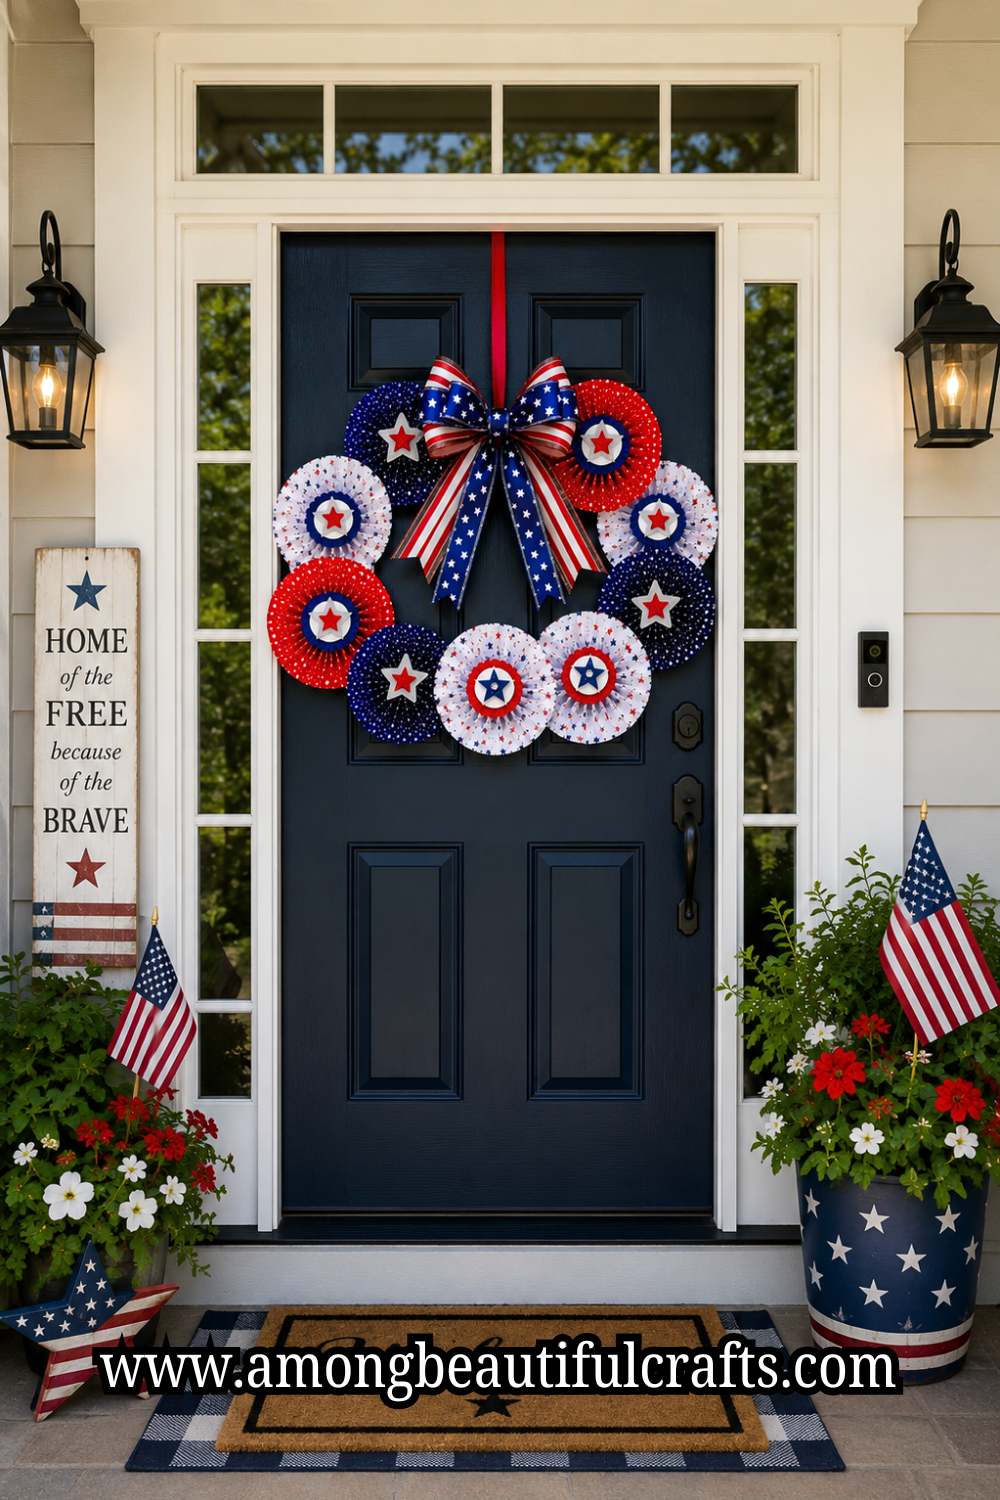
Walk past any front door decorated with a paper rosette wreath and you will stop to look. There is something about those layered, blooming circles of paper that demands attention in the most charming way possible. A patriotic version in red, white, and blue takes that charm and cranks it all the way up. This paper rosette wreath Fourth of July tutorial will show you exactly how to make one that costs a fraction of what you would spend on a store-bought version; and looks significantly better.
If you’re decorating for the holiday, 25 Patriotic Paper Craft Ideas For Festive Fourth of July Décor offers even more creative ways to fill your home with patriotic handmade decorations.
Paper rosettes have been around for decades, but they never go out of style. Each rosette is made from accordion-folded paper pinched in the center and fanned open into a full circular bloom. Alone, one rosette is pretty. Grouped together on a wreath frame, they become genuinely stunning. Moreover, you get to control every color, size, and arrangement yourself, which means your wreath will look like nothing else on your street.

The project is approachable enough for a complete beginner and satisfying enough for an experienced crafter. No glue gun experience is required. No special tools are needed beyond scissors and basic craft supplies. By the end of this guide, you will have a full, lush wreath ready to hang on your door before July Fourth arrives.
What Is a Paper Rosette?
A paper rosette is a decorative paper bloom made from folded strips or sheets of paper. The paper is accordion-folded into a long fan shape, then pinched or stapled at the center. When both ends of the folded strip are connected, the fan springs open into a full circle.
Rosettes can be made flat, like a medallion, or slightly curved for a more dimensional look. For a wreath, flat rosettes work best because they sit cleanly against the frame. However, mixing a few dimensional rosettes into your arrangement adds lovely depth and variety.
Supplies You Will Need
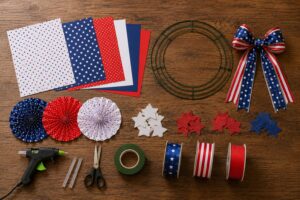
Gather your supplies before starting. Having everything on your table means you can work through the project without interrupting your momentum.
- A wire or foam wreath frame, 12 to 14 inches in diameter
- Red, white, and blue cardstock (at least 10 sheets of each color)
- Scissors or a paper trimmer
- A ruler and pencil
- A bone folder or butter knife for scoring
- A stapler with staples
- A hot glue gun and glue sticks
- Clear fishing line or ribbon for hanging
- Optional: white or gold star stickers for embellishment
- Optional: red, white, and blue ribbon for a bow accent
How Many Rosettes Do You Need?
The number of rosettes depends on your wreath frame size and how full you want the finished wreath to look. For a 12-inch frame, plan on making 18 to 22 rosettes total. For a 14-inch frame, aim for 24 to 28.
A good color distribution for a patriotic wreath: roughly one-third red, one-third white, and one-third blue. For a wreath with 21 rosettes, that means 7 red, 7 white, and 7 blue. Alternatively, you can do a red and blue heavy palette with white as the accent color. That ratio; 9 red, 9 blue, and 3 white — creates a bolder, more graphic look. Make extra rosettes before you start gluing. Having a few spares means you can fill gaps or replace any that do not turn out quite right without stopping to make more mid-assembly.
How to DIY a Gorgeous Paper Rosette Wreath for July 4th
Step One: Cut Your Paper Strips

The size of your paper strips determines the final size of each rosette. For a medium rosette about four inches in diameter, cut strips that are 12 inches long and 2 inches wide. For a smaller rosette about two and a half inches in diameter, cut strips that are 8 inches long and 1.5 inches wide. Use a paper trimmer if you have one. It cuts multiple sheets at once and keeps every strip perfectly uniform. Uniform strips make for tidy, consistent rosettes that sit neatly together on the frame.
Paper-folding projects often inspire crafters to try How to Make Paper Sunflowers That Look Beautiful All Summer Long, another decorative paper craft that looks far more complicated than it actually is.
Cut your strips in batches by color. Stack five to six sheets of the same color cardstock together. Measure and cut through all layers at once. This speeds up the process significantly and keeps all your strips organized by color as you go. For a 21-rosette wreath using medium rosettes, you will need about 42 strips total; two strips per rosette. So cut at least 14 strips of red, 14 strips of white, and 14 strips of blue before moving on.
Step Two: Score and Accordion-Fold Each Strip

Scoring each strip before folding is the step most beginners skip; and then immediately regret. Scored folds are sharper, cleaner, and much easier to keep consistent than unscored ones. Lay one strip flat on your work surface. Use a ruler and bone folder to score across the strip every half inch. Press firmly enough to create an indent but not so hard that you tear through the paper.
After scoring, begin accordion-folding. Fold the first crease forward. Fold the next crease backward. Continue alternating until the entire strip is folded. Each fold should be about half an inch wide. At the end of the strip, you will have a tightly folded fan of paper. Repeat this process for every strip. Work through all your red strips first, then white, then blue. Keeping colors sorted saves time when you move to assembly.
Accordion-fold techniques like these are also useful in 17 Summer Paper Craft Ideas Kids Can Make During the Holidays, where simple paper transformations create impressive results.
Step Three: Join Two Strips Into One Rosette

One rosette requires two folded strips joined together. Apply a small dab of hot glue to the last fold of one strip. Press the first fold of a second strip firmly onto the glued end. Hold for ten seconds until the bond is secure. You now have one long folded fan. Bring both ends of this long fan together to form a circle. Apply hot glue to the last fold and press it firmly onto the first fold. Hold the joint until the glue sets completely.
The fan should spring open into a full circle. If the rosette does not want to stay fully open, use a tiny strip of tape across the back seam to reinforce it. Pinch the center of the rosette slightly to encourage it to fan open evenly in all directions. Make all your rosettes before starting on wreath assembly. Completing the rosettes in a batch first means you can see your full color spread and plan the layout before committing to any glue placement.
Step Four: Add Detail to Your Rosettes (Optional but Lovely)

Plain rosettes look beautiful on their own. However, a few small additions elevate the entire wreath from pretty to polished.
Star centers: Cut small circles from contrasting cardstock. Glue a star sticker or hand-cut star shape onto each circle. Glue the decorated circle onto the center of the rosette. Red centers on white rosettes, blue centers on red rosettes, and white centers on blue rosettes create a lovely layered patriotic effect.
Ombre rosettes: Use two strips of slightly different shades of the same color. One strip in bright red and one in a deeper crimson create a rosette with subtle color depth. Similarly, pale blue paired with deep navy gives the same dimensional effect.
Glitter edges: Run a glue stick along the outer folded edges of a finished rosette. Dip the edges into red or blue fine glitter. Tap off the excess and let it dry completely. These sparkly rosettes catch light beautifully and add a festive shimmer to the overall wreath.
Decorative embellishments like these pair beautifully with 13 Fourth of July Resin Tray Ideas for Gorgeous Party Décor, where glitter, color layering, and patriotic accents are used to create eye-catching holiday pieces.
Step Five: Plan Your Layout Before Gluing

Before any rosette touches the wreath frame with hot glue, do a full dry run of your layout. Lay your frame flat on the table. Arrange all your rosettes across the frame in your planned color order. Step back and look at the arrangement critically. Check that no two rosettes of the same color sit directly beside each other. Look for gaps where the frame shows through too much. Identify spots where a smaller rosette would fill the space better than a large one. Photograph your layout once you are happy with it. This reference photo saves you from trying to remember the arrangement once you start gluing and working quickly.
Thoughtful layout planning is also important in 23 Red White and Blue Painting Ideas for Your Home This Summer, where color placement can dramatically affect the finished look.
Step Six: Glue Rosettes to the Frame

Start gluing from the outside edge of the frame inward. Apply a generous amount of hot glue to the back of the first rosette. Press it firmly onto the outer edge of the wreath frame. Hold it for fifteen seconds before releasing. Work around the full outer edge first, placing rosettes side by side with their edges touching. Then move to the inner ring. Fill the inner curve of the frame with a second row of rosettes, slightly overlapping the first row.
Push rosettes closely together as you work. Gaps between rosettes reveal the frame beneath and make the wreath look sparse. After completing both rows, tuck small spare rosettes into any remaining visible gaps. Press each newly glued rosette against its neighbors firmly. The slight pressure encourages the rosettes to fan into each other naturally, which creates that full, lush look that makes paper rosette wreaths so appealing.
Layered holiday decorations often work beautifully alongside 17 Fourth of July Clay Crafts That Double as Party Decorations, especially when decorating for a large gathering.
Step Seven: Add a Ribbon Bow

A ribbon bow at the bottom of your wreath gives it a polished, finished look and hides any glue that may have squeezed out around the lower rosettes. Cut three lengths of ribbon; one red, one white, one blue; each about 18 inches long. Hold all three together and tie them in a single knot at the center. Fan the loops out into a layered bow shape. Secure the knot with a small dab of hot glue and press the bow firmly onto the bottom of the wreath.
Trim the ribbon ends at an angle. This prevents fraying and gives the tails a clean, intentional look. Alternatively, cut a small V notch into the end of each ribbon tail for a more decorative finish.
Ribbon accents can coordinate perfectly with How to Make a Patriotic Macramé Wall Hanging for 4th of July, helping create a cohesive patriotic decorating theme throughout your home.
Step Eight: Attach Your Hanger

Turn the wreath over and look at the back. Choose a spot at the top of the frame where the wire or foam is most stable. Cut a 10-inch piece of clear fishing line. Loop it twice around the frame at that spot and tie it securely with a double knot. Pull the knot tight and trim any excess fishing line. The clear fishing line is nearly invisible against a door or wall. This means only your wreath will be visible when it is hanging; no distracting hanger showing above it. Alternatively, thread a loop of satin ribbon through the top of the frame if you prefer a visible, decorative hanger.
Tips for the Best Rosette Wreath Results
- Work on a flat, protected surface: Hot glue drips and cardstock scraps accumulate quickly. A silicone mat or thick layer of newspaper under your project saves your table.
- Keep your glue gun temperature consistent: High-temperature glue guns bond faster and more securely than low-temp ones. However, high-temp glue can also burn through thinner paper if applied in too large a quantity. Use small, controlled amounts.
- Make more rosettes than you think you need: Extra rosettes are never a waste. They fill unexpected gaps and replace any that tear or fold incorrectly during assembly. Leftover rosettes can decorate gift packages, table centerpieces, or party favor bags.
- Reinforce any wobbly rosettes: If a rosette does not stay fully open after gluing, press a small strip of clear tape across the back seam. The tape is invisible from the front and keeps the rosette fanned open permanently.
Creative leftovers can even be incorporated into How to Make a Patriotic Resin Tray With Red, White and Blue Flowers, where small decorative elements often become part of a larger design.
Where to Display Your Wreath

Your finished paper rosette wreath deserves a prominent spot. Here are a few display ideas beyond the obvious front door choice:
Hang it above your fireplace mantle as the centerpiece of your holiday display. Mount it on an interior wall as part of a patriotic gallery arrangement. Lean it against a lantern or vase on your party table as a decorative accent. Hang it on the back of a chair at the head of the dining table. After July Fourth, store it flat in a shallow box and bring it out again next summer.
A wreath displayed as part of a larger holiday setup pairs beautifully with How to Make a Patriotic Clay Wreath That Lasts Every Summer, creating multiple patriotic focal points throughout your home.
Final Thoughts
A paper rosette wreath is one of those projects that surprises you with how achievable it is. You sit down expecting a challenge and finish with something that looks like it came from a boutique décor shop. The accordion-folding takes a little patience at first, but the rhythm becomes almost automatic after your third or fourth rosette. Before long the whole thing feels less like a craft project and more like a quiet, satisfying ritual.
For anyone looking to expand their patriotic decorating beyond paper crafts, 19 Patriotic Rock Painting Ideas That Are Easy Enough for Kids offers another simple project that adds handmade charm to porches, gardens, and party spaces.
What stays with you after the wreath is hanging on your door is the specific pride of knowing you made it. Every rosette was folded by your hands. Each color was chosen intentionally. Every glue point was placed with care. That is the difference between decorating a home and genuinely personalizing one; and it is a difference your guests will feel even if they cannot quite explain why.
Similarly, patriotic artwork such as How to Paint a Fourth of July Canvas Without Artistic Experience can help carry the same red, white, and blue theme into other areas of your home without requiring advanced artistic skills.
And if this is your first time making a paper rosette wreath, it almost certainly won’t be your last. The same technique works beautifully for Christmas, Easter, baby showers, and birthdays; just swap the colors and you have a completely different decoration. Once you understand the basic folds, the possibilities are honestly endless. So don’t pack away your supplies just yet. There’s a good chance another wreath is already forming in the back of your mind.