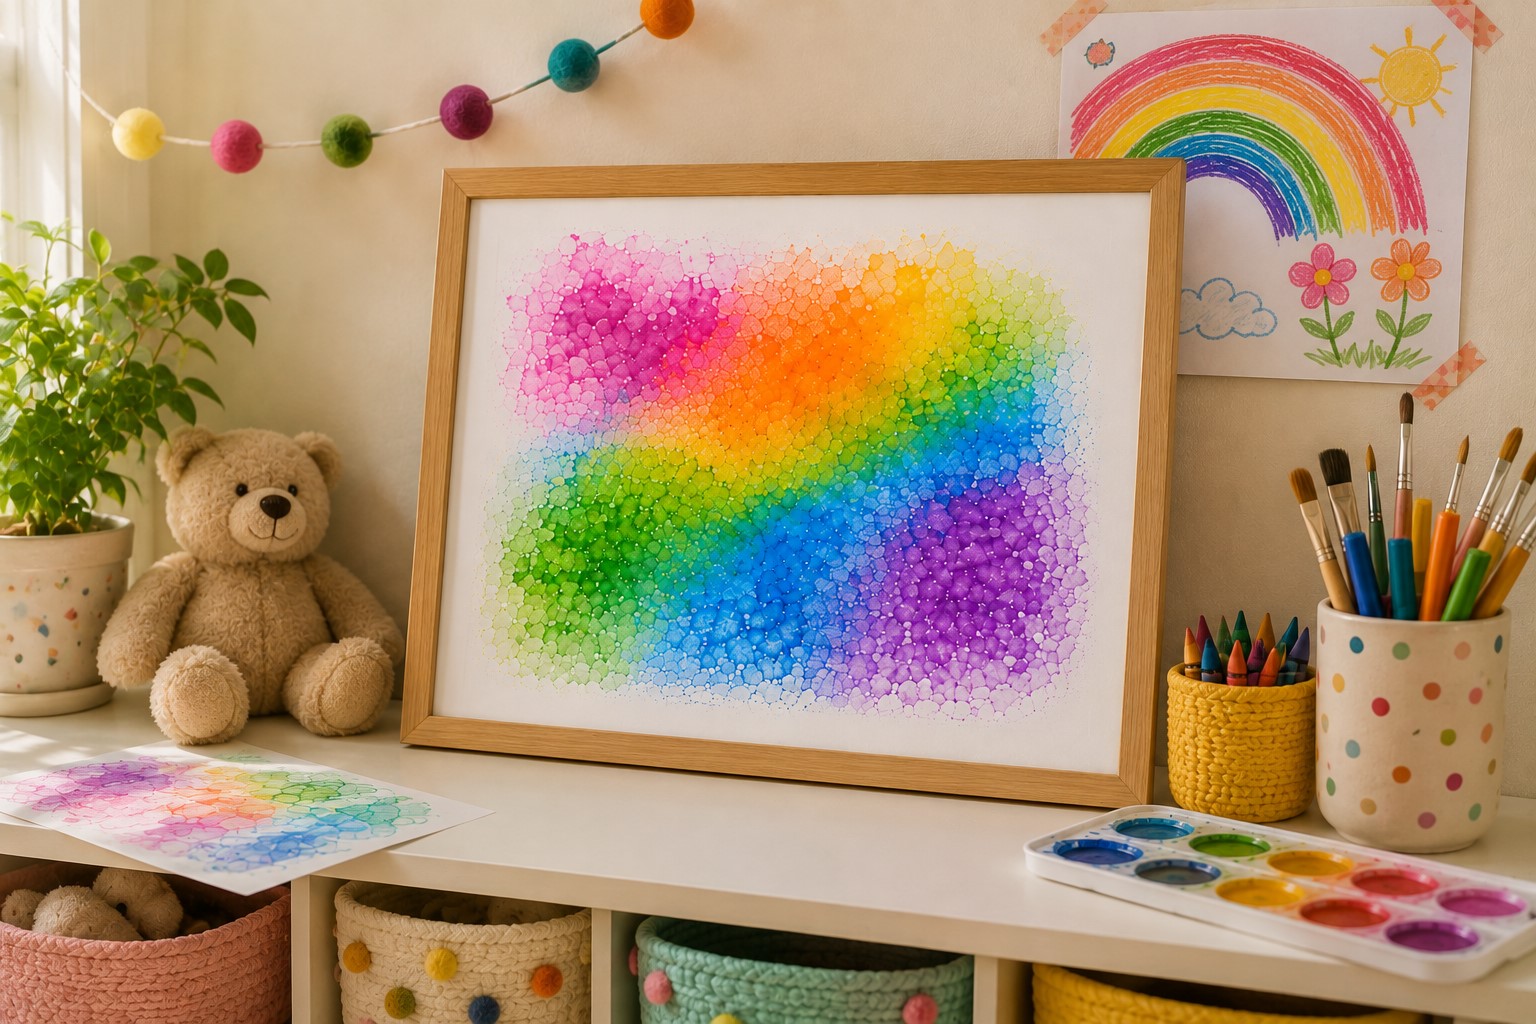
Bubble art feels like play, but kids learn quite a lot while making it.
They practice blowing carefully and controlling their breath. They also watch colors spread, overlap, and change on paper.
I love activities like this because children can create something beautiful without worrying about perfect results. Plus, every bubble print looks a little different.
If your kids love playing with bold, bright colors like this, 21 Creative Rainbow Crafts That Brighten Any Day is another fun activity to try together.
If you make bubble art with kids, you may quickly notice one thing. The activity can get messy when you do not prepare first.
A little spilled bubble mixture can turn into a sticky spot very quickly. That is why learning How to Make Bubble Art With Kids starts with setting up the right workspace.
Once you protect the table and organize the supplies, the activity becomes much easier to manage.
In this guide, I’ll walk you through the whole process step by step. I’ll show you which supplies work best and how to prepare your workspace.
Then, we’ll mix the bubble colors and create the prints. I’ll also share simple ways to reduce spills, splashes, and sticky surfaces.
So, grab some paper and bubbles, and let’s turn an ordinary afternoon into colorful art time.
What You Need to Make Bubble Art
You only need a few simple supplies for this project. Most of them are easy to find at home or in a craft store.
- Bubble solution – (Check price on Amazon)
- Liquid food coloring
- Small cups – (Check price on Amazon)
- Drinking straws
- Thick white paper – (Check price on Amazon)
- Large tray
- Plastic table covering or old tablecloth – (Check price on Amazon)
- Paper towels
- Art aprons or old shirts – (Check price on Amazon)
For the paper, I recommend watercolor paper because it handles the moisture well. Mixed-media paper also works nicely for bubble prints.
Thick cardstock can work too, especially for smaller prints.
A similarly small, simple supply list is all you need for figuring out How to Make Adorable Clay Magnets Worth Displaying, if you want another quick project to try.
A regular children’s bubble solution works well for this activity. You do not need a special art solution.
Choose a few bright food coloring shades for your bubble mixtures.
Three or four colors are enough to get started. You can always prepare more colors later if the children want to experiment.
How to Make Colorful Bubble Art With Kids Without the Mess
Step 1: Protect the Table Before You Begin
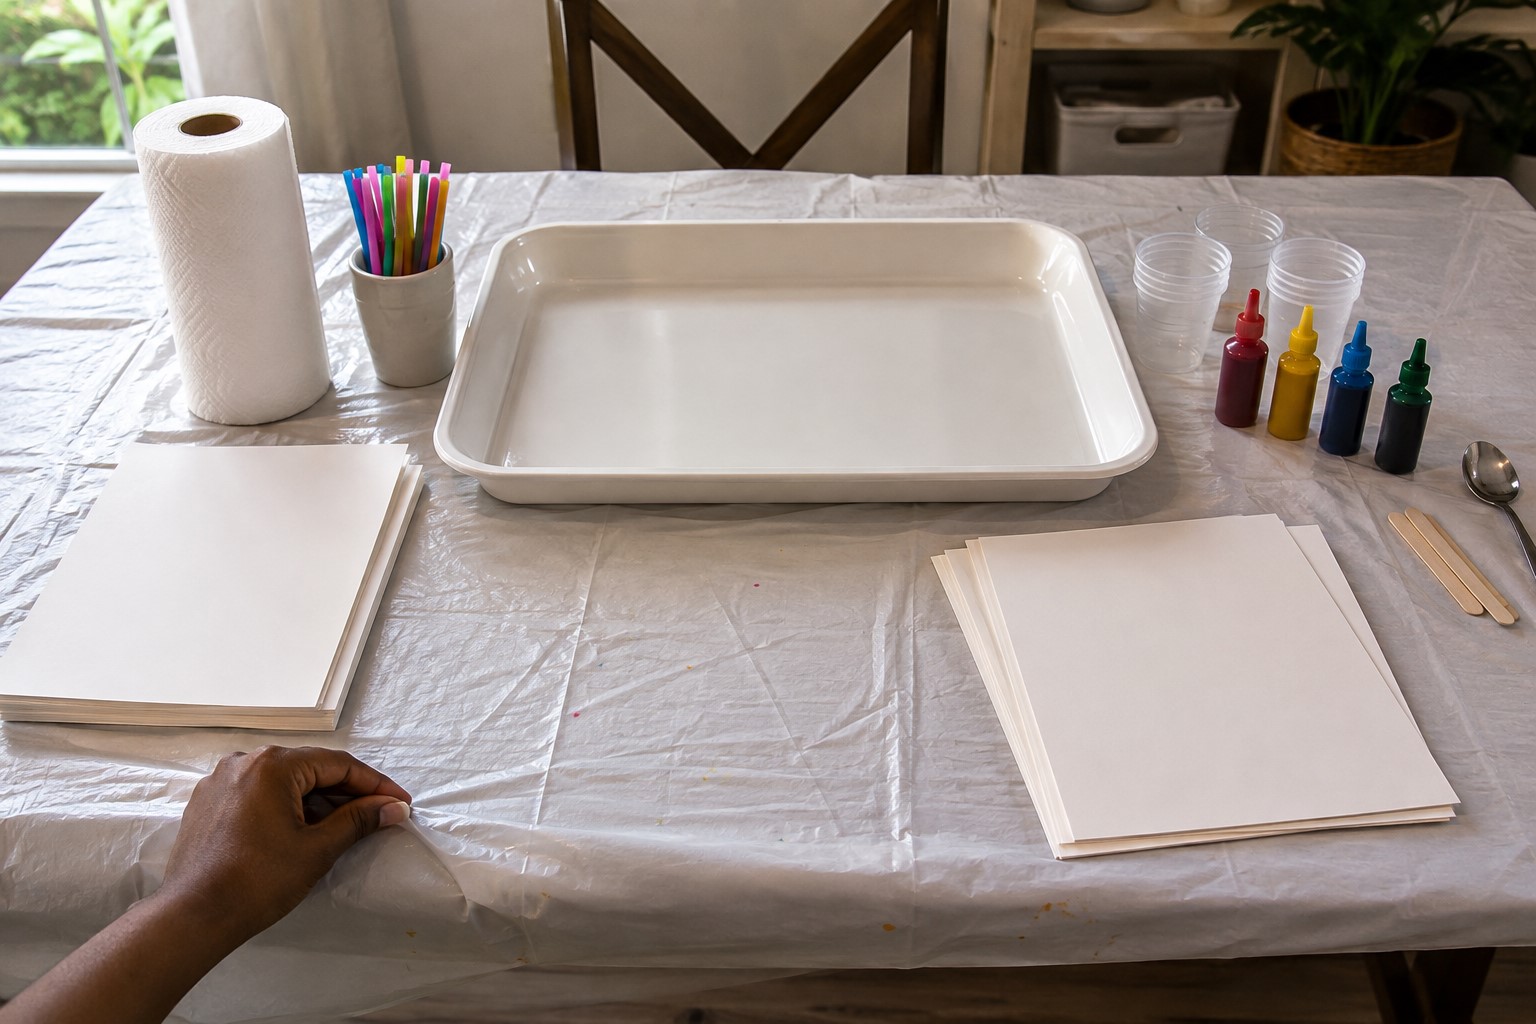
Cover your table with an old tablecloth, plastic sheet, or newspaper. Make the covering large enough to protect the entire area where the children will work.
This matters because the bubble solution can drip from the paper after each print. A little food coloring can also escape if a cup gets knocked over.
Once the table is covered, place a large tray in the center. The tray will hold your colored bubble mixtures during the activity.
It also gives you a contained place for small spills and overflowing bubbles.
Setting up a protected workspace like this also matters for a Step-by-Step Guide to Making Beautiful Seashell Art for Your Home, where glue and small pieces can scatter easily.
Next, choose a clean area for the finished artwork. Keep this space separate from the active workspace. You do not want wet prints sitting beside cups of bubble solution.
Place several sheets of thick white paper within easy reach. Watercolor paper works especially well because it can handle the moisture.
Mixed-media paper or thick cardstock can also give good results.
If you are working with younger children, you can cut the paper into smaller pieces.
Smaller sheets are easier for little hands to hold over the bubbles. They also give children more chances to experiment.
Finally, put paper towels beside the tray. Do this before the activity begins, rather than waiting for the first spill.
When everything has a place, the whole activity feels much calmer.
Step 2: Divide the Bubble Solution Into Cups
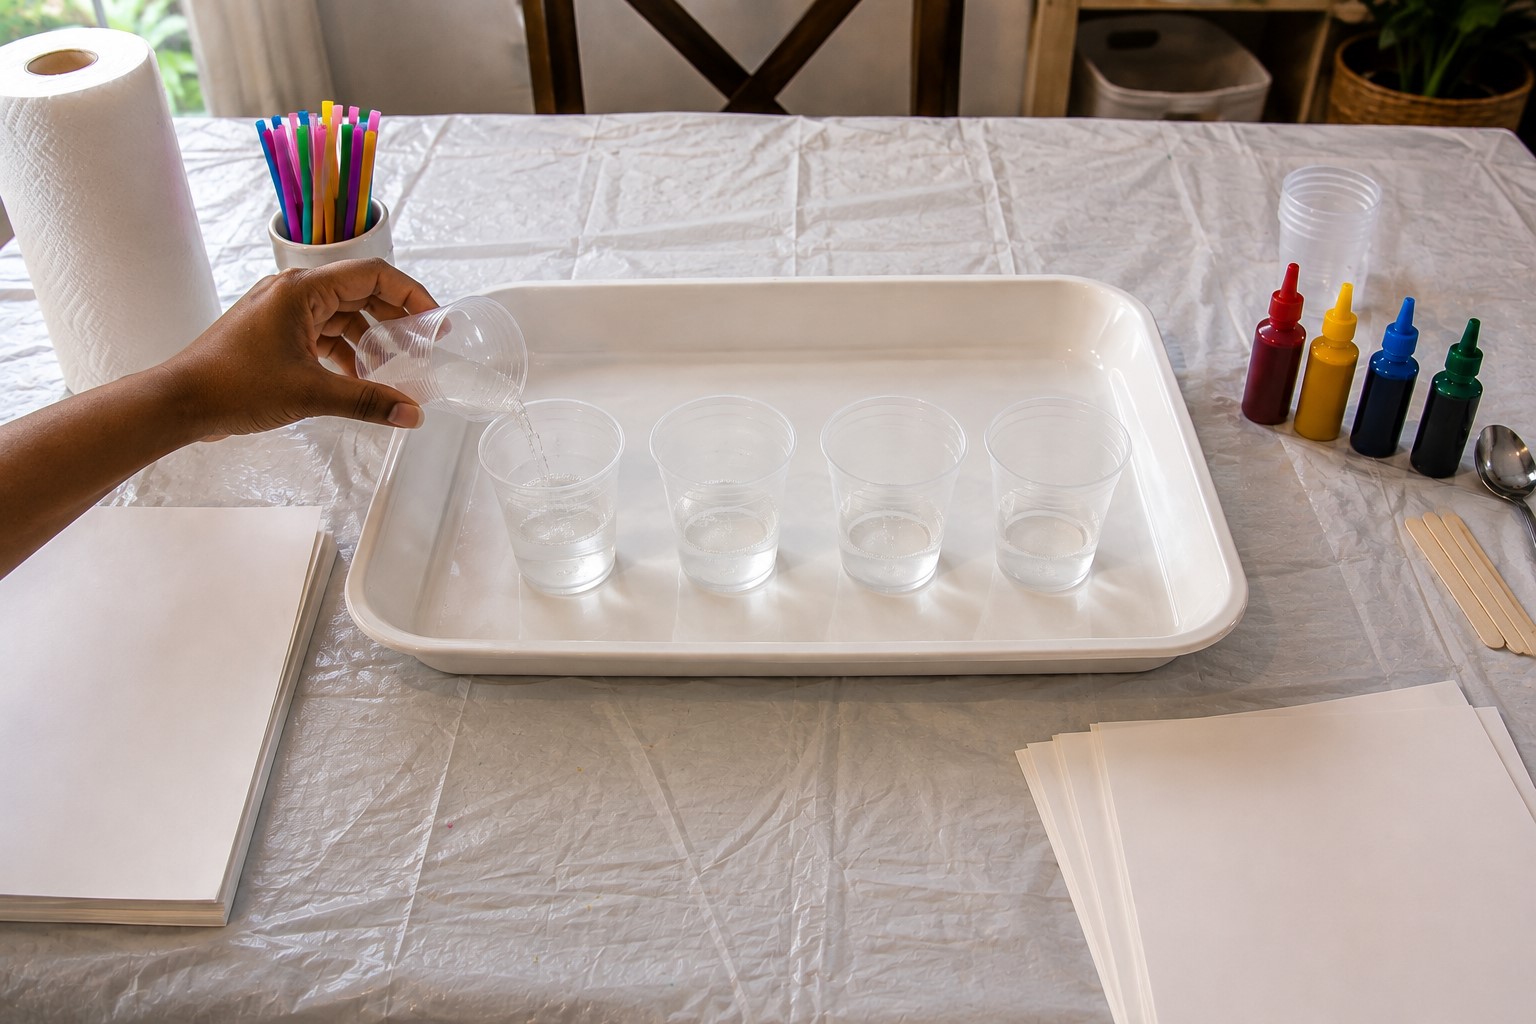
Place three or four small cups inside the tray. Pour a small amount of bubble solution into each cup.
You do not need to fill the cups very high. A shallow amount of solution is enough for making bubble prints. It also leaves plenty of room for the bubbles to rise without spilling over.
Starting with small amounts gives you better control over the activity. If one color does not turn out well, you can adjust it without wasting a large amount of solution.
Keep the cups far enough apart for small hands to reach them safely. If several children are working together, give each child a clear area around the tray.
At this point, do not give the children the straws yet. First, prepare all the colors so you can explain the process properly.
Step 3: Turn the Bubble Solution Into Bright Colors
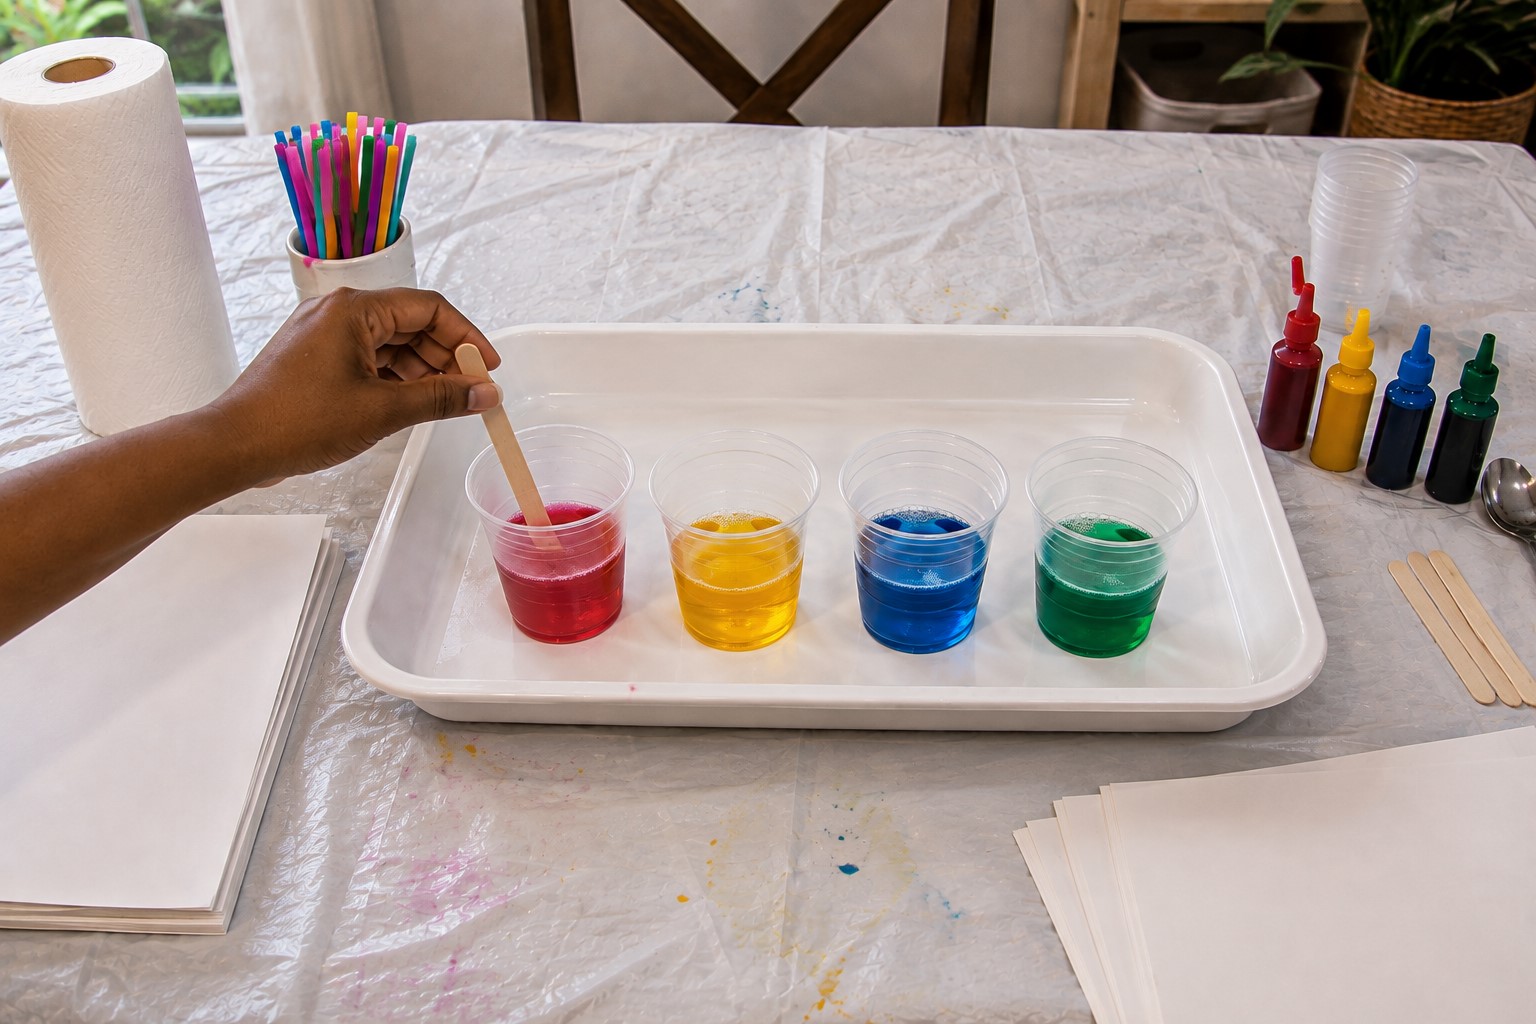
Choose your first food coloring shade. Add two or three drops to one cup of bubble solution.
Stir the mixture gently with a clean spoon or craft stick. Keep stirring until the color spreads evenly through the solution.
Look at the shade before adding more coloring. If it looks too pale, add one more drop and mix again.
You want a color that will leave a clear mark on the paper. Still, you do not need the solution to look extremely dark.
Testing a color before committing to it fully is a habit worth building, the same way it helps with figuring out How to Paint a Watercolor Bookmark in Under 30 Minutes.
Repeat this process with your other cups. You can use pink, yellow, blue, purple, green, or any colors you enjoy.
For a first activity, I recommend starting with three or four colors. That gives children enough choices without filling the table with too many cups.
If you want to introduce color mixing, choose colors that create interesting combinations.
Blue and yellow can create green-looking areas when they overlap. Pink and blue can create purple-looking sections.
Step 4: Test the Colors Before the Children Start
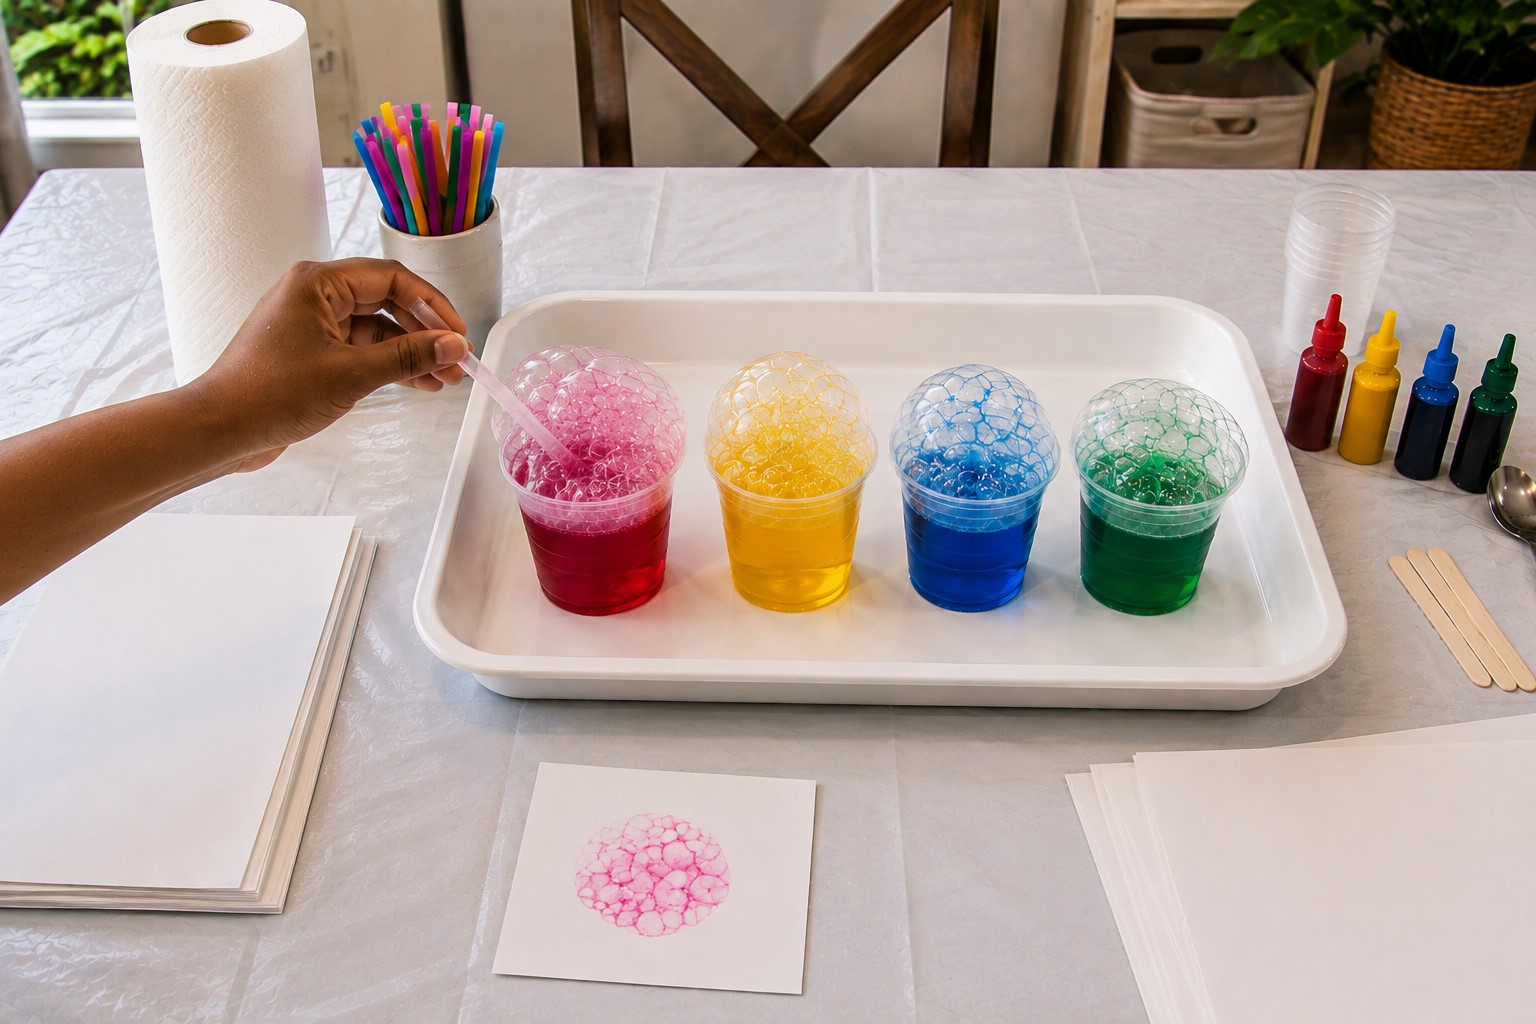
Before handing the cups to the children, test each mixture yourself. This small step can save you from making adjustments later.
Take one straw and place it into the first cup. Make sure the bottom of the straw sits below the surface of the bubble solution.
Now blow gently through the straw. You should see bubbles begin to form around the opening.
Continue blowing until some bubbles rise above the surface. You do not need a huge pile of bubbles for the test.
Take a small piece of paper and lower it gently onto the bubbles. Let it touch them for about one second. Lift the paper and check the print.
If the color looks very faint, add another drop of food coloring. Mix it again and make another test print.
If the color looks clear and bright, leave the mixture as it is. Repeat the same test with the other colors.
Testing the mixtures also helps you understand how the bubbles behave. You will know how much you need to blow before showing the children.
Step 5: Explain the Straw Rule Before They Begin
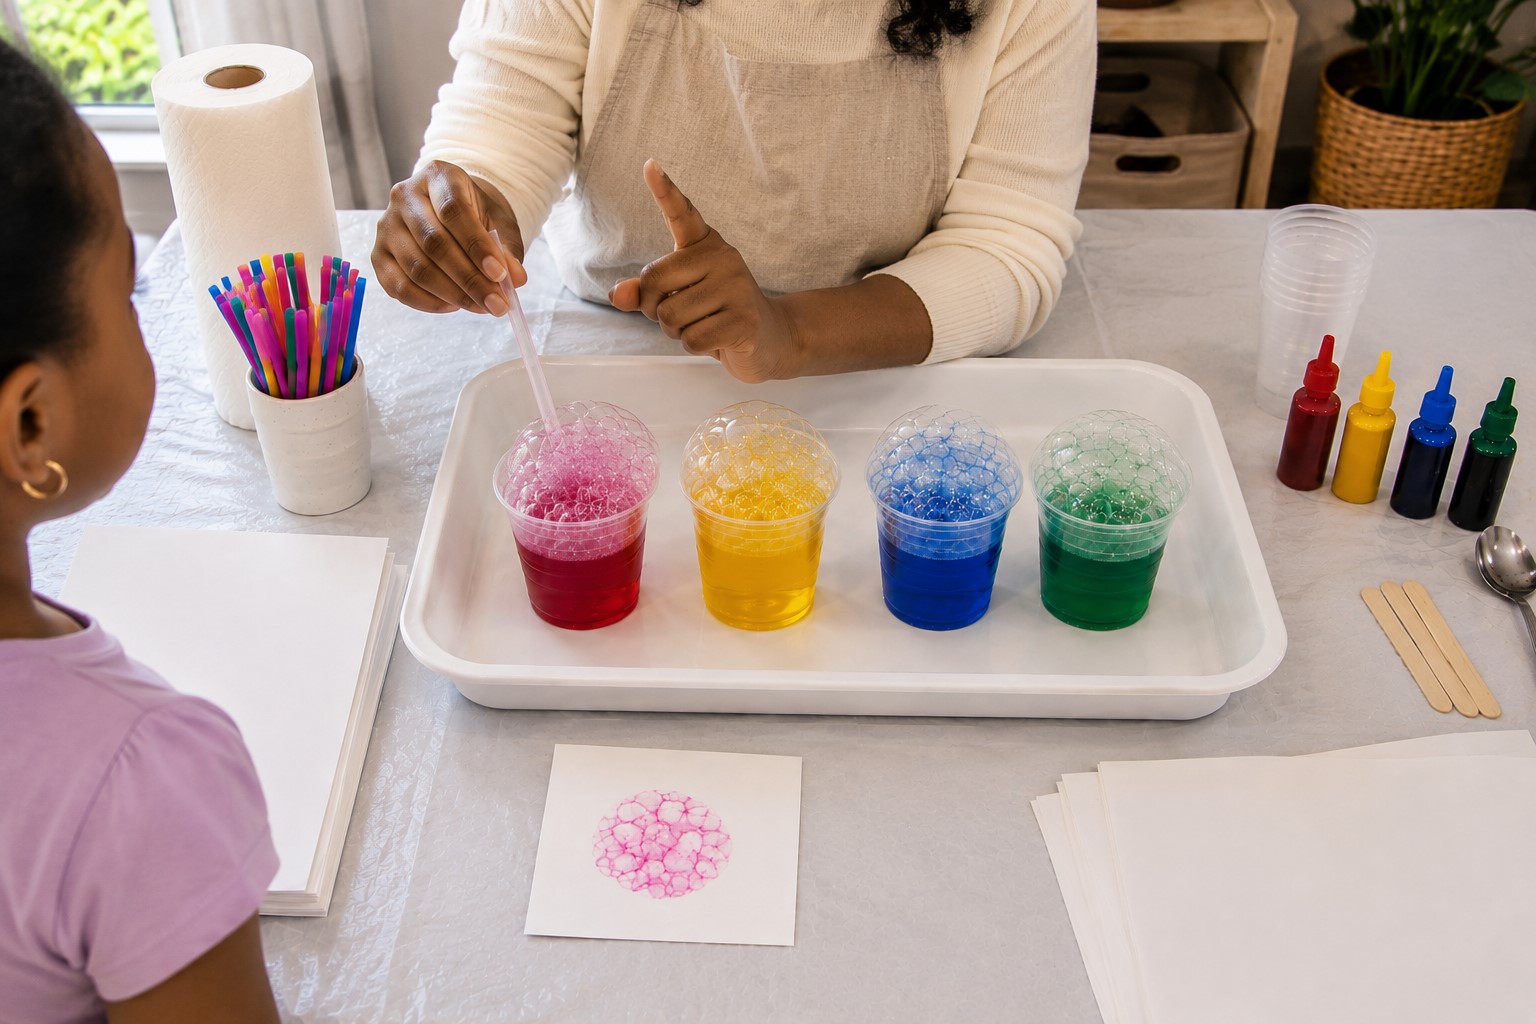
Now you can bring the children to the table. Before anyone starts blowing, explain one important rule. They should blow through the straw and never suck through it.
This is especially important with younger children because they may naturally try to draw the liquid upward.
Show them exactly what you mean. Put the straw into the bubble solution and demonstrate a gentle outward breath.
You can keep the instruction simple by saying, “Blow out, never suck in.”
Then, let the children practice the blowing motion without putting the straw into the colored mixture. Once they understand the movement, they can start making bubbles.
Stay close during the first few attempts. Some children will blow too hard at first, while others may not blow strongly enough.
That is completely normal. They will usually understand the technique after a few tries.
If a child cannot manage the straw safely, you can make the bubbles for them. The child can still control the artwork by choosing the color and deciding where to place the paper.
Step 6: Let the Child Choose the First Color
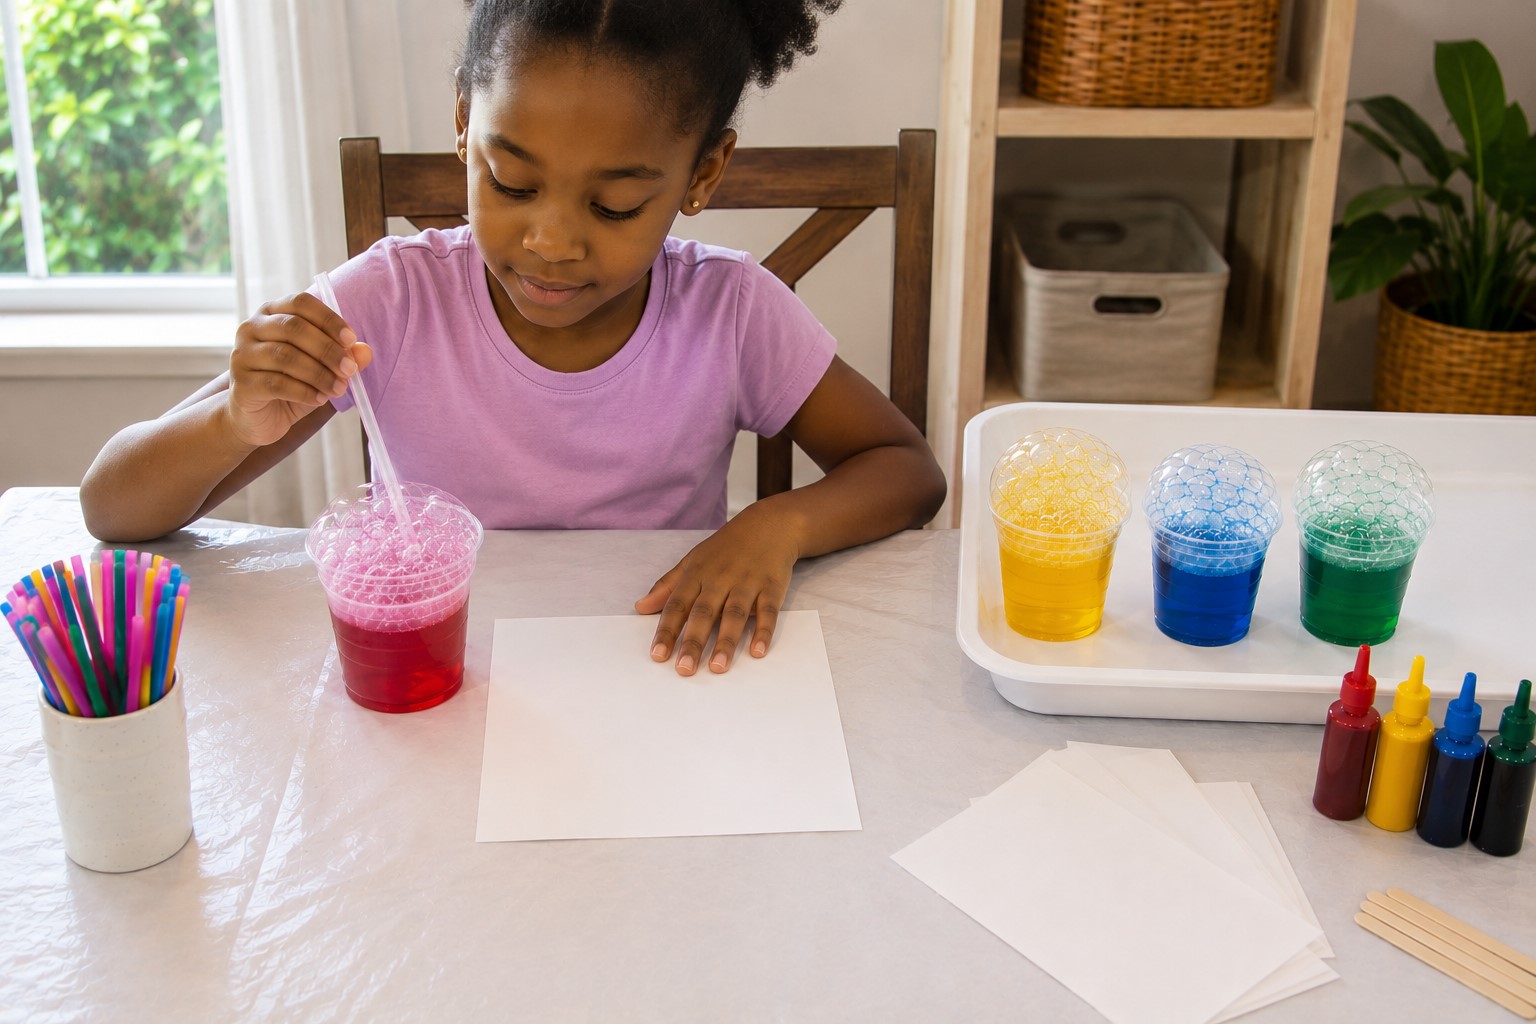
Give each child a clean sheet of paper and let them choose their first bubble color.
Allowing them to choose makes the activity feel more creative from the beginning. You can also ask them why they picked that color.
Giving children this kind of creative freedom is also what makes 19 Easy Clay and Pipe Cleaner Crafts Kids Will Want to Make such a fun activity.
Once they choose, place the matching cup in front of them. Ask the child to hold the straw near the top. The other end should go into the bubble solution.
Make sure the bottom of the straw sits below the surface. If it sits too high, the child will only blow air across the top of the mixture.
Once the straw is positioned correctly, they are ready to create their first bubbles.
Step 7: Teach Them to Blow Slowly
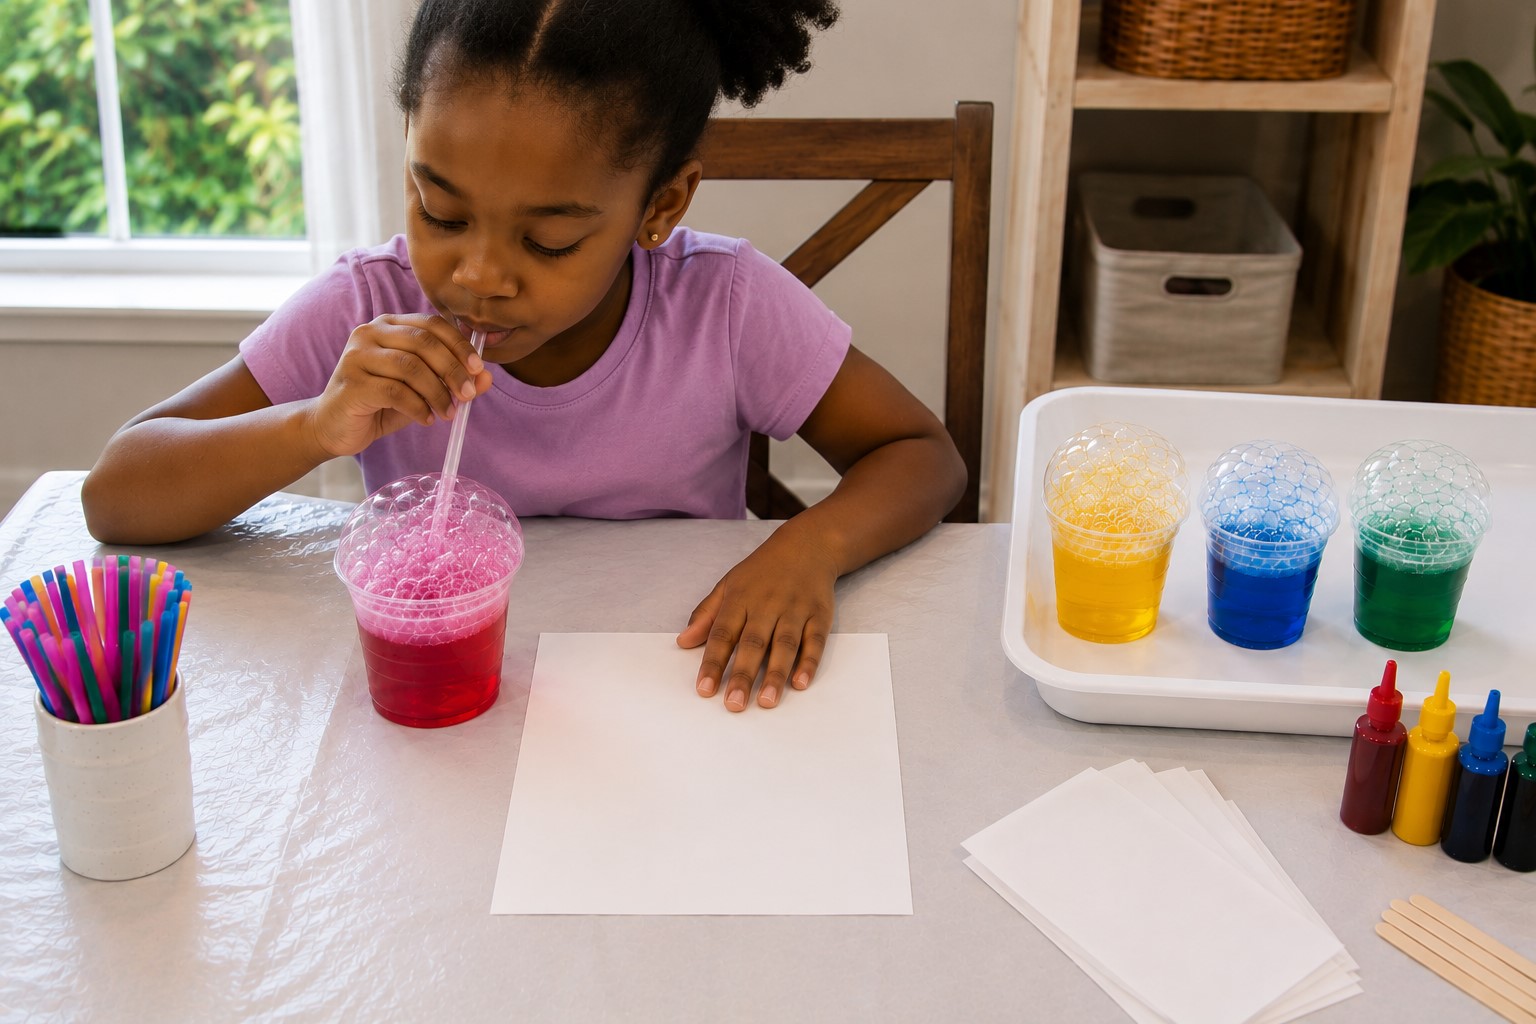
Ask the child to take a gentle breath and blow through the straw. At first, only a few small bubbles may appear. Encourage them to keep blowing slowly.
As more air enters the mixture, the bubbles should grow and begin rising above the surface.
This is where children often get excited and start blowing harder. Remind them to slow down if the bubbles begin rising too quickly.
Strong blowing can make the bubbles overflow the cup. Gentle blowing gives the child more control and creates a steady layer of bubbles.
You can make this part playful by asking them to watch the bubbles grow. Say something simple like, “Can you make the bubbles climb higher?”
That turns the instruction into a little challenge without making the activity feel like a lesson.
Step 8: Build a Small Mound of Bubbles
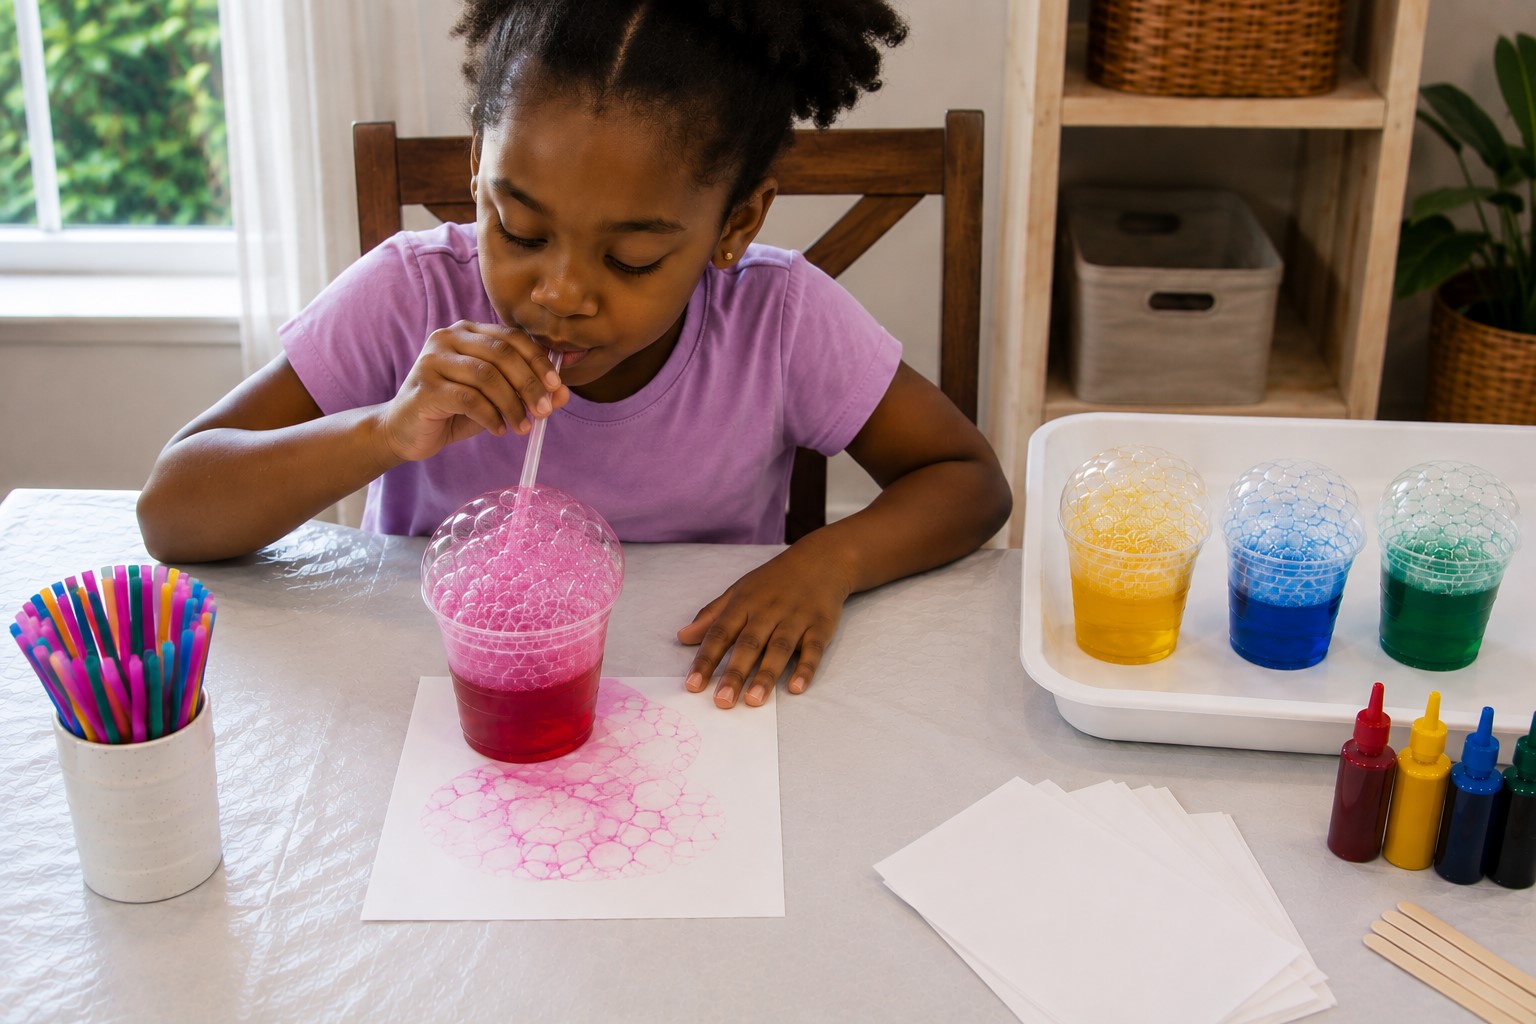
Keep the child blowing gently until the bubbles rise slightly above the top of the cup. You do not need a giant mound. A small layer of bubbles is enough to create a good print.
Once the bubbles reach the right height, ask the child to stop blowing. If the bubbles collapse before you are ready, do not worry. Simply have the child blow again.
The first few attempts may take some practice. Children are learning how much air they need to create the right amount of bubbles.
Building something slowly and patiently like this is also a big part of learning How to Build a Beautiful Terrarium That Doesn’t Get Moldy.
If the bubbles keep overflowing, reduce the amount of bubble solution in the cup. Then, ask the child to use softer breaths.
If the bubbles barely rise, check the straw position. The end needs to sit below the surface of the liquid.
Step 9: Hold the Paper Above the Bubbles
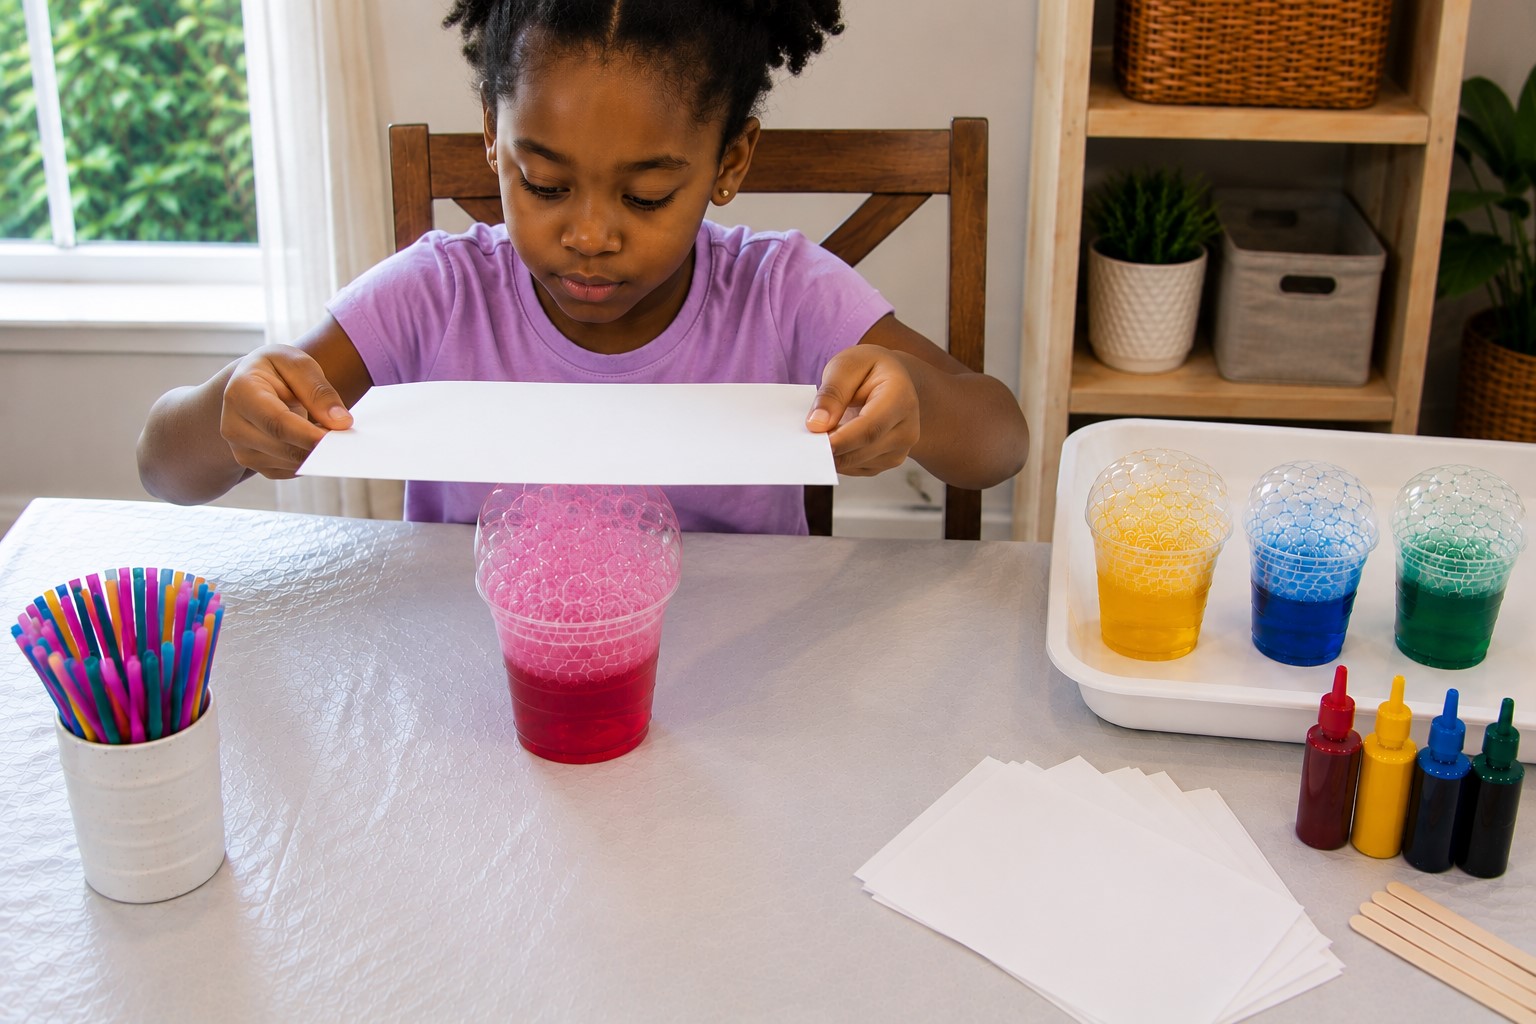
Now take the sheet of paper in both hands. Hold it above the cup with the surface you want to print facing the bubbles.
Keep the paper fairly level. This helps several bubbles touch the paper at the same time.
Move the paper toward the bubbles slowly. This part is worth demonstrating because children may want to push the paper down quickly. Explain that they only need to touch the bubbles.
Do not press the paper deep into the cup. That can make the paper too wet and may push bubble solution over the rim. Instead, lower the paper gently until the bubbles reach it.
Step 10: Make the First Bubble Print
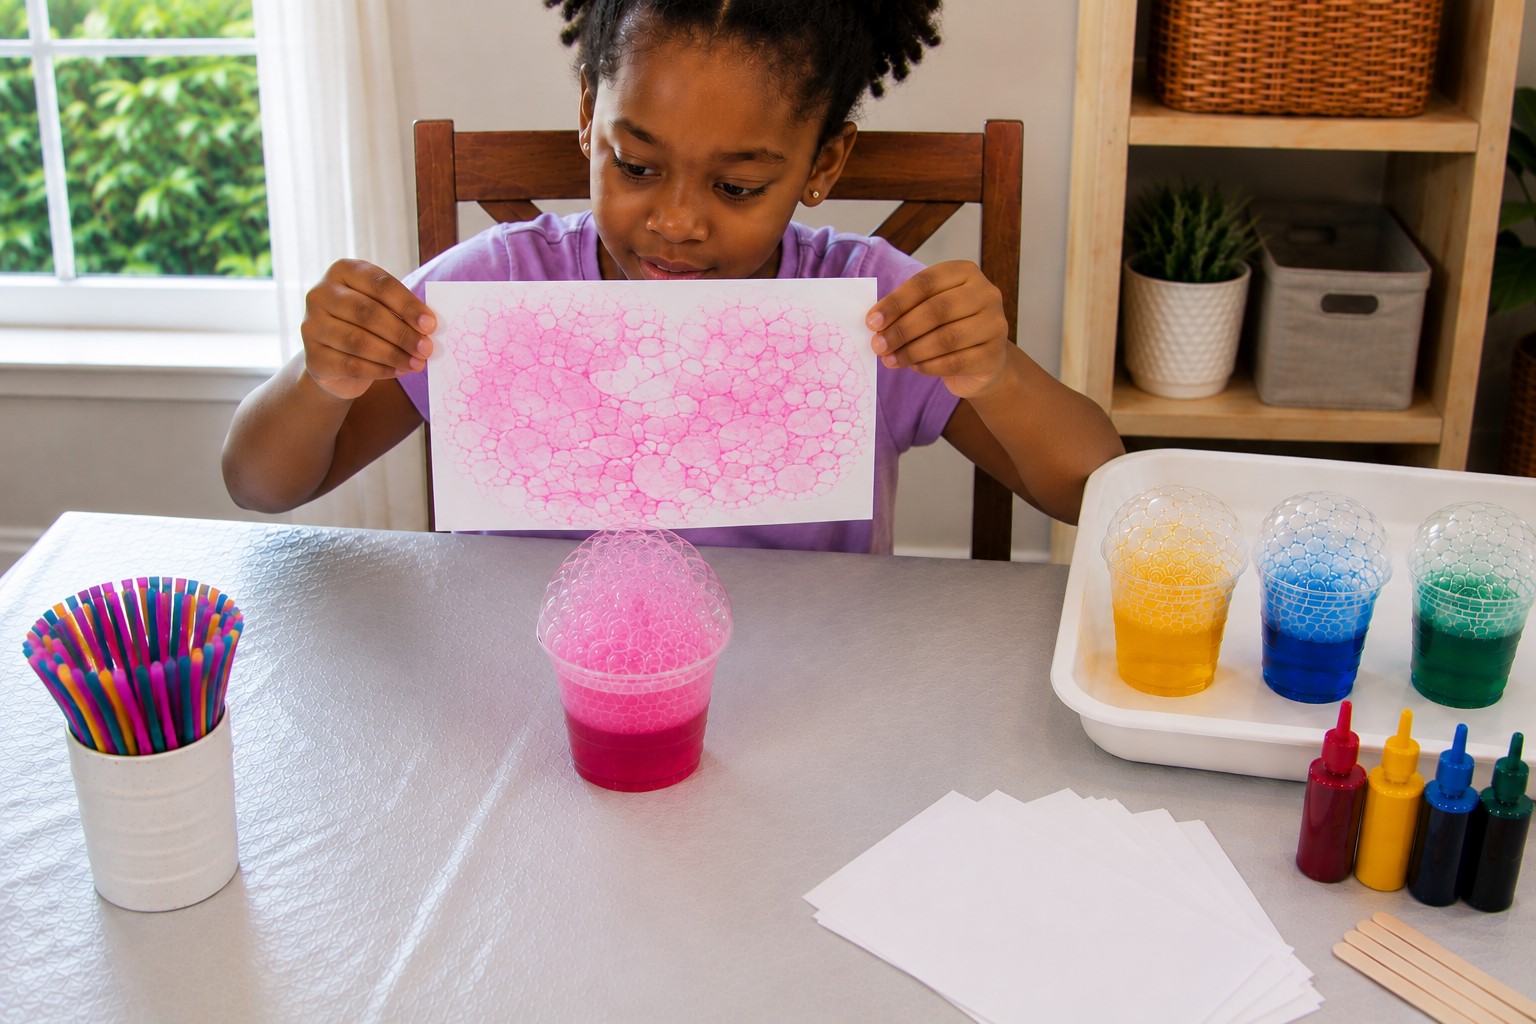
Let the bubbles touch the paper for about one second. You will notice some bubbles popping against the paper. Those bubbles leave behind colorful circular marks.
After a brief moment, lift the paper straight upward. Try not to drag it sideways across the cup.
Lifting it directly gives you a cleaner print and keeps the paper from brushing against the rim.
This same patient, detail-focused technique is also what makes learning How to Do Diamond Painting: A Beginner’s Step-by-Step Tutorial such a satisfying craft for kids and adults alike.
Turn the paper over and look at the result with the child. You should see colorful circles, partial rings, overlapping marks, and uneven patches of color.
Some parts may look darker than others. That happens when several bubbles pop in the same area. Other parts may look very light. Those areas simply received fewer bubbles.
Do not try to correct the print. The uneven pattern is what makes bubble art different from ordinary painting. This is also a nice moment to let the child react to the result.
Ask what they notice about the bubbles. You can point out the different sizes and shapes without telling them what their artwork should look like.
Step 11: Put the First Print Aside to Dry
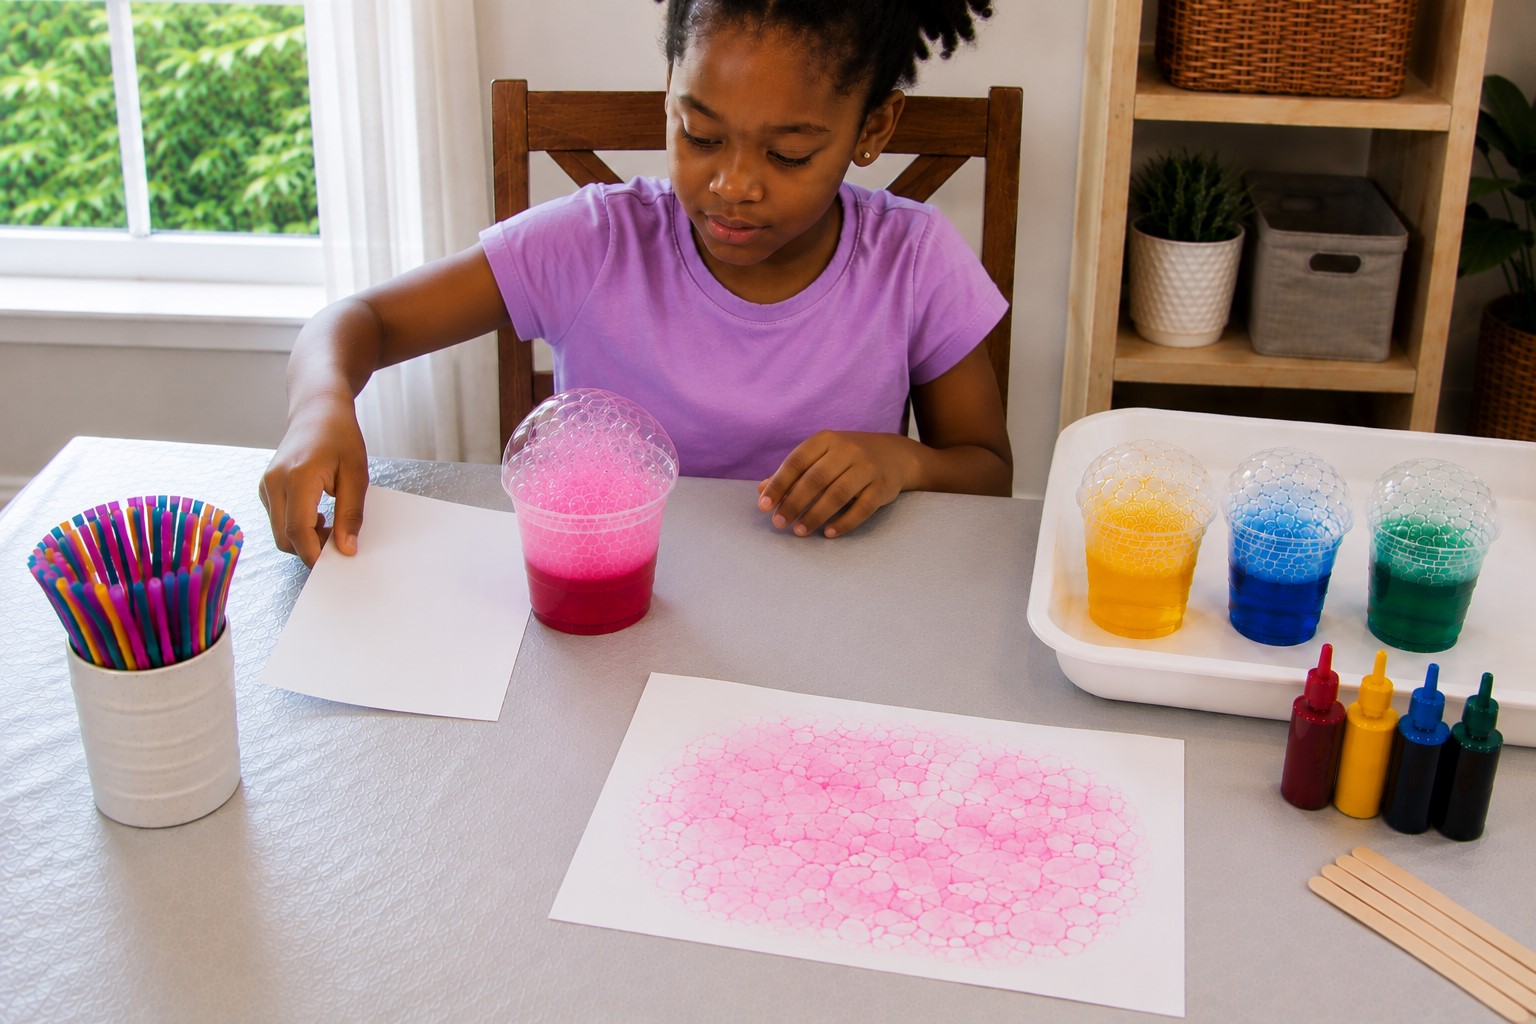
Once you finish the first print, place it in the drying area. Keep it flat and away from the cups.
Do not place another sheet on top of it while it is wet. The colors can transfer from one sheet to another.
You also want to avoid touching the print too much. The surface may look dry while some areas underneath are still damp. Instead of waiting around, give the child another sheet of paper.
This gives them a chance to make another print while the first one dries.
Step 12: Let the Child Try the Same Color Again
Use the same bubble mixture for the next print. Ask the child to repeat the process from the beginning.
They should place the straw below the liquid, blow gently, create a mound of bubbles, and touch the paper to the bubbles.
This second attempt often looks different from the first. The child may blow more gently this time.
They may also create more bubbles or hold the paper at a slightly different angle.
That difference is useful because the child begins to see how their actions affect the artwork. Let them make several prints with the first color if they enjoy it.
There is no need to rush into the next color. Once they feel comfortable creating the bubbles and making the print, you can introduce another color.
Continuing from Step 13, I’ll keep the same single-tutorial flow, with fuller explanations and no unnecessary mini-sections interrupting the process.
Step 13: Introduce the Second Color
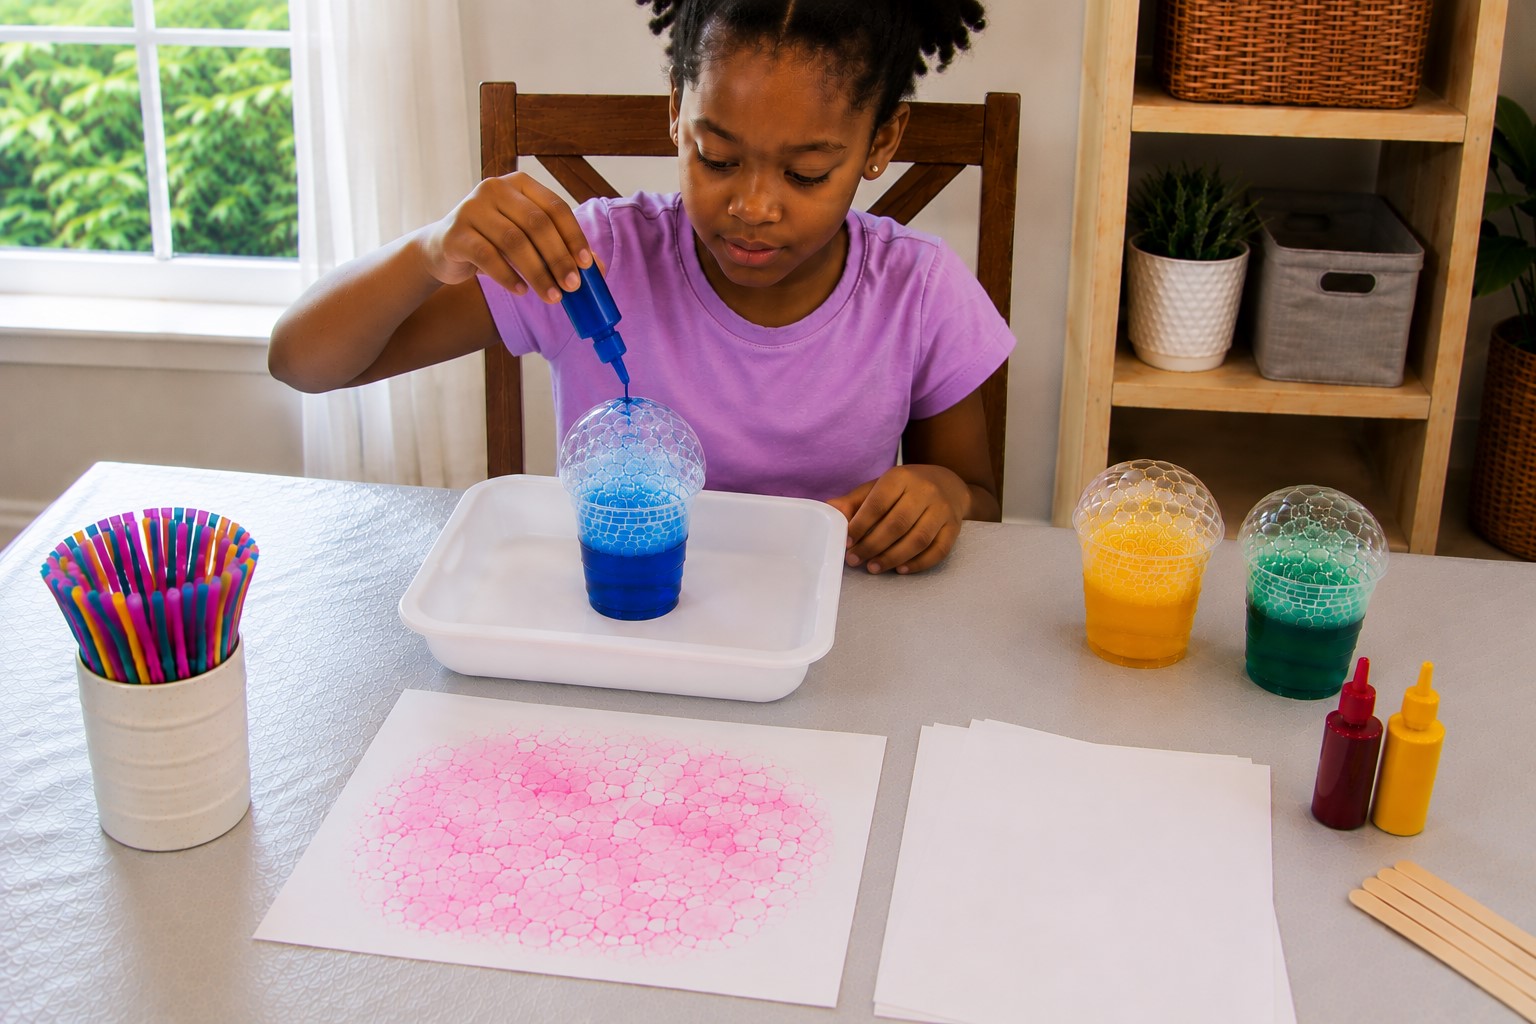
Once the child feels comfortable with the first color, bring out a second bubble mixture.
You do not need to change anything about the technique. The child will repeat the same process with the new color.
Have them place the straw below the surface of the second mixture. Then, ask them to blow gently until the bubbles rise above the cup.
This time, let the child decide where the new bubbles should go on the paper.
They can make a completely separate group of prints beside the first color. They can also place the new bubbles over some of the first color.
I usually encourage children to try both options. One shows them how colors look beside each other. The other lets them see what happens when colors overlap.
Give them time to make a few prints before introducing another color. This keeps the activity from becoming rushed.
Step 14: Let the Colors Overlap
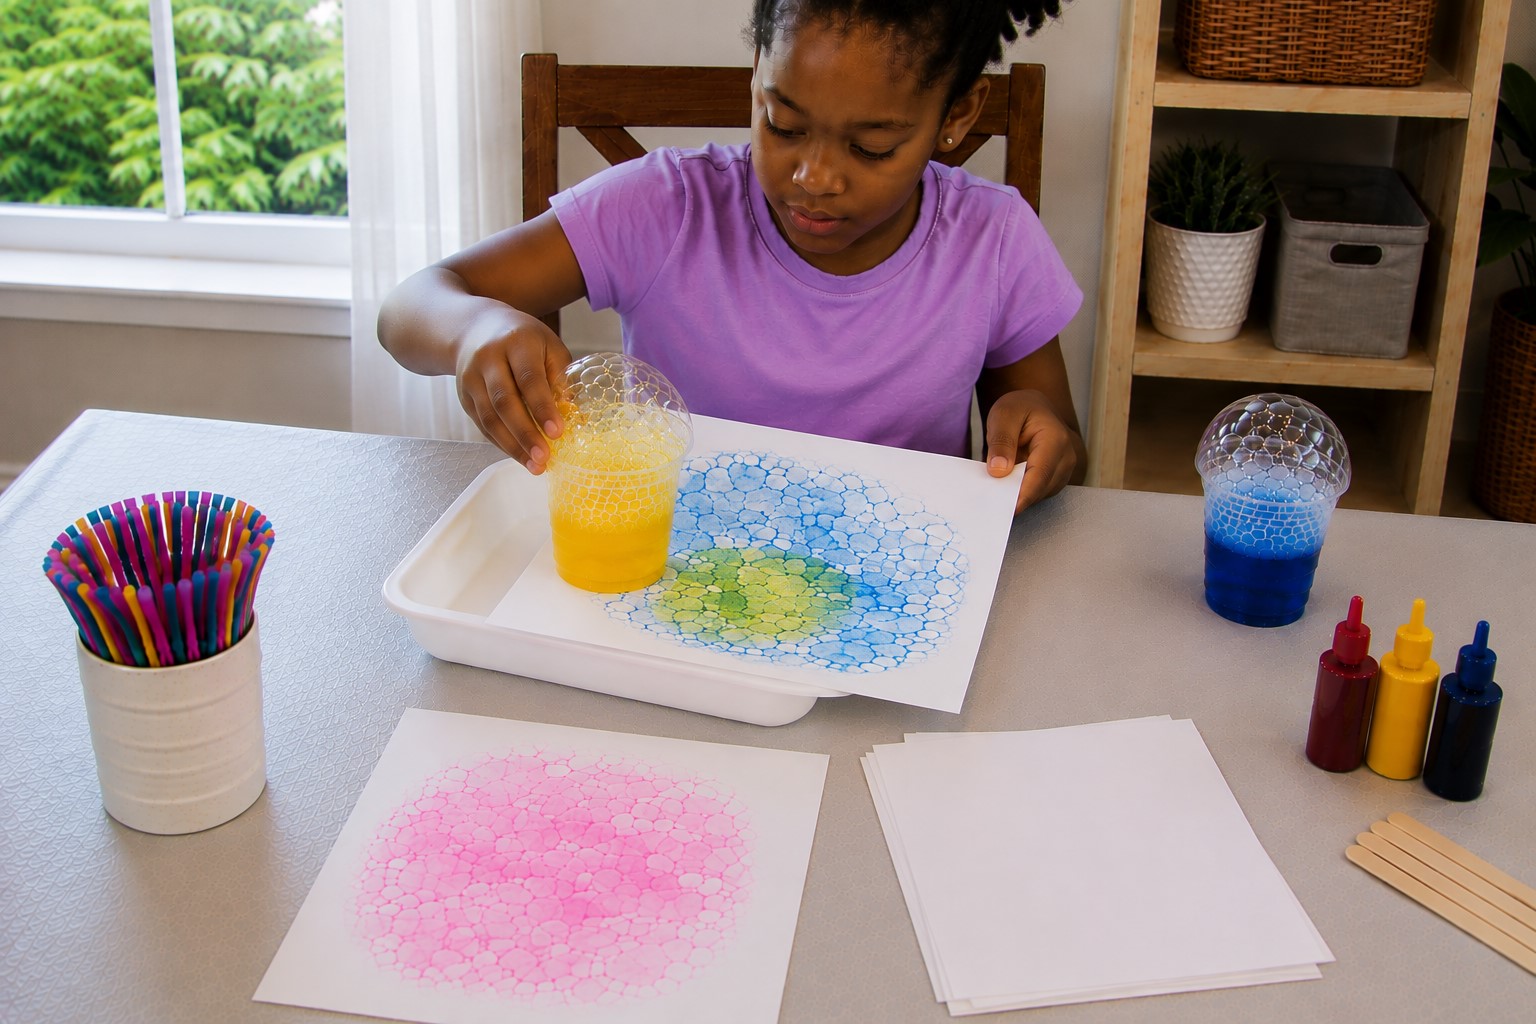
Overlapping the bubbles is where the artwork starts to become even more interesting.
Choose two colors that can create a noticeable change when they meet. Blue and yellow are a good example.
Have the child make a few blue bubble prints first. Let those prints dry for a short while. Then, make yellow bubbles and place them over some of the blue areas.
The new color may create green-looking sections where the prints overlap. You can repeat this with other combinations. Try pink and blue, yellow and red, or red and blue.
Watching colors blend and change like this is also the appeal of figuring out How to Paint on Fabric That Stays Bright Wash After Wash.
The results may not always look exactly like traditional paint mixing. That is fine. The goal is for children to notice that colors can change when they meet.
You can make this part into a simple guessing game. Before the child adds the second color, ask what they think will happen.
After the print dries, compare their guess with the result.
This gives the activity a small learning moment without taking away from the fun.
Step 15: Continue Adding Colors One at a Time
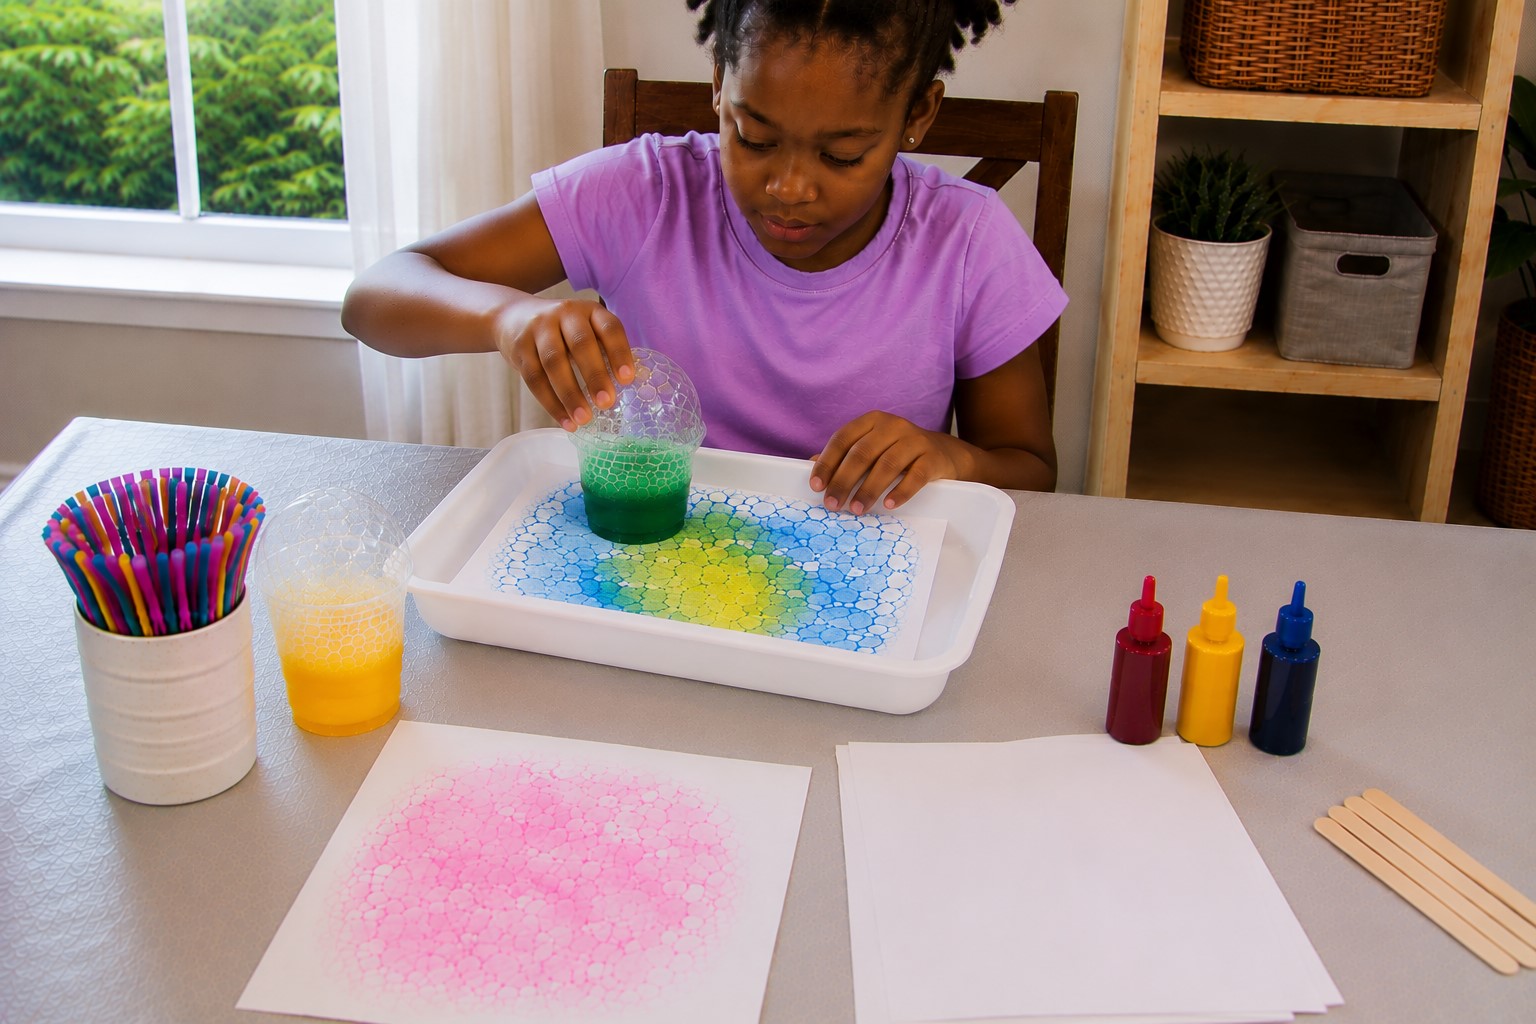
Once the second color is complete, you can introduce another shade. Keep following the same process instead of putting all the colors onto the paper at once.
Create the bubbles, make the print, and give the new layer some time to dry. Working one color at a time gives the child more control over the final design.
It also helps prevent the colors from becoming one large muddy patch. You do not need to use every color you prepared. Three well-chosen colors can create a beautiful print.
If the child wants a very bright and colorful page, let them experiment with more shades.
If they prefer a simpler design, stop after two or three colors. There is no right number of bubble prints for this activity.
Step 16: Leave Some Empty Space on the Paper
As the child adds more bubble prints, remind them that they do not need to cover the whole sheet.
White space can make the colored areas stand out. It also gives the artwork a little breathing room.
Children may naturally want to keep adding bubbles because the process is fun. If that happens, give them another sheet instead of encouraging them to fill every empty area.
This lets them experiment without making one piece too crowded. You can also show them how different the same colors look when they have more space around them.
That small observation can help children begin thinking about how artists arrange things on a page.
Step 17: Decide When the Artwork Is Finished
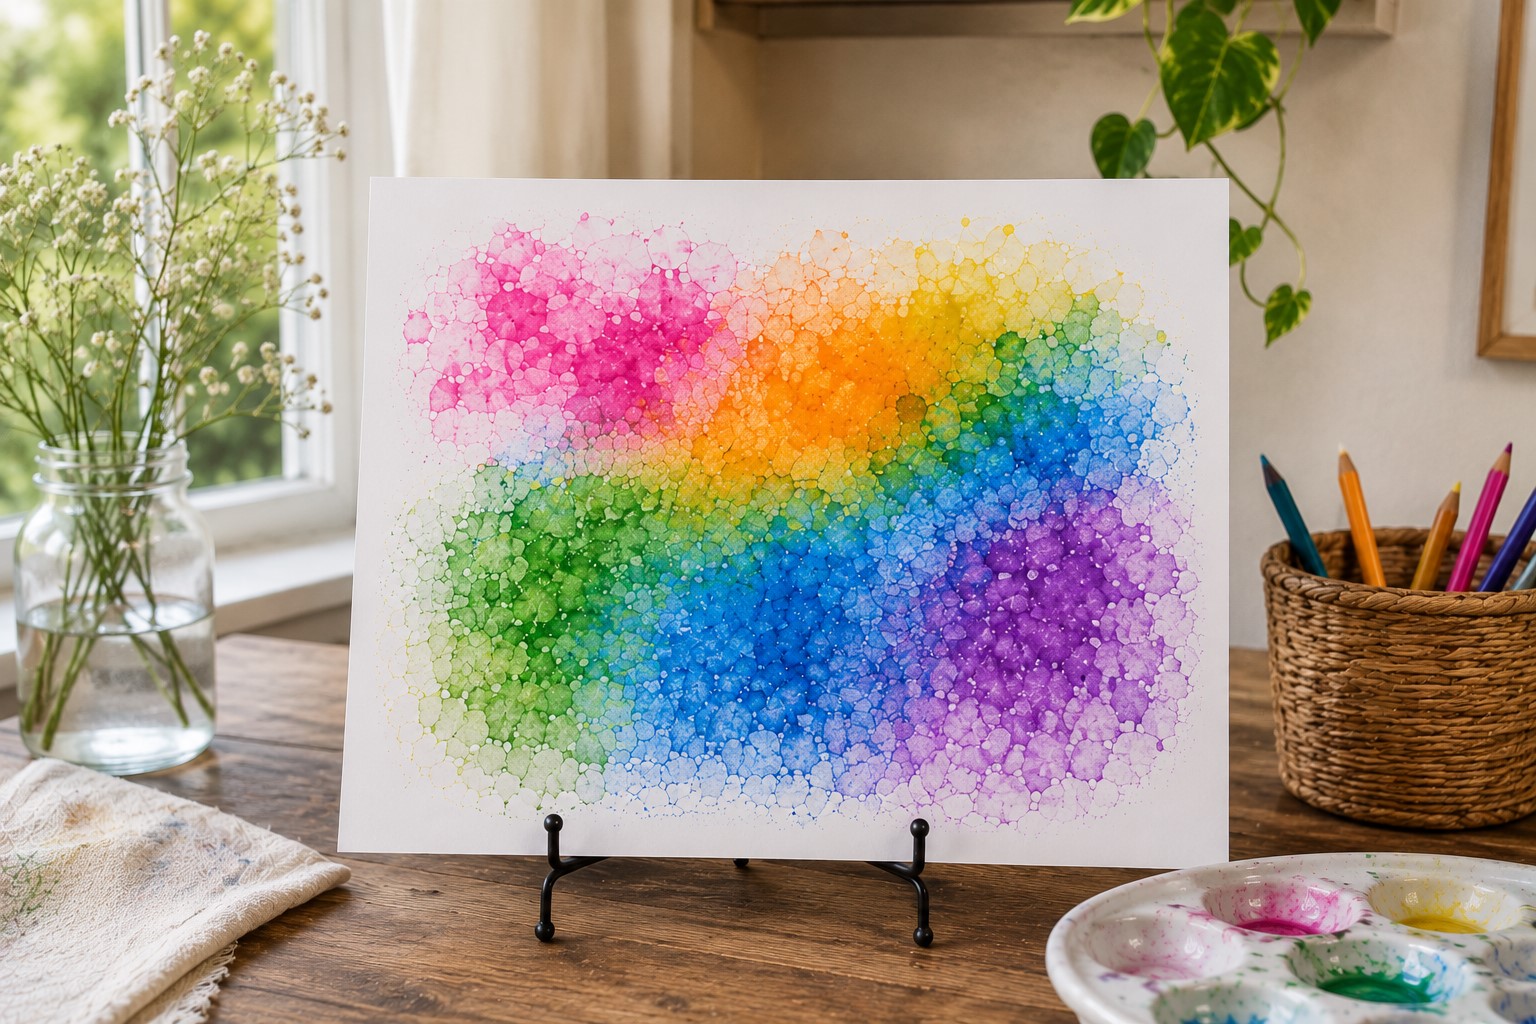
After several layers, stop for a moment and look at the artwork together. Ask the child if they like how the colors are arranged. If they want more color, let them add another layer.
If they think it looks finished, move it to the drying area. Try not to decide when the artwork is finished for them.
One child may be happy with three colorful bubble clusters. Another may want the entire page covered with overlapping prints. Both results are perfectly fine.
The point of this project is to give children control over their creative choices.
Step 18: Let the Bubble Artwork Dry Completely
Place the finished prints flat in your drying area. Keep enough space between each sheet so they do not touch.
Do not stack them while they are wet. Bubble solution can remain underneath the surface even when the paper looks almost dry.
If wet sheets touch each other, colors may transfer from one print to another. Give the artwork plenty of time to dry before moving it.
The same patient waiting is what helps the project on How to Make a Beautiful Origami Crane You’ll Be Proud to Display hold its shape properly too.
You can use this waiting period to clean the cups and tray. Children can also help with simple cleanup tasks once they finish creating.
When the prints are completely dry, look at them again. The colors may appear slightly different from when the paper was wet.
Some marks may look softer, while overlapping areas may become easier to see.
Fun Ways to Turn the Bubble Prints Into Other Crafts
The finished prints are already colorful enough to display on their own. Still, you can use them for other simple crafts once they dry.
Turn Bubble Prints Into Flowers
Start with a colorful bubble print that contains several round marks. Use a marker to draw stems beneath some of the larger circles.
Add simple leaves beside the stems. The bubble marks now become the flower heads.
You can make one large flower in the middle of the page. You can also turn several bubble prints into a whole garden.
If your child enjoys making flowers, exploring How to Make Full and Fluffy Tissue Paper Flowers That Impress is another fun project to try.
This is a nice option when the children enjoy drawing but still want the bubble patterns to remain the main part of the artwork.
Make Colorful Butterflies
Choose a print with several colorful areas close together. Once the paper dries, draw a simple butterfly body between two larger bubble clusters.
Add curved wing outlines around the colorful areas. Then, draw two small antennae above the body.
You do not need to make the wings perfectly symmetrical. The uneven bubble patterns already give the butterfly a playful look.
If your child enjoys making animal-themed crafts like this, 23 Adorable Farm Animal Crafts That Bring the Barnyard to Life has plenty more ideas to explore.
Create Homemade Greeting Cards
Use smaller pieces of thick paper when making cards. Create the bubble print on the front and let it dry completely.
Then, fold the paper in half. Children can write a short message inside. They could make a birthday card, thank-you card, or simple note for someone they love.
The colorful bubble pattern makes each card feel personal without requiring complicated drawing.
Make a Bubble Print Collage
If you have several dried prints, turn them into a collage. Start by cutting the colorful sections into simple shapes.
You can make circles, flowers, leaves, hearts, stars, or butterflies.
Arrange the pieces on a clean sheet of paper before adding glue. Move the pieces around until the child likes the arrangement. Then, glue each piece down.
If you enjoy this kind of arranging with natural or colorful materials, figuring out How to Make a Beautiful Nature Collage Using Natural Materials is a fun companion project.
This is especially useful when you have leftover bubble prints that you do not want to throw away.
Common Bubble Art Problems and How to Fix Them
Bubble art is simple, but children may need a little help while they learn the technique.
The Bubbles Keep Overflowing
If the bubbles keep spilling over the cup, ask the child to blow more gently. Strong breaths can create bubbles faster than the child can control them.
You should also check how much bubble solution is in the cup. If the cup is very full, pour some of the solution into another cup. Then, have the child try again with slower breaths.
The Print Looks Too Pale
A faint print usually means the bubble mixture needs more color. Add another drop of food coloring and stir the mixture thoroughly.
Make another test print before giving it back to the child. If the color still looks weak, add another small amount.
Try not to add a lot at once because very strong coloring can create unnecessary stains.
The Paper Gets Too Wet
If the paper becomes soggy, check how long it touches the bubbles. The paper only needs brief contact. You can also switch to watercolor paper or another thicker option.
Avoid pressing the paper deeply into the bubble mound. A light touch gives you enough color without soaking the paper.
The Colors Become Muddy
Too many wet colors overlapping in the same place can create a muddy-looking section. Let one layer dry before adding another strong color.
Keeping colors distinct and well-separated matters here too, the same way it does in figuring out How to Make Sand Art in a Bottle Without the Colors Mixing.
You can also reduce the number of colors on one sheet. Sometimes two or three colors give a much cleaner result than using many shades.
The Bubbles Are Too Small
Make sure the straw sits below the surface of the bubble solution. Then, ask the child to blow steadily rather than taking several very short breaths.
If the bubbles still remain small, give the mixture a gentle stir and try again. You can also test the solution yourself to make sure the bubble solution produces good bubbles.
The Child Keeps Sucking Instead of Blowing
Stop the activity if the child cannot remember the straw rule. Show them the correct motion again. You can also remove the straw from their hands and make the bubbles yourself.
Then, let the child control the paper. This keeps them involved without turning the activity into a struggle.
Final Thoughts
Bubble art is a simple activity, but it gives children so much room to explore. They learn to control their breath, watch colors interact, and make creative choices as they work.
At the same time, they get to enjoy the simple excitement of making bubbles.
If your family enjoys screen-free craft time like this, 21 Easy Minecraft Paper Crafts Kids Can Finish in One Sitting is another great activity to keep in your back pocket.
The secret to figuring out How to Make Bubble Art With Kids is not complicated supplies or perfect technique.
It comes down to preparing the workspace, using manageable amounts of bubble solution, and giving children enough time to learn the process.
Once they understand how to create the bubbles and make the prints, you can step back and let their creativity take over.
If the grown-ups want a craft project of their own afterward, exploring How to Make Gorgeous Air Dry Clay Earrings That Don’t Crack is a nice way to unwind once the kids are done.
I especially enjoy this activity because every print brings a small surprise. Some will have bold circles, while others will have delicate overlapping patterns.
So, do not worry if the first few attempts look different from what you expected. Let the children experiment, make mistakes, try new colors, and enjoy the process.
With the right setup, learning How to Make Bubble Art With Kids can become a colorful, playful project that feels more like an afternoon of fun than a formal art lesson.