It is surprising how much a messy desk can affect your day. You sit down to work, then spend the next few minutes looking for a pencil or pen. Before long, supplies end up scattered everywhere.
That is one reason I love practical crafts. Projects like How to Make a Clay Pencil Holder give you something fun to make and something useful to keep afterward.
A while back, I helped my niece clean her study desk before school started. We expected the job to take a few minutes. Instead, we found pencils inside drawers, markers between notebooks, and pens hiding under piles of paper.
As we sorted everything, she asked if we could make a holder rather than buy one. We grabbed some clay, talked while we worked, and shaped a simple container together. It was not fancy, yet it did exactly what she needed.
That little project stayed with me because it solved a real problem. Her desk looked neater, and she actually enjoyed keeping it organized. Since then, I have suggested this craft to many beginners. It does not require special skills, and you can easily make it your own.

In this guide, I will show you the steps, share a few tips from experience, and help you create a clay pencil holder that keeps your desk tidy every day.
Why Make Your Own Clay Pencil Holder?
Many people think of clay projects as decoration. While decorative crafts have their place, practical crafts often bring more value to everyday life. A clay pencil holder gives you a place to store supplies while adding personality to your desk.
Store-bought organizers can look nice, but they often lack character. You usually choose from a few colors and shapes. With a handmade holder, you decide everything. You can make it tall, short, round, square, or even shaped like your favorite animal.
Another reason I enjoy this project is the sense of accomplishment. Creating something with your own hands feels rewarding. Then you get to use that item every day. Each time you reach for a pencil, you remember the effort you put into making it.
Kids enjoy this project as well. At the same time, adults often find it relaxing. So whether you craft alone or with family, this project offers a fun way to spend an afternoon.
Supplies You Will Need
Gather your materials before you begin. Having everything nearby makes the process much easier.
Here is what I recommend:
- Air-dry clay or oven-bake clay
- Rolling pin
- Craft knife
- Ruler
- Small bowl of water
- Sandpaper
- Acrylic paint
- Paintbrushes
- Clear sealer
- Pencil
- Wax paper or silicone mat
You probably already own some of these items. Even if you need to buy a few supplies, this project remains budget-friendly.
Choosing the Right Clay

Before starting, choose the clay that best fits your needs. Air-dry clay works well for beginners. You do not need special equipment. Simply shape the clay and let it dry. Many first-time crafters prefer this option because it feels less intimidating.
Oven-bake clay creates a stronger finished piece. Yet you must follow the baking instructions carefully. If you already enjoy clay crafts, you may prefer this option.
For most readers, I suggest air-dry clay. It keeps the process simple and still produces great results.
Plan Your Design
Take a few minutes to think about the finished look. First, decide how many supplies you want to store. A holder for pencils requires less space than one for markers and scissors.
Next, think about shape. Round holders feel classic and easy to make. Square holders look modern and fit neatly against books and folders. Then consider decoration.
Some people love bright colors. Others prefer simple neutral tones. Choose a style that matches your workspace. I often sketch a quick design before touching the clay. The sketch does not need to look perfect. It simply helps me organize my ideas.
How to Make a Clay Pencil Holder That Really Keeps a Desk Organized
Step 1: Prepare Your Work Area

Start with a clean, flat surface. Place wax paper or a silicone mat on your table. This prevents the clay from sticking. Keep your tools within reach.
Fill a small bowl with water. Then set aside a towel for quick cleanup. A prepared workspace saves time later. It also helps you focus on the creative part of the project.
Step 2: Roll Out the Clay

Take a portion of clay and knead it gently. This step softens the clay and removes air pockets. After that, use a rolling pin to flatten it.
Aim for an even thickness. Most pencil holders work well with walls about one-quarter inch thick. Try not to rush here. Even thickness creates a stronger finished piece.
Step 3: Create the Base

Use your ruler to measure the base. A base around four inches wide works for most pencil holders. Of course, you can adjust the size. Cut the shape carefully with a craft knife.
Check the edges before moving on. Smooth rough spots with your fingers. A clean base makes assembly easier later.
Step 4: Form the Walls

Roll out another piece of clay. Cut strips that will become the walls of your holder. Make sure the height suits your needs. For example, taller walls work well for markers. Shorter walls provide easier access to pencils.
Attach the strips around the base. Then press gently where the pieces meet. Add a little water to help the clay stick together. After that, smooth the seams with your fingers.
This stage often determines the final look. So take your time and make small adjustments as needed.
Step 5: Strengthen the Structure

Once the basic shape looks good, strengthen the joints. Press along every seam. Then smooth each connection. Look for cracks or gaps. If you spot any, fill them with small pieces of clay.
Many beginners skip this step. Later, they wonder why the holder feels weak. Spending a few extra minutes here makes a big difference.
Step 6: Add Personal Details

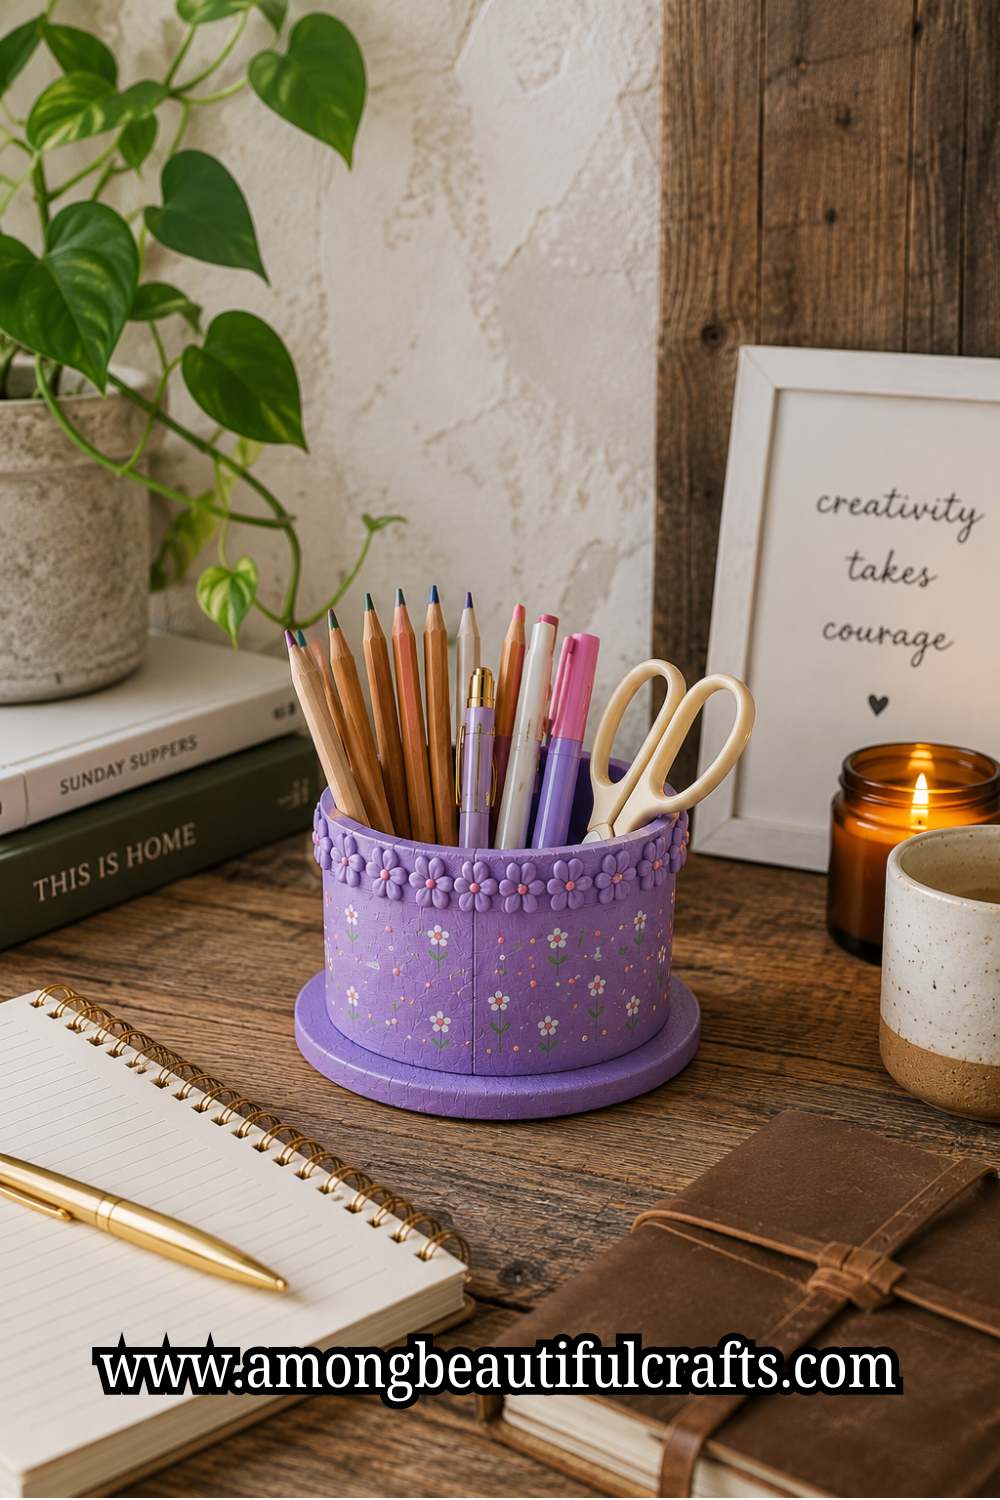
Now comes my favorite part. You can leave the holder plain, or you can add decorative elements. Some people carve simple patterns into the clay. Others create flowers, stars, hearts, or geometric designs.
My niece added tiny flowers around the rim of her holder. Meanwhile, another friend pressed lace into the clay for texture. Choose details that make you smile. After all, you will see this project every day.
Step 7: Smooth the Entire Surface

Before the clay dries, inspect the entire holder. Run your fingers across the surface. Look for bumps, dents, or rough spots. Next, dip a finger into water and gently smooth uneven areas. A little water goes a long way.
Do not use too much water. Excess moisture can weaken small details. Move slowly around the holder. Then check it from different angles.
I learned this lesson after rushing through a project sometime. The holder looked fine from one side. Yet the other side had several rough spots.
Since then, I always take a few extra minutes here. A smoother surface creates a cleaner finished look.
Step 8: Let the Clay Dry

Now place the holder in a safe location. Choose a flat surface where it will not get bumped or moved. Drying times vary by clay type. Air-dry clay often needs one to three days.
Check the package instructions for guidance. Avoid placing the holder near direct heat. Fast drying can lead to cracks. Instead, let the clay dry naturally.
During this stage, patience matters. I know it feels tempting to move ahead. Still, waiting gives you better results. Touch the clay occasionally. Once it feels completely hard and dry, you can continue.
Step 9: Sand Rough Areas

After drying, examine the holder again. You may notice a few rough spots. If so, use fine-grit sandpaper to smooth them. Work gently around edges and decorative details.
Soon, the surface will feel much cleaner. Wipe away dust with a dry cloth when finished. This small step helps paint look better later.
Step 10: Paint Your Pencil Holder

Now the project starts to come alive. Choose colors that match your desk or personal style. Start with a base coat. Then allow it to dry completely.
After that, add extra colors, patterns, or designs. Stripes, dots, and simple shapes work well for beginners. Kids often enjoy bright colors. Adults sometimes prefer softer shades.
Neither choice is wrong. The goal is to create something you enjoy seeing every day.
When people ask me about How to Make a Clay Pencil Holder, they often focus on shaping the clay. Yet painting usually becomes the most exciting part. This is where your personality really shows.
Step 11: Add Extra Decorations

Once the paint dries, decide if you want more details. You can keep the holder simple. On the other hand, you can make it more decorative.
Try adding:
- Small painted flowers
- Geometric patterns
- Initials
- Inspirational words
- Polka dots
- Simple borders
Keep the design balanced. Too many decorations can make the holder look crowded. Sometimes less creates a stronger impact.
Step 12: Seal the Finished Piece

The final step protects your work. Apply a clear sealer according to the product instructions. A sealer helps prevent scratches and fading. It also makes cleaning easier.
Brush on a thin layer. Then allow it to dry fully. Some crafters add a second coat for extra protection. Once the sealer dries, your holder is ready to use.
Easy Design Ideas for Beginners
If you need inspiration, start with one of these simple ideas.
Minimalist Pencil Holder
Use a plain shape and one solid color. This design fits almost any workspace.
Nature-Inspired Holder
Press leaves into the clay before drying. Then paint the impressions in soft colors.
Marble Effect Holder
Blend two clay colors together. The swirls create a beautiful marble look.
Geometric Desk Organizer
Create clean lines and sharp angles. This style works especially well in modern spaces.
Personalized School Holder
Add a name or initials. Kids love having something made just for them.
Common Mistakes to Avoid
Every crafter makes mistakes. The good news is that most mistakes have simple solutions.
Making the Walls Too Thin
Thin walls can crack or bend. Instead, keep a consistent thickness throughout the project.
Rushing the Drying Process
Many beginners want quick results. Yet clay needs time to dry properly. Allow the process to happen naturally.
Skipping Surface Smoothing
Small imperfections become more noticeable after painting. Spend extra time smoothing the clay before it dries.
Using Too Much Water
Water helps blend seams. At the same time, too much water weakens the clay. Use only small amounts.
Forgetting to Seal the Holder
Without a sealer, paint can wear down faster. A protective finish helps your project last longer.
Frequently Asked Questions
Can children make a clay pencil holder?
Yes. Children can enjoy this project with adult supervision. Choose simple designs for younger crafters.
What clay works best for beginners?
Air-dry clay usually works best. It removes the need for baking.
How long does the project take?
The building process often takes one to two hours. Drying time adds another one to three days.
Can I make multiple compartments?
Absolutely. Many people create sections for different supplies.
Is this project expensive?
Not at all. Most supplies remain affordable and easy to find.
Can I make this as a gift?
Yes. A handmade pencil holder makes a thoughtful gift for students, teachers, and friends.
Tips, Ideas, and Creative Uses for Your Clay Pencil Holder
Once your pencil holder is finished, you can customize it, keep it looking great, and even use it as a thoughtful gift. Here are some simple ideas to help you get more from your project.
Ways to Make It More Useful
- Create separate sections for pencils, pens, and markers.
- Make the holder wider to store scissors and rulers.
- Add a small tray for paper clips, erasers, and sticky notes.
- Design compartments based on your daily needs.
- Use it to organize both school and office supplies.
Easy Customization Ideas
- Paint each side a different color.
- Choose soft neutral shades for a simple look.
- Add your name or initials.
- Match the colors to your room décor.
- Press leaves or simple patterns into the clay.
- Create themes such as nature, coastal, or classroom-inspired designs.
How to Keep It Looking Great
- Dust it regularly with a soft cloth.
- Clean small marks with a slightly damp cloth.
- Avoid soaking it in water.
- Keep it away from hard falls.
- Touch up paint scratches when needed.
- Apply a protective sealer for longer-lasting results.
Making the Project With Kids
- Use simple shapes for younger children.
- Let them choose their own colors and decorations.
- Help with cutting and shaping when necessary.
- Focus on creativity instead of perfection.
- Encourage them to take pride in their finished work.
Final Thoughts
When supplies pile up on a desk, staying organized becomes much harder. A simple pencil holder creates a designated place for everyday items.
Better yet, making one yourself adds a personal touch that no store-bought organizer can match. That is what makes How to Make a Clay Pencil Holder such a rewarding project.
I still smile when I think about the afternoon my niece and I spent making her first holder. We started with a cluttered desk and a lump of clay.
By the end, we had created something useful that she felt proud to use every day. Moments like that remind me why I enjoy practical crafts so much.
If you have never worked with clay before, this project offers a great place to start. The steps stay simple, the materials remain affordable, and the results feel genuinely useful.
So gather your supplies, take your time, and enjoy the process. Before long, you will have a handmade organizer that keeps your desk tidy and shows off your creativity.