Every school year has that one notebook. You promise yourself it will stay neat. You write your name carefully on the first page.
You tell yourself you will keep it looking nice until the last day of school. Then a few weeks pass. The cover starts to bend. Corners get scratched.
A pen leaves a random mark across the front. Before long, that brand-new notebook already looks tired.
A while back, I decided to change that instead of buying another notebook with a fancy cover. I picked up some colorful patterned paper, opened a jar of Mod Podge, and tried a simple decoupage technique I had been wanting to learn.
I did not expect much from my first attempt. Yet the moment everything dried, I could hardly believe it was the same notebook.
It looked brighter, stronger, and far more personal than anything I could have picked from a store shelf. Since then, decorating notebooks has become one of those little traditions I look forward to before every school season.
Making a DIY Back-to-School Notebook Cover now feels just as exciting as shopping for new school supplies.
I want you to enjoy that same feeling, so I will walk you through the entire process without skipping the small details.

In this tutorial, you will learn how to decorate a notebook using the decoupage technique with colorful paper and Mod Podge.
We will prepare the cover, arrange the paper, glue each piece neatly, smooth out bubbles before they dry, and seal everything for a clean, durable finish.
Along the way, I will share the simple habits that helped me get better results after making many notebook covers.
By the end, you will have a notebook that feels uniquely yours and the confidence to decorate journals, planners, and sketchbooks the same way.
Materials You’ll Need
Before you begin, gather all your supplies in one place. This saves time and helps you enjoy the project without stopping every few minutes to look for something.
Notebook
Choose a notebook with a sturdy cover. Hardcover notebooks work best because they stay firm while you decorate them.
A notebook with a thick cardstock cover also works well. If the cover has dents or tears, choose another one because the paper may not stick smoothly.
Colorful Decorative Paper
You can use scrapbook paper, wrapping paper, decorative napkins, magazine pages, or patterned printer paper.
Pick colors that look good together instead of choosing every pattern you like. A simple color palette usually creates a cleaner finish.
Mod Podge
This works as both the glue and the protective finish. It keeps the paper in place and seals the completed design. You can choose either a matte or glossy finish depending on the look you want.
Foam Brush or Soft Paintbrush
A foam brush spreads Mod Podge evenly across the notebook. A soft paintbrush also works well if you use light, smooth strokes.
Scissors or Craft Knife
Sharp cutting tools make neat edges. Clean cuts always make the finished notebook look more professional.
Pencil and Ruler
These help you measure and mark the paper before cutting. Even small measurements make a big difference.
Cutting Mat
A cutting mat protects your table while giving you a safe place to trim your paper.
Plastic Card or Bone Folder
This helps smooth the paper after placing it on the notebook. An old gift card works perfectly if you do not own a crafting tool.
Soft Cloth or Paper Towels
Keep these nearby to wipe away extra Mod Podge before it dries.
Before You Start
Before touching the glue, spend a few minutes preparing everything. This small habit makes the entire project much easier.
First, cover your work surface with wax paper, newspaper, or a craft mat. Mod Podge dries quickly, so protecting your table saves a lot of cleanup later.
Next, wipe the notebook cover with a damp cloth. Dust, fingerprints, and tiny bits of dirt can prevent the paper from sticking properly.
Allow the notebook to dry completely before moving forward.
Now place all your decorative papers on the table. Mix and match them until you find a combination you really enjoy.
I usually choose one large pattern, one smaller pattern, and one solid color. That simple combination keeps the notebook interesting without making it look too busy.
Finally, decide if you want the entire cover covered with paper or if you want to leave a small border around the edges. There is no wrong choice. Just decide before you begin so the whole design looks intentional.
How to Make an Adorable Back-to-School Notebook Cover
Step 1: Plan Your Design

The best notebook covers rarely happen by accident. Spending a little time planning helps every piece fit together naturally.
Lay the notebook in front of you without using any glue yet. Place large sheets of paper over the cover and move them around until something catches your eye.
Try turning the paper in different directions because even a small change can completely change the design.
If you plan to create a collage, overlap several paper pieces. Let some pieces become the background while others stand out as the main design.
Try not to place all the brightest colors in one corner. Instead, spread them across the cover so everything feels balanced.
Once you like the arrangement, step back and look at it from a distance. Empty spaces become much easier to notice this way. Rearrange the papers until the notebook feels complete.
Before removing anything, take a quick picture with your phone. I do this every time because it helps me remember the exact layout while I glue each piece onto the notebook.
It is a simple trick, yet it makes creating a DIY Back-to-School Notebook Cover much less stressful.
Step 2: Prepare the Notebook Cover

A beautiful finish starts with a clean surface. Even the prettiest paper will struggle to stay attached if the notebook is dusty or oily.
Look over the notebook carefully. Remove every sticker and peel away leftover adhesive. If sticky residue remains, rub it gently with a damp cloth until it disappears.
Some notebooks have glossy covers. If yours feels very slippery, lightly sand the surface using fine-grit sandpaper. You only need a few gentle passes.
The goal is not to scratch the notebook deeply. You simply want to create a surface that gives the Mod Podge something to grip.
After sanding, wipe away every bit of dust with a clean cloth. Let the notebook dry completely before opening the Mod Podge.
This preparation may seem small, yet it often determines how long your finished notebook lasts. Taking five extra minutes now can save you from peeling corners later.
Step 3: Cut and Arrange the Decorative Paper

Now comes one of my favorite parts because the notebook finally starts showing its personality.
Place the notebook on the back of your decorative paper. Trace around it lightly with a pencil. Then cut slightly outside the pencil line.
You can always trim extra paper later, but adding paper back is impossible.
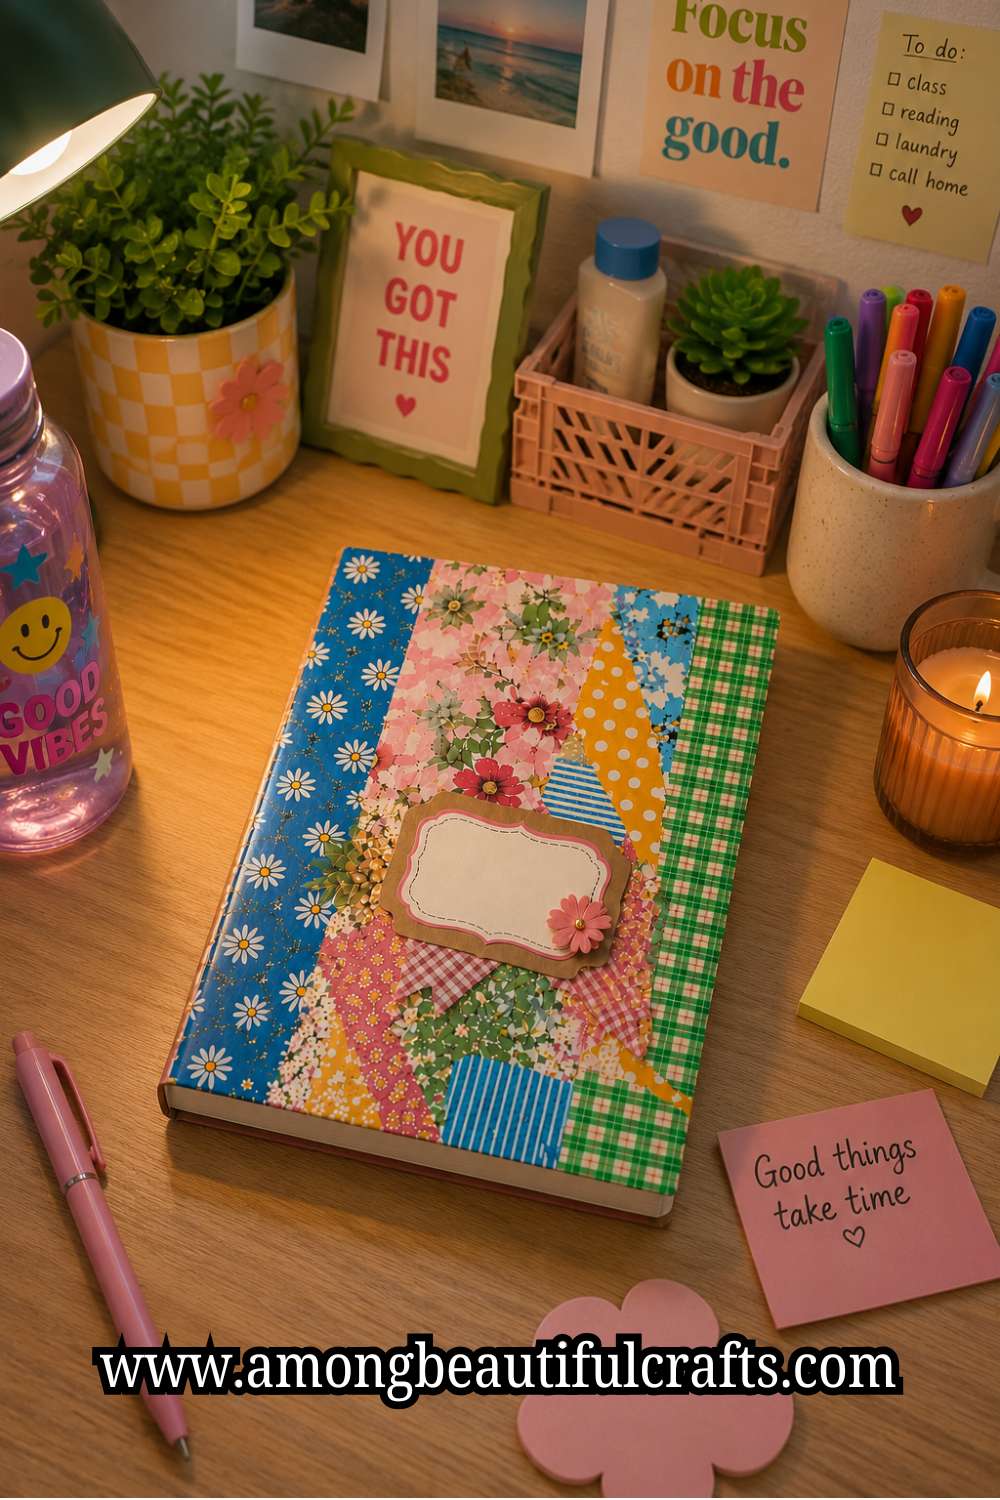
If you are creating a collage, cut different shapes instead of perfect rectangles. Try circles, torn edges, leaves, strips, or uneven pieces. Mixing shapes gives the notebook more movement and makes it feel handmade.
Arrange every piece again before reaching for the glue. Overlap some papers while leaving others fully visible. Move pieces around until the colors feel balanced.
Do not forget about the notebook spine. Many beginners focus only on the front cover. Decorating the spine makes the entire notebook look polished from every angle.
Once everything looks right, place the paper pieces in order beside your notebook. This keeps the assembly process smooth and prevents confusion once the glue comes out.
Step 4: Apply the First Layer of Mod Podge

Many beginners use far too much Mod Podge during this step. More glue does not create better results. In fact, too much glue often creates wrinkles.
Pour a small amount of Mod Podge into a shallow dish. Dip your foam brush lightly instead of soaking it.
Brush a thin, even layer across one small section of the notebook. Work slowly because Mod Podge begins drying sooner than many people expect.
Do not coat the entire notebook at once. Instead, glue one section before adding paper. Then continue with the next section. This keeps the adhesive fresh and gives you better control.
As you brush, check for thick puddles along the edges. Spread them out immediately with long, smooth strokes.
The glue layer should look even instead of heavy. If you can see large white patches sitting on top, use the brush to spread them thinner before moving forward.
Step 5: Attach the Paper Without Wrinkles

This step transforms your notebook from ordinary to beautiful.
Pick up the first paper piece and line it up carefully before letting it touch the glue. Once it sticks, avoid pulling it back repeatedly because thin paper can tear.
Start pressing from the center of the paper. Then slowly work toward the edges. This pushes trapped air outward instead of trapping it underneath.
Next, use your plastic card or bone folder to smooth the paper with gentle pressure. Move slowly instead of pressing hard. Firm pressure removes bubbles, while rough pressure can stretch or tear delicate paper.
If a small wrinkle appears, lift that section carefully before the glue dries. Smooth it again using slow movements.
Do not panic over tiny imperfections because many become almost invisible after the final sealer dries.
Continue adding one paper piece at a time until the notebook is completely covered. Keep wiping away extra Mod Podge with a damp cloth whenever you notice it collecting around the edges.
Soon your DIY Back-to-School Notebook Cover will begin looking exactly the way you imagined.
Step 6: Seal the Entire Cover

Once every paper piece has dried, it is time to protect all your hard work.
Load only a small amount of Mod Podge onto your brush. Apply it using long strokes that move in the same direction. This creates a smoother finish with fewer visible brush marks.
Cover every section of the notebook, including the edges and corners. These areas receive the most wear during daily use.
Allow the first coat to dry completely. It may feel dry to the touch after a short time, but do not rush. Waiting a little longer creates a much stronger finish.
After the first coat dries, apply another thin coat. Two or three light coats always look better than one thick coat.
Keep checking for drips around the edges while the sealer remains wet. Wipe them away before they dry.
Step 7: Finish the Edges and Corners

The edges often decide whether a notebook looks homemade or professionally finished.
Look closely around every corner. If excess paper hangs over the edge, trim it carefully with a craft knife or sharp scissors.
Next, brush a little Mod Podge directly onto every corner. These small areas usually receive the most handling, so they deserve extra protection.
Press each corner gently until it lies completely flat. If a corner lifts while drying, add a tiny amount of Mod Podge underneath before pressing it back into place.
Now run your fingers around the notebook edges. They should feel smooth instead of rough. If you notice sharp paper edges, trim them carefully before adding one last thin coat of sealer.
This little bit of extra care gives the notebook a clean finish that lasts much longer.
Step 8: Let the Notebook Cure Completely

Your notebook may look finished, but the project still needs a little patience.
Place the notebook on a flat surface where nobody will touch it. Keep it away from direct sunlight because strong heat can affect the drying process.
Allow the notebook to cure fully before placing it inside a backpack. This gives the Mod Podge time to harden properly.
Once the cover feels completely dry, gently open and close the notebook several times. This prevents the covers from sticking together after sealing.
Now you can personalize it even more if you like. Add your name, a subject label, ribbon, small stickers, or tiny embellishments. Just remember that simple decorations often have the biggest impact.
When you finish, take a moment to admire your work. You started with an ordinary notebook, and now you have a colorful handmade project that feels completely unique.
Every time you carry your DIY Back-to-School Notebook Cover, you will remember that you created it with your own hands.
Step 9: Add Optional Decorations

At this stage, your notebook already looks beautiful. Even so, a few thoughtful details can make it feel even more personal.
The secret is to add only a few decorations instead of covering every empty space.
Start by thinking about how you plan to use the notebook. If it is for school, you may want to add a name label or the subject on the front cover.
Place the label where it balances the design instead of hiding your favorite paper.
Next, look for small embellishments that match your theme. Thin ribbon, tiny paper flowers, alphabet stickers, die cuts, or small vinyl shapes all work well.
Try placing them on the cover without glue first. Move them around until you find a position that feels right.
If you enjoy a little sparkle, add fine glitter to only one or two areas. Too much glitter can take attention away from the colorful paper. A small amount catches the light without making the notebook look crowded.
You can also create a layered effect by adding a small paper frame around your name label. This little detail gives the cover extra dimension while keeping everything neat.
Before attaching anything permanently, close the notebook and look at it from different angles. Sometimes a decoration looks perfect on the table but feels out of place once you hold the notebook in your hands.
When everything looks balanced, glue each decoration carefully. Then apply a light coat of Mod Podge over paper embellishments if you want extra protection.
If you use raised decorations like gems or buttons, leave them unsealed because they already have their own finish.
Small finishing touches often make a DIY Back-to-School Notebook Cover feel truly one of a kind.
Step 10: Protect and Care for Your Finished Notebook

Your notebook is ready to use, so now it deserves a little care. Looking after it takes only a few minutes and helps the cover stay beautiful throughout the school year.
Always place the notebook inside your backpack instead of squeezing it between heavy textbooks. This reduces pressure on the corners and keeps the cover from bending.
Try to keep the notebook away from water. Mod Podge creates a protective finish, but soaking the notebook can still damage the paper underneath.
If the cover gets dusty, wipe it gently with a soft, dry cloth. Avoid using rough sponges because they may scratch the sealed surface.
Do not place heavy objects on top of the notebook for long periods. Constant pressure can flatten raised decorations or bend the cover.
If a corner begins lifting after months of use, do not throw the notebook away. Add a tiny amount of Mod Podge under the loose paper, press it down gently, and allow it to dry. That quick repair usually keeps the notebook looking great.
Once you learn this technique, you will start seeing other plain items differently. Journals, planners, sketchbooks, folders, and even storage boxes can all receive the same colorful makeover.
After making one notebook, you will probably find yourself planning the next DIY Back-to-School Notebook Cover before the first one even fills up.
Final Thoughts
I hope this tutorial shows that creating a beautiful notebook does not require expensive supplies or years of crafting experience.
A little planning, colorful paper, and Mod Podge can completely transform something ordinary into a notebook you will feel proud to carry.
Better yet, the decoupage technique becomes easier every time you use it, so each project looks even better than the last.
Do not worry if your first notebook is not perfect. Every crafter improves with practice, and even small imperfections give handmade projects their charm.
Enjoy the process, experiment with different papers, and try new color combinations each time.
Before long, decorating notebooks will become one of your favorite back-to-school traditions. You might even find yourself making one for friends, family members, or teachers.
Most importantly, have fun and let your creativity guide you. There is no single right way to decorate a notebook because every design reflects your own personality.
I hope this DIY Back-to-School Notebook Cover inspires you to look at ordinary school supplies in a whole new way.
Once you finish your first notebook, you will have the confidence to create many more handmade pieces that bring a little extra joy to every school day.