When I buy cardstock, I almost always come home with more colors than I planned. A shade reminds me of a quiet forest, another looks perfect for flowers, and suddenly I have ideas for projects I didn’t expect to make.
Before long, those papers cover my craft table while I sketch a simple scene. I rarely think about the finished frame first. Instead, I picture what I want someone to see when they look through it.
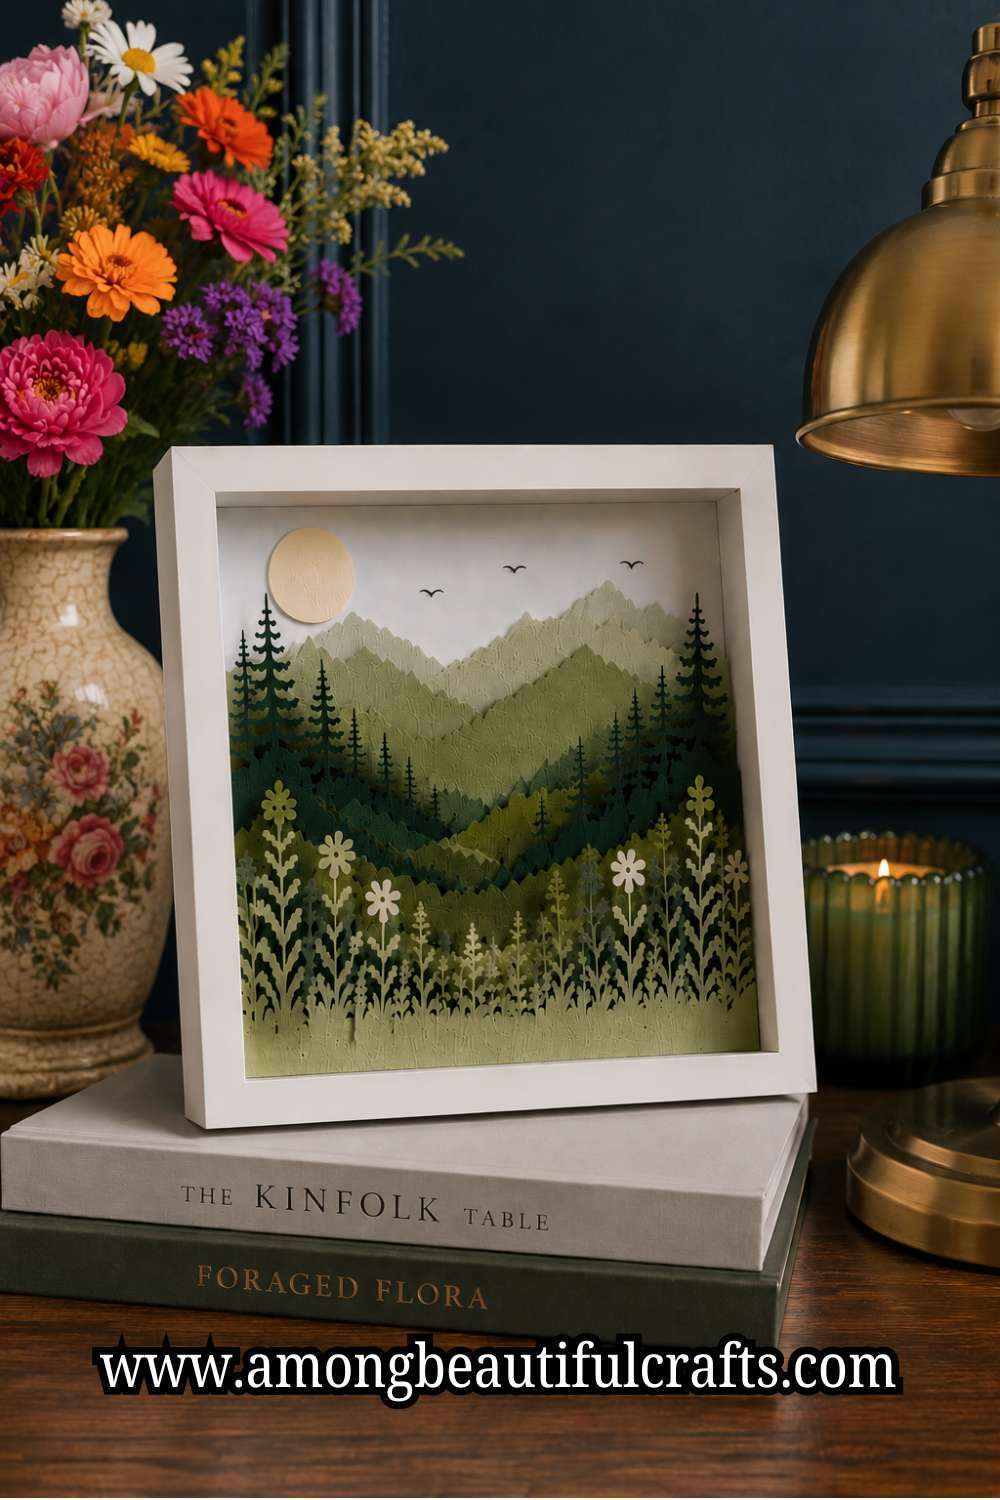
That’s one reason I enjoy How to Make a Layered Paper Shadow Box so much. It gives me the freedom to turn a simple idea into something full of depth and character.

In this tutorial, I’ll walk you through the same process I use whenever I build a shadow box from scratch. We’ll start with planning the design before making the first cut.
Then we’ll choose the right paper, create clean layers, assemble everything in the correct order, and finish with a piece you’ll be proud to display.
Along the way, I’ll share the little tips that make the work easier and help you avoid the mistakes many beginners make.
By the end, you’ll have the confidence to create a layered paper shadow box that looks detailed, balanced, and beautifully handmade.
Materials You’ll Need
Before we begin, let’s gather everything in one place. I like doing this because it keeps the project flowing without constant interruptions.
There is nothing worse than reaching an important step and realizing your foam tape or glue is missing.
You don’t need expensive supplies to make a beautiful shadow box. Good-quality basics will give you much better results than buying lots of unnecessary tools.
- Shadow box frame
- Cardstock in different colors
- Plain paper for sketching
- Pencil and eraser
- Craft knife
- Sharp scissors
- Self-healing cutting mat
- Metal ruler
- Foam tape or foam dots
- Craft glue
- Tweezers
- Cutting machine (optional)
- Soft cloth for cleaning the frame
- Small brush for removing paper dust
Take a few minutes to organize your workspace before you start. Keep your sharp tools on one side and your paper on the other.
I also like placing a small container nearby for tiny paper scraps. It keeps my table tidy and makes it easier to focus on the project.
How to Make a Stunning Layered Paper Shadow Box From Scratch
Step 1: Choose a Theme You Love

Every shadow box begins with an idea, so don’t rush this part. Take a few minutes to think about what you want your finished piece to say.
I always find this stage exciting because it feels like the beginning of a little story. Sometimes I already have a clear picture in mind. Other times, I simply look through my colored cardstock until something sparks an idea.
If this is your first shadow box, keep the design simple. A small woodland scene, a flower garden, mountains, butterflies, or a moonlit landscape all make beautiful beginner projects. A simple design gives you room to enjoy the process instead of worrying about hundreds of tiny details.
Picture the Finished Frame
Before you draw anything, imagine the shadow box hanging on your wall or sitting on a shelf. That little exercise helps you choose a design that matches the space.
I also think about who will see it. If I’m making a gift for a child, I might choose stars or friendly animals. If the shadow box is for my living room, I usually lean toward flowers or nature scenes.
Once you settle on a theme, write it down. That simple reminder keeps you focused during the next steps.
Step 2: Sketch Your Main Design

Now it’s time to bring your idea onto paper. Don’t worry about creating a perfect drawing because this sketch is only a guide.
I usually grab a pencil and make light lines first. That way, I can erase anything that doesn’t look quite right without starting all over again.
At this stage, I focus on the larger shapes instead of tiny details. For example, I’ll sketch the outline of a tree before thinking about individual branches.
The same goes for flowers, mountains, or buildings. Getting the overall layout right matters much more than making every little piece perfect.
Keep the Design Balanced
As your sketch comes together, leave enough open space around the main objects. Crowding everything into one area makes the finished shadow box look busy instead of beautiful.
I also like stepping away from my table for a minute before moving on. When I come back, it’s much easier to notice if one side feels heavier than the other or if something looks out of place. Small adjustments now will save you plenty of work later.
Step 3: Separate the Design Into Layers

This is the step where your drawing starts looking like a real shadow box. Instead of seeing one flat picture, begin dividing it into several layers. Each layer should add a little more depth to the finished scene.
I like starting with the background because it sets the mood for everything else. Mountains, skies, large trees, or distant buildings usually belong there.
After that, I move to the middle layers before finishing with the objects that should appear closest to the viewer.
Let Every Layer Have a Purpose
Try not to repeat the same shapes on every layer. Instead, allow each one to contribute something different to the design.
For example, the back layer could hold rolling hills, while the middle layer adds tall trees. The front layer might feature flowers, grass, or a small fence.
When each layer has its own purpose, the finished shadow box feels much more natural and interesting to look at.
Step 4: Review the Layout Before Cutting

I know it’s tempting to grab the craft knife right away, yet this is one habit I never skip.
Before making the first cut, I spend another minute looking over the entire design. It’s amazing how often I notice something I want to change.
Sometimes a flower feels too large. Other times, a tree blocks part of the background. Those little changes only take a few seconds with a pencil, yet they can completely improve the finished piece.
Make Small Changes Now
Ask yourself a few simple questions before you continue. Does every layer add something to the scene?
Will important details disappear behind another layer? Does the design still look balanced?
If the answer to any of those questions is no, make the adjustment now. Once you start cutting cardstock, even small changes become much harder to fix.
Step 5: Choose the Right Cardstock

Now that your design is ready, it’s time to choose the paper. This decision may seem small, yet it has a big effect on the final result.
Good cardstock holds its shape, cuts more neatly, and stays flat inside the frame.
I normally use cardstock between medium and heavy weight because it offers a nice balance. It feels sturdy enough to support detailed cuts without becoming difficult to work with.
Match the Colors to Your Theme
Try laying all your cardstock on the table before choosing the final combination. Seeing the colors together often helps you notice which ones work best.
I also avoid using too many bold colors in one project. Instead, I let one or two shades stand out while the others support the overall scene.
That simple approach creates a cleaner design and allows the layered effect to become the main attraction instead of the colors alone.
Step 6: Prepare Your Cutting Tools

Before you cut the first layer, make sure your tools are ready. I used to think any craft knife would do the job.
After replacing a dull blade with a sharp one, I immediately noticed the difference. The cuts looked cleaner, and I didn’t have to force the blade through the cardstock.
Place a self-healing cutting mat under your paper to protect your table. Keep a metal ruler nearby for straight lines, and have a pair of sharp scissors ready for larger cuts.
I also like keeping a pair of tweezers within reach. They make it much easier to lift tiny paper pieces without bending them.
Work Safely and Comfortably
Good lighting makes a big difference during this step. I always move closer to a window during the day or switch on a bright desk lamp at night.
Take your time as you cut. Slow, steady movements give you much cleaner edges than trying to finish quickly.
If your hand starts to feel tired, pause for a minute before continuing. A short break is much better than fixing a cut that went the wrong way.
Step 7: Cut the Background Layer

I always begin with the background because it gives me confidence for the rest of the project. The background usually has larger shapes, so it helps me settle into a comfortable cutting rhythm before working on smaller details.
Follow the outline carefully and keep the cardstock in place with your free hand. Instead of turning your wrist into awkward positions, rotate the paper whenever you need a better angle. I still use this trick because it gives me much smoother curves.
Check Your Edges
Once you finish cutting, lift the layer gently and look around every edge. Tiny paper fibers sometimes remain attached, especially around curved sections.
Trim those little pieces with your craft knife or scissors. A few extra seconds here will make the finished shadow box look much neater.
Step 8: Cut the Remaining Layers One at a Time

Now continue with the rest of your layers. I never rush this stage because every piece plays an important role in the final design.
Even if two layers look similar, small differences help create depth inside the frame.
Complete one layer before moving to the next. That simple habit keeps your workspace organized and reduces the chance of mixing pieces together.
Stay Organized
As each layer is finished, place it in a neat stack. I usually number the back lightly with a pencil so I always know the correct order.
If a tiny section tears, don’t panic. Small repairs often disappear once the layers are assembled. A little craft glue can save a piece that looks beyond repair.
Step 9: Test the Layer Arrangement

This is one of my favorite parts because the design finally starts coming to life. Stack the finished layers without using glue or foam tape. Simply place one on top of another and see how the scene looks.
Don’t worry if everything isn’t perfect yet. This step gives you a chance to adjust the arrangement before anything becomes permanent.
Look for Balance
Hold the stacked layers at eye level or place them inside the empty frame for a quick preview. This makes it much easier to spot areas that feel crowded or empty.
If something doesn’t look right, remove the layer and make small adjustments. I often trim a leaf, shorten a branch, or move a small detail before moving forward. Those little changes can completely improve the finished piece.
Step 10: Add Foam Spacers Between the Layers

Now it’s time to create the beautiful depth that makes shadow boxes so special. Foam tape or foam dots separate each layer and allow light to create natural shadows.
Cut the foam into small pieces instead of using long strips. Small pieces stay hidden more easily and support the paper without drawing attention.
Keep the Spacing Even
Place the spacers around the edges and behind larger shapes where they won’t show from the front. Press each one down firmly before adding the next layer.
I always check the design from different angles before continuing. If one area looks uneven, it’s much easier to fix it now than after everything is inside the frame.
Step 11: Assemble the Layers

This is the moment when all your hard work starts coming together. I always enjoy this step because the scene finally begins to look the way I imagined.
Take your time and add one layer at a time. There is no prize for finishing quickly.
Start with the background layer and work toward the front. After placing each layer, check that it sits straight before adding the next one.
A small shift may not seem important now, yet it becomes much more noticeable once the shadow box is complete.
Double-Check the Alignment
Pause after every layer and look at the design from the front. Make sure important details stay visible and that nothing covers another layer by mistake.
If something looks slightly off, lift the layer carefully and adjust it before moving on. I always spend an extra minute here because it saves me from taking everything apart later.
Step 12: Clean the Inside of the Frame

Before placing your artwork inside the frame, give the glass and the inside edges a quick clean. Tiny bits of dust can sneak in while you’re working, and they become much easier to notice once the frame is closed.
I usually wipe the glass with a soft cloth, then check it under good lighting. If I spot a fingerprint or a small paper fiber, I remove it right away. It only takes a minute, yet it makes the finished project look much more polished.
Don’t Forget the Paper Layers
Take one last look at the front of your design before framing it. Brush away any loose paper pieces that may have settled on the layers.
I like using a soft brush because it removes tiny scraps without damaging delicate details.
Step 13: Place the Design Inside the Frame

Now carefully lift the finished design and place it inside the shadow box frame. Hold it by the edges whenever possible to avoid leaving fingerprints on the paper.
Once it sits inside the frame, check that every side fits comfortably. The artwork should lie flat without bending or pressing against the frame.
Secure Everything in Place
Close the back of the frame according to the manufacturer’s instructions. Then gently shake the frame once or twice.
If anything moves inside, open it again and secure the layers before closing it. I always do this quick check because it gives me peace of mind before displaying the finished piece.
Step 14: Give Your Shadow Box a Final Check

You’re almost done, so spend a few minutes enjoying your work before hanging it up. I like placing the shadow box near a window first because natural light shows off the layered effect beautifully.
Look at it from different angles. You’ll notice how the shadows change as the light moves across the paper. That’s one of my favorite parts of this craft.
Make Small Finishing Touches
If you notice anything that could look better, fix it now. You might trim a tiny paper fiber, wipe away another fingerprint, or straighten a small section.
Those finishing touches may seem minor, yet together they make the shadow box look neat and professionally finished.
Common Mistakes to Avoid
Almost everyone makes a few mistakes during their first shadow box, and that’s completely normal. The good news is that most of them are easy to avoid once you know what to watch for.
- One common mistake is choosing a design with too many tiny details. While intricate patterns look beautiful, they can quickly become frustrating. Start with simple shapes and work your way up to more detailed scenes.
- Another mistake is using paper that is too thin. Thin paper bends easily and doesn’t hold its shape as well as cardstock. Good-quality cardstock gives your layers better support and creates cleaner results.
- Many beginners also rush through the cutting stage. Slow, careful cuts almost always look better than fast ones. If your hand feels tired, take a short break before continuing.
- I also recommend checking the layer arrangement before adding foam spacers. A quick test fit helps you catch small problems while they are still easy to fix.
- Finally, don’t forget to clean the glass before closing the frame. It only takes one fingerprint or tiny paper scrap to distract from all your hard work. That simple habit has saved me more times than I can count.
Final Thoughts
Making a shadow box from scratch might seem like a big project at first, yet it becomes much easier once you break it into small steps.
That’s exactly why I enjoy teaching How to Make a Layered Paper Shadow Box. You don’t have to master every technique in one day.
Just focus on one layer, then the next, and before you know it, you’ll have a beautiful piece that started as a few sheets of cardstock.
Give yourself permission to learn as you go because every project teaches you something new.
Don’t be afraid to make this craft your own. Try different color combinations, experiment with new themes, or personalize a design for someone special.
Some of my favorite shadow boxes weren’t part of my original plan. They changed along the way because I spotted a better idea while I was working.
That’s one reason I never see small mistakes as wasted effort. They often lead to creative ideas I wouldn’t have discovered otherwise.
The more shadow boxes you make, the more confident you’ll become with cutting, layering, and building realistic depth.
I hope this guide gives you the confidence to pick up your supplies and start creating. Work at your own pace, enjoy each stage, and celebrate the little moments when your design begins to come alive.
Those tiny shadows between the layers are what make this craft so rewarding. Once you finish your first shadow box, you’ll probably start looking at every empty frame as a chance to create something new.
Most importantly, have fun with the process because handmade projects always carry a special story that no store-bought decoration can replace.